
Use this page to understand how Automations are created, triggered, monitored, and managed in AI Studio.
Overview
Automations are scheduled or triggered agent flows that run automatically or by manual action.
Use Automations for repeatable AI-supported workflows such as alerts, scheduled analysis, report generation, monitoring, summarization, approval routing, and notification delivery.
Automations sit under Orchestrate, which means they control how AI workflows run across time, triggers, steps, branches, approvals, and outputs.
User flow
Users may experience Automations as scheduled outputs, triggered alerts, recurring analysis, approval requests, or notifications.
Users do not need to open AI Studio unless they are responsible for configuring, approving, or reviewing the Automation.
|
User or system action |
What happens |
|---|---|
|
A schedule, trigger, or manual run starts |
The Automation begins. |
|
The workflow reaches an Instruction step |
The agent follows configured instructions and may use Specialists, Skills, or Data Sources. |
|
The workflow extracts, summarizes, or sets values |
Variables can be created and reused later in the flow. |
|
The workflow reaches a Condition step |
The Automation branches based on configured logic or AI evaluation. |
|
The workflow reaches a For each step |
A repeated action runs once for each item in a table or extracted list. |
|
The workflow reaches a Wait for approval step |
A reviewer approves or rejects before the flow continues. |
|
The workflow reaches a Notify step |
Results are delivered through the configured channel. |
|
Admin reviews Run History |
Run status, duration, token usage, and cost can be reviewed. |
How Automations work
Where to find Automations
To open Automations:
-
Go to Admin.
-
Select AI Studio.
-
Under Orchestrate, select Automations.
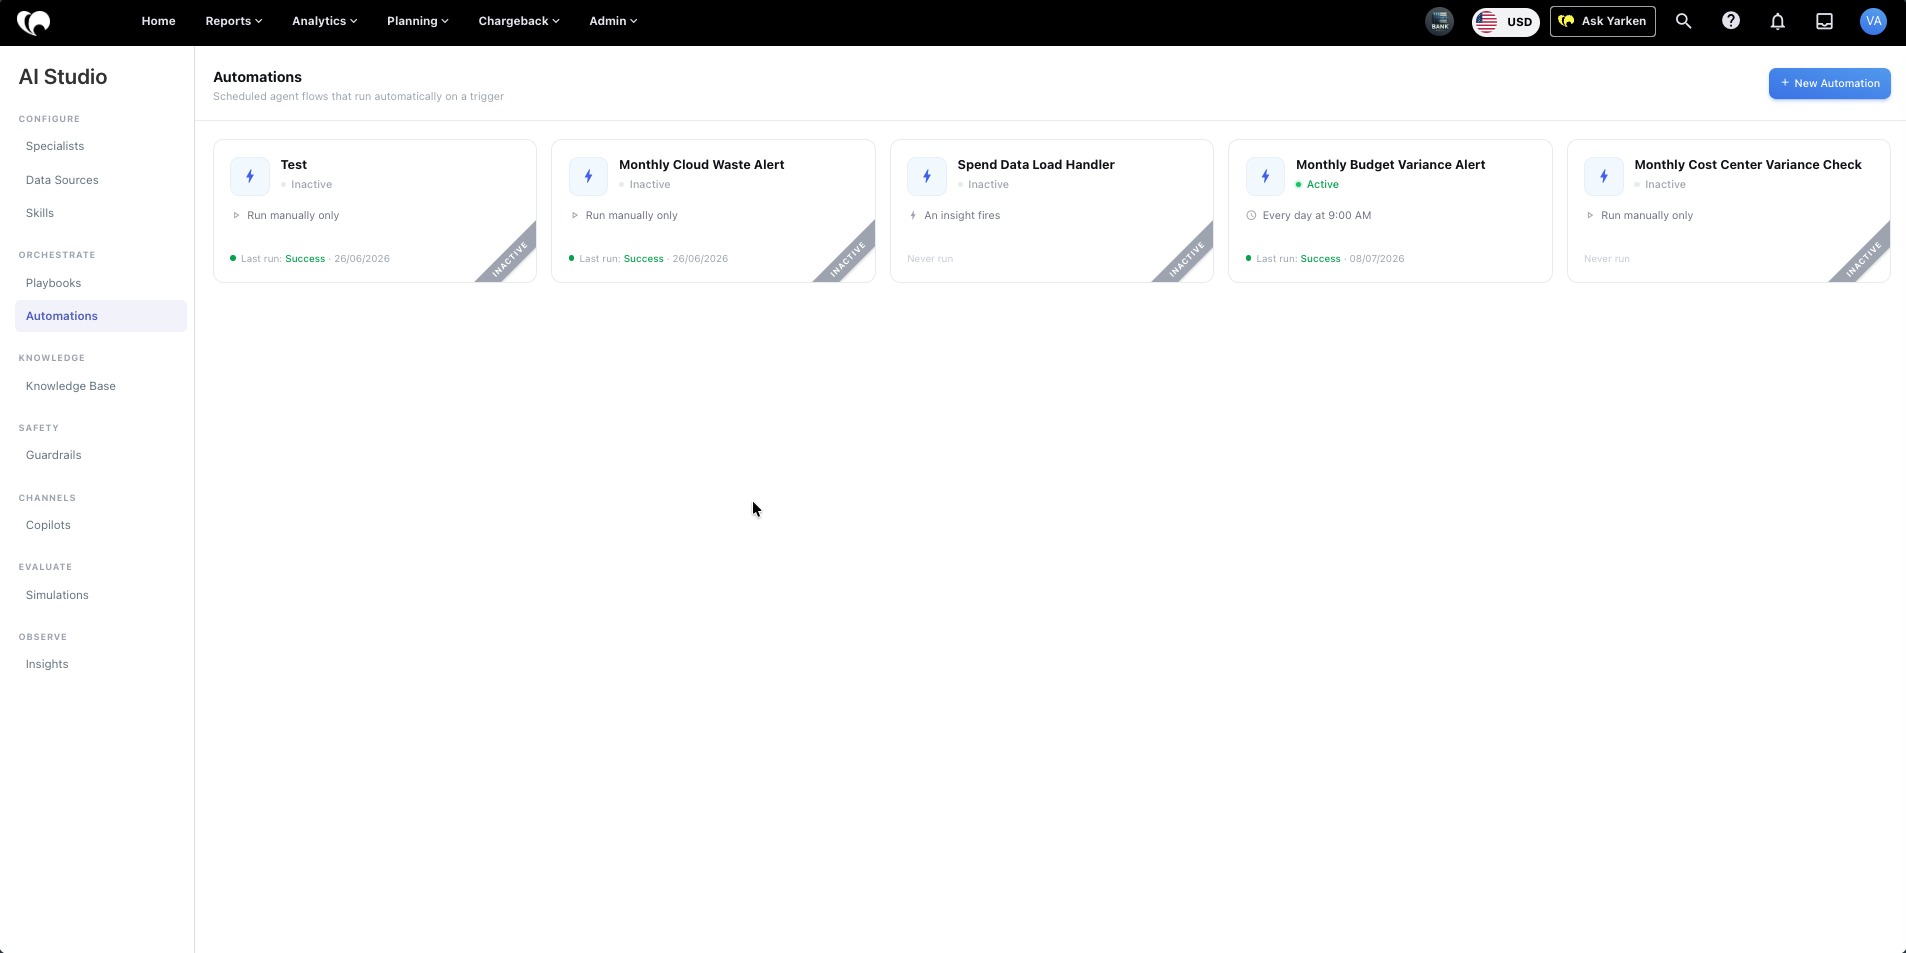
The Automations page displays automation cards in the main panel.
What the Automations page shows
Each automation card shows:
|
Field |
Description |
|---|---|
|
Automation name |
User-facing name of the automation. |
|
Status |
Whether the automation is active or inactive. |
|
Trigger |
How the automation runs, such as manual, schedule, or insight trigger. |
|
Last run |
Latest run outcome and date |
The page also includes + New Automation.
Current automation examples
The current screen shows examples such as:
-
Test.
-
Monthly Cloud Waste Alert.
-
Spend Data Load Handler.
-
Monthly Budget Variance Alert.
-
Monthly Cost Center Variance Check.
Examples shown include inactive and active Automations.
Trigger examples include:
-
Run manually only.
-
An insight fires.
-
Every day at 9:00 AM.
Builder and Run History tabs
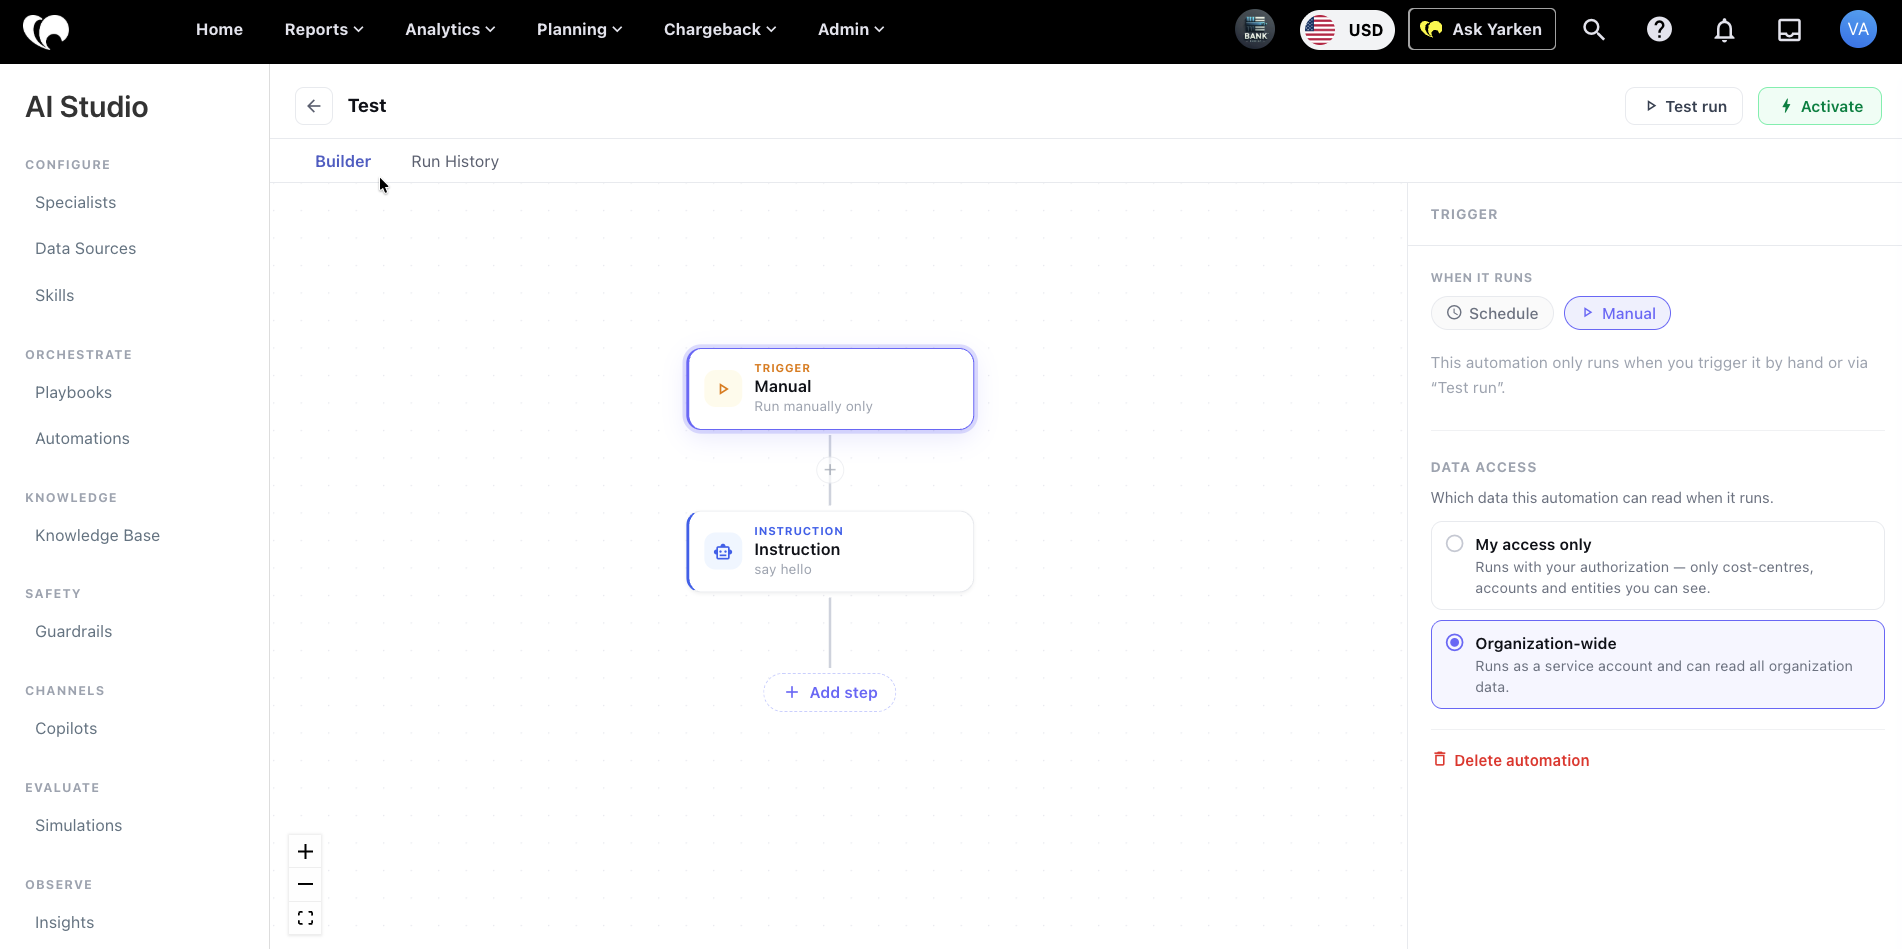
Each Automation includes two main tabs:
|
Tab |
Purpose |
|---|---|
|
Builder |
Configure the trigger, steps, branches, data access, and delivery behavior. |
|
Run History |
Review past runs, success rate, duration, tokens, cost, and status. |
Admin configuration flow
Create an automation
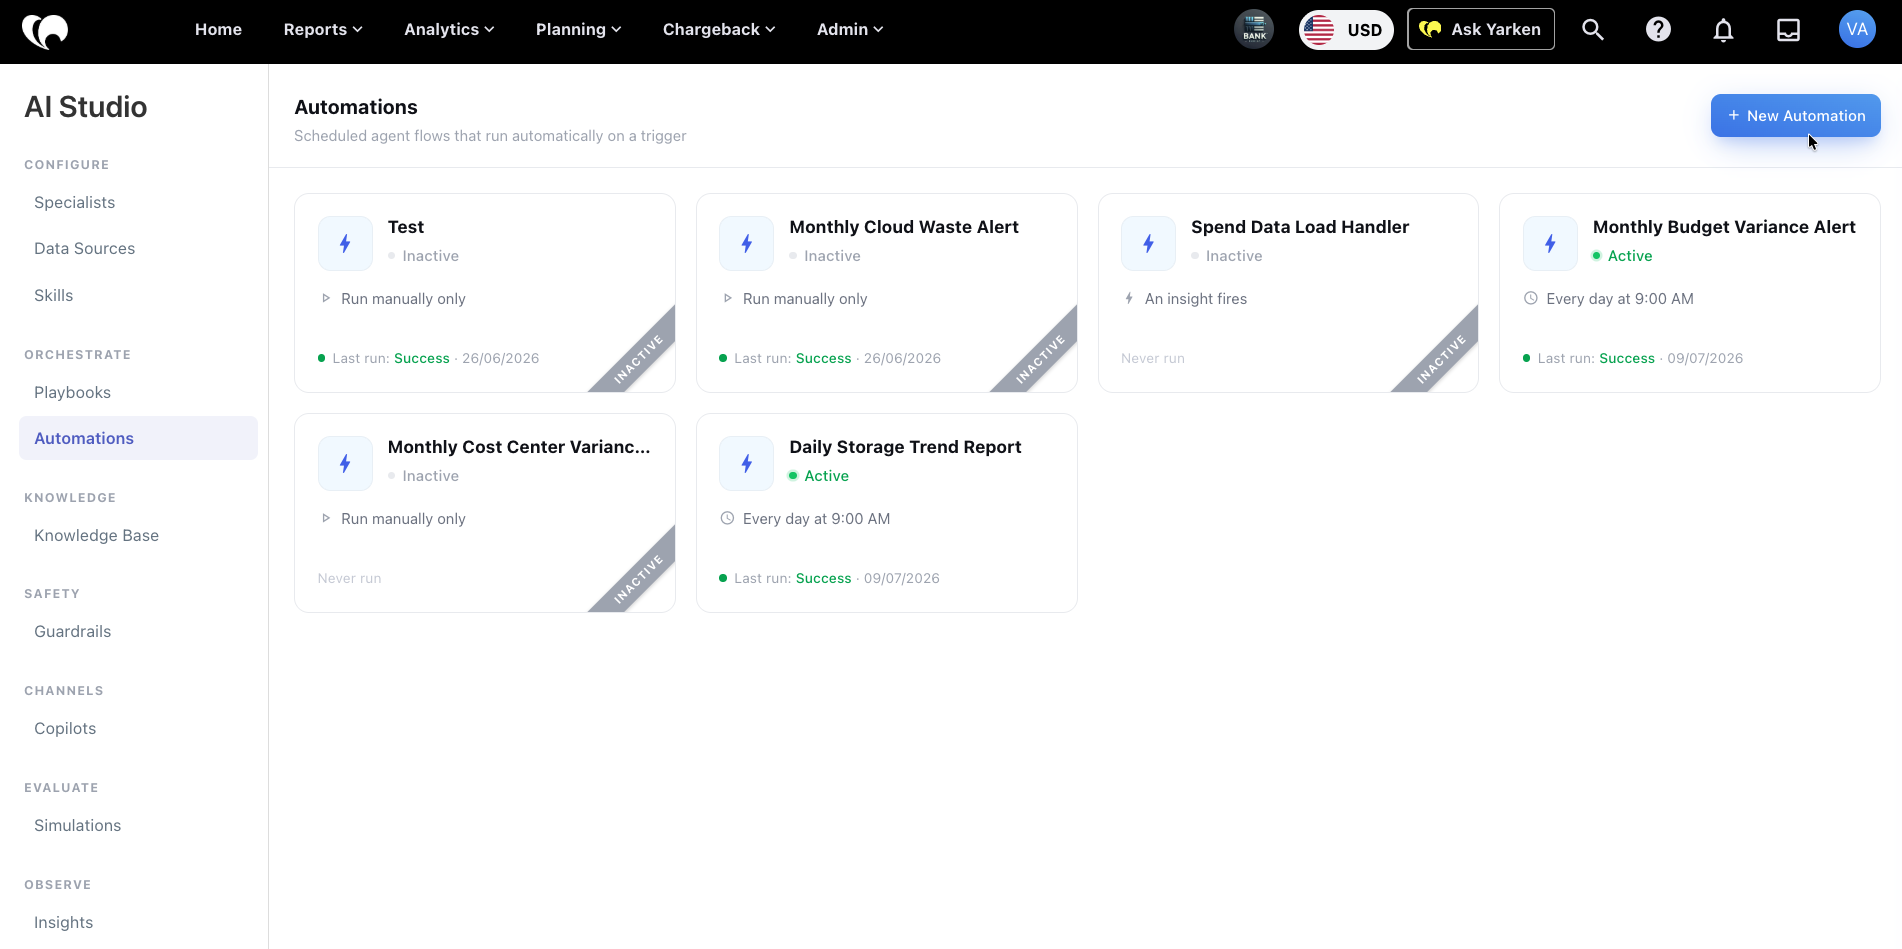
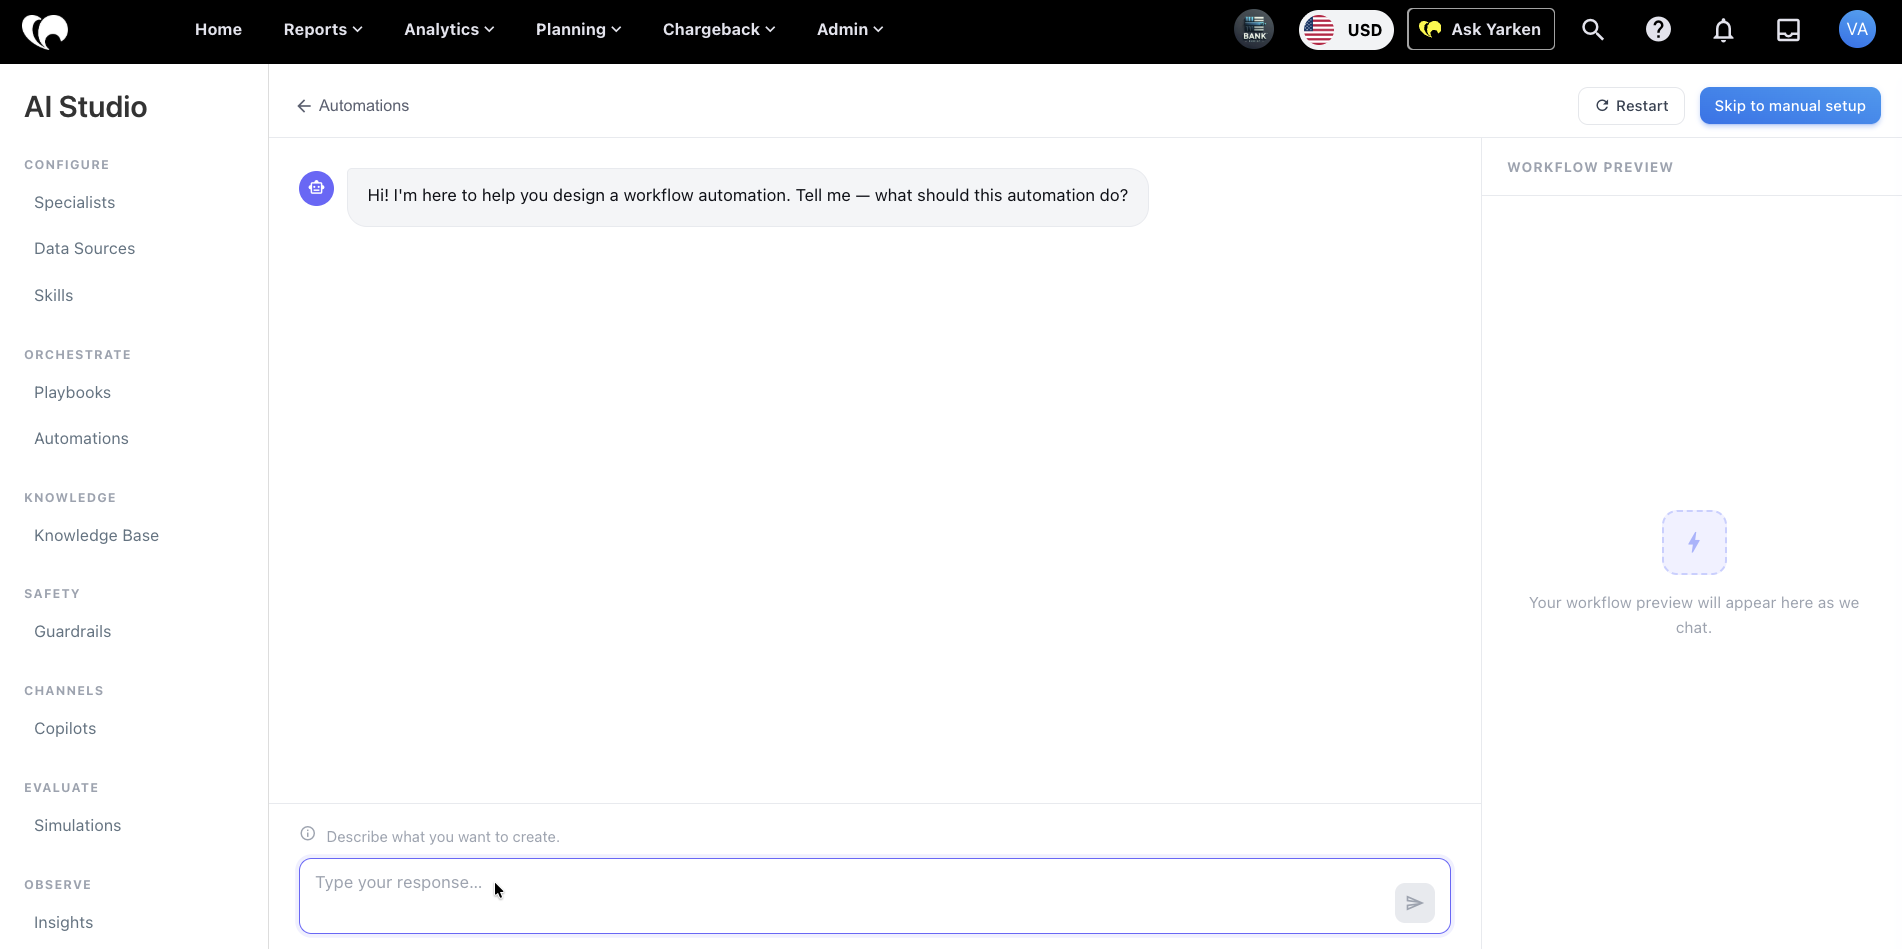
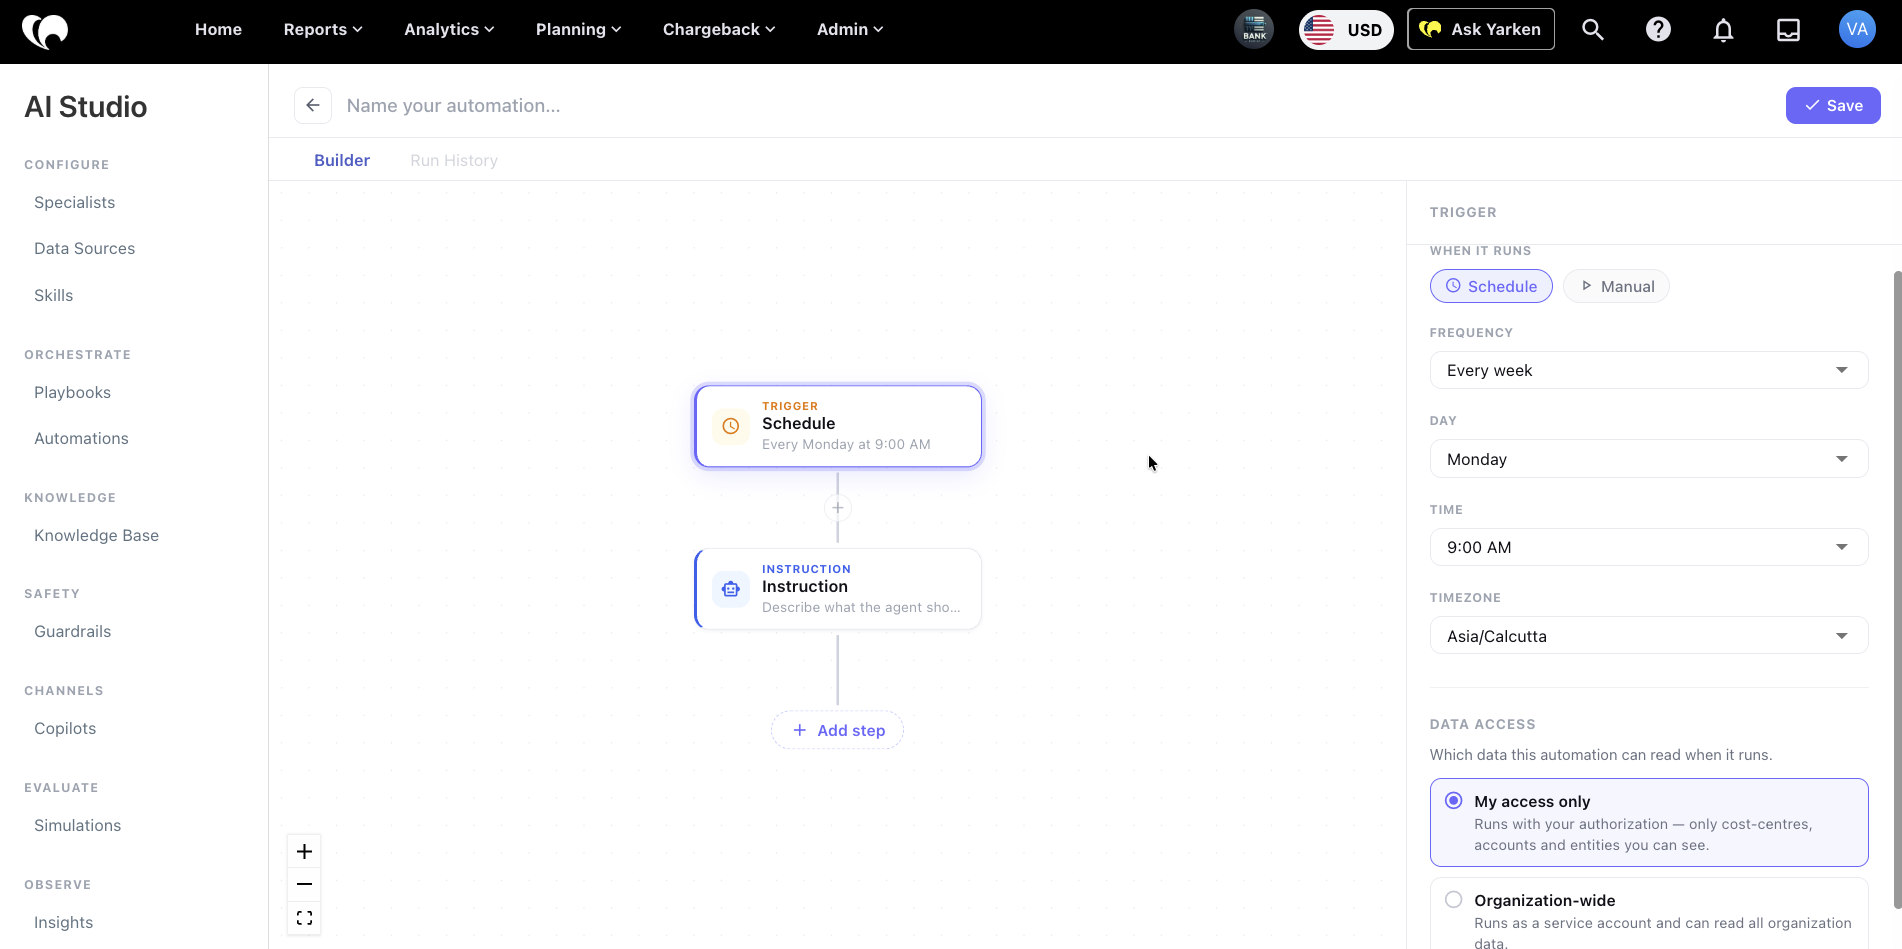
Similar to the process of creating specialists, there’s two ways to create an Automation. Guided and Manual setup:
-
Go to Admin > AI Studio > Automations.
-
Select + New Automation.
-
Configure the trigger using guided or manual setup process.
Guided Setup
Manual Setup -
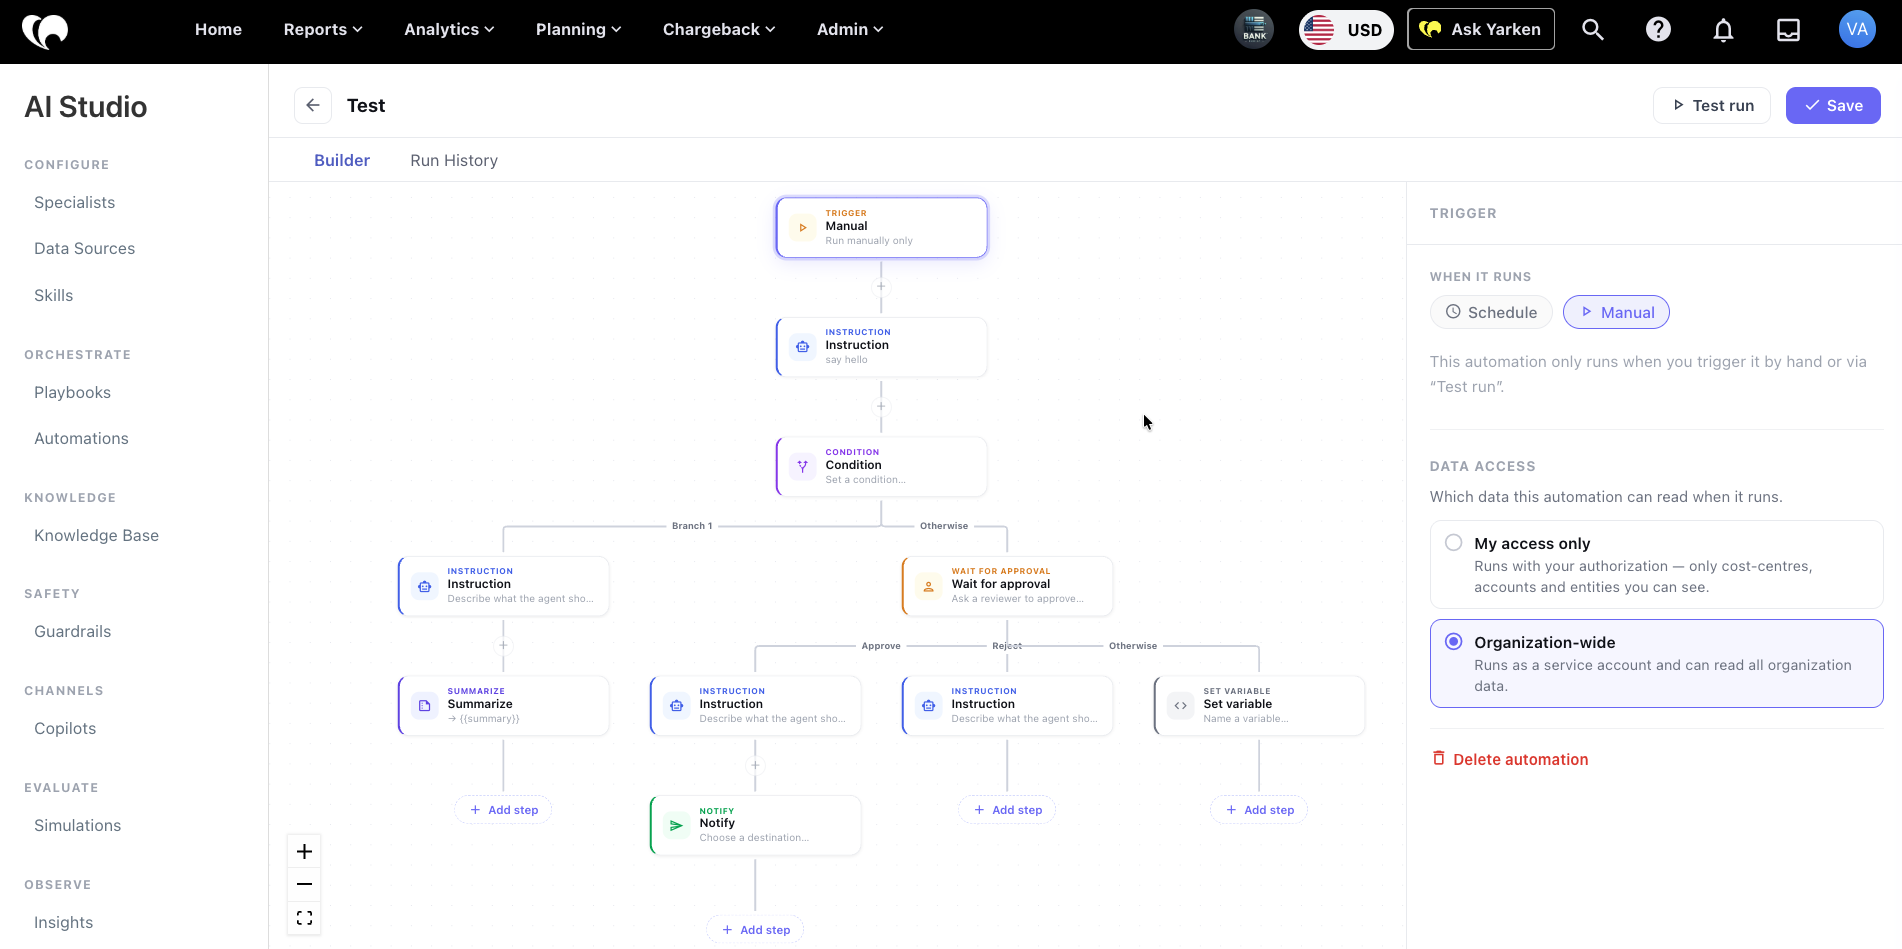
Add the required workflow steps.
-
Configure data access.
-
Select Save.
-
Select Test run to validate the workflow.
-
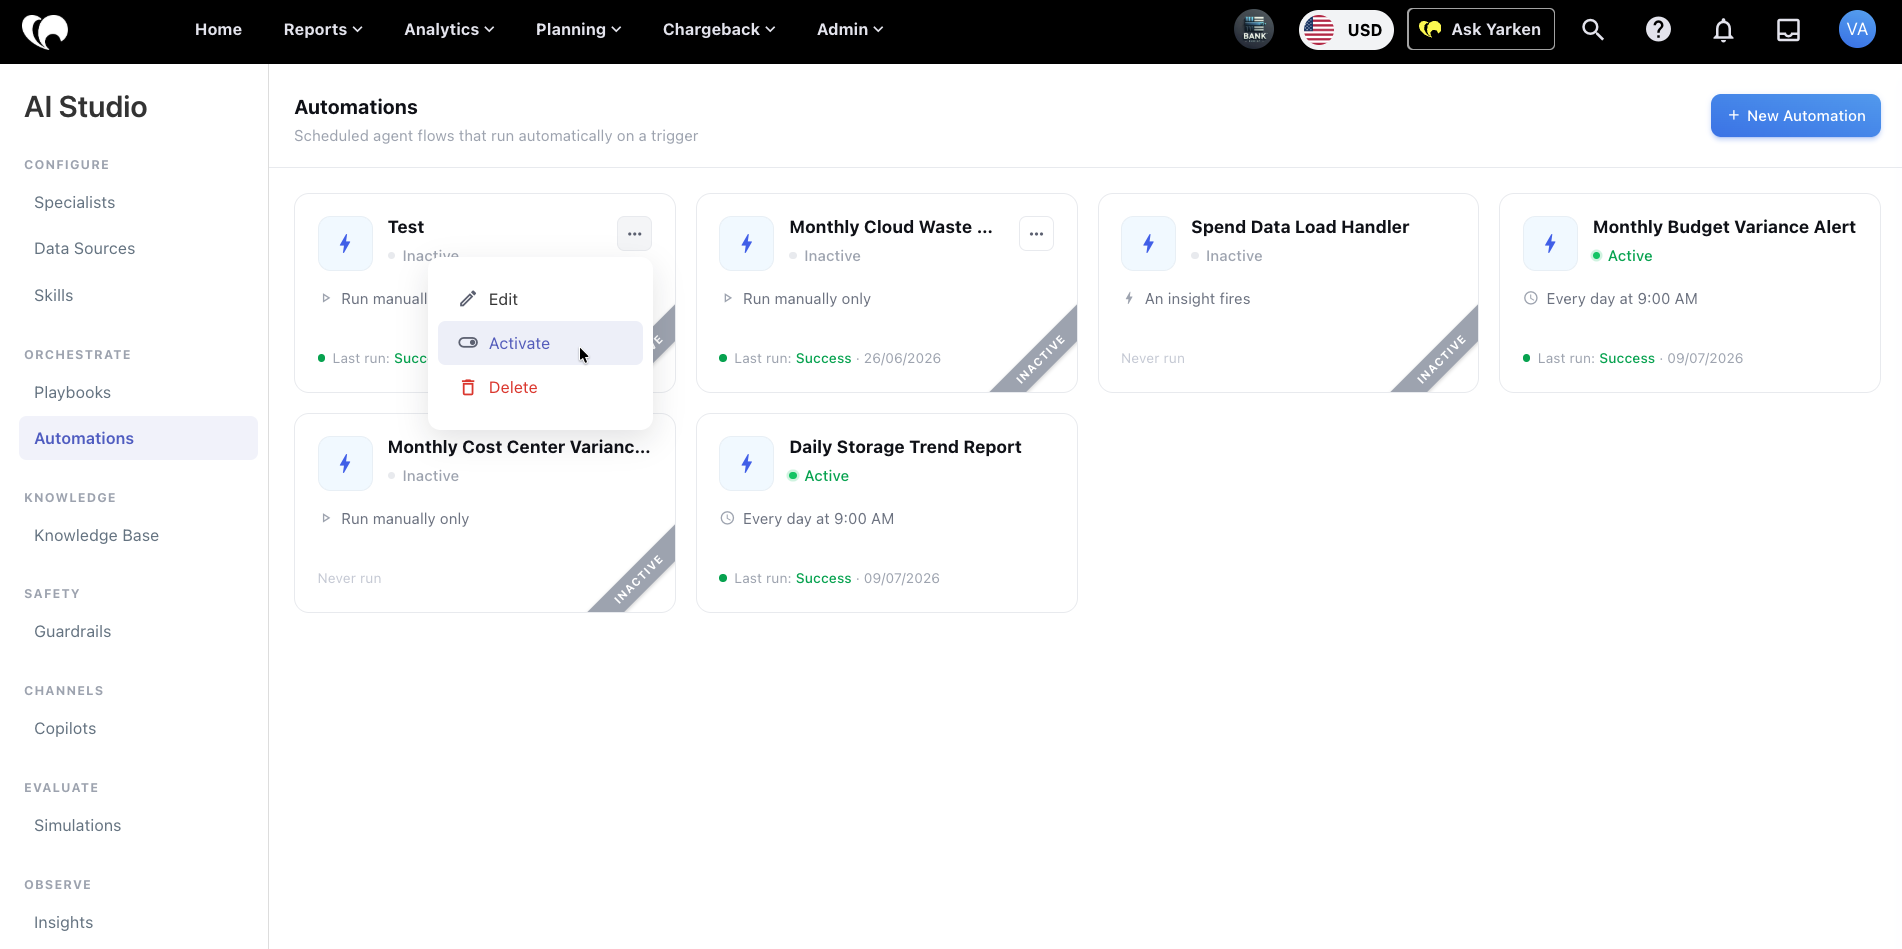
Select Activate when ready.
Configure the trigger
The trigger controls when the Automation runs.
Current trigger options shown include:
|
Trigger option |
Description |
|---|---|
|
Manual |
Runs when someone starts it manually or selects Test run. |
|
Schedule |
Runs according to the configured frequency, day, time, and time zone. |
|
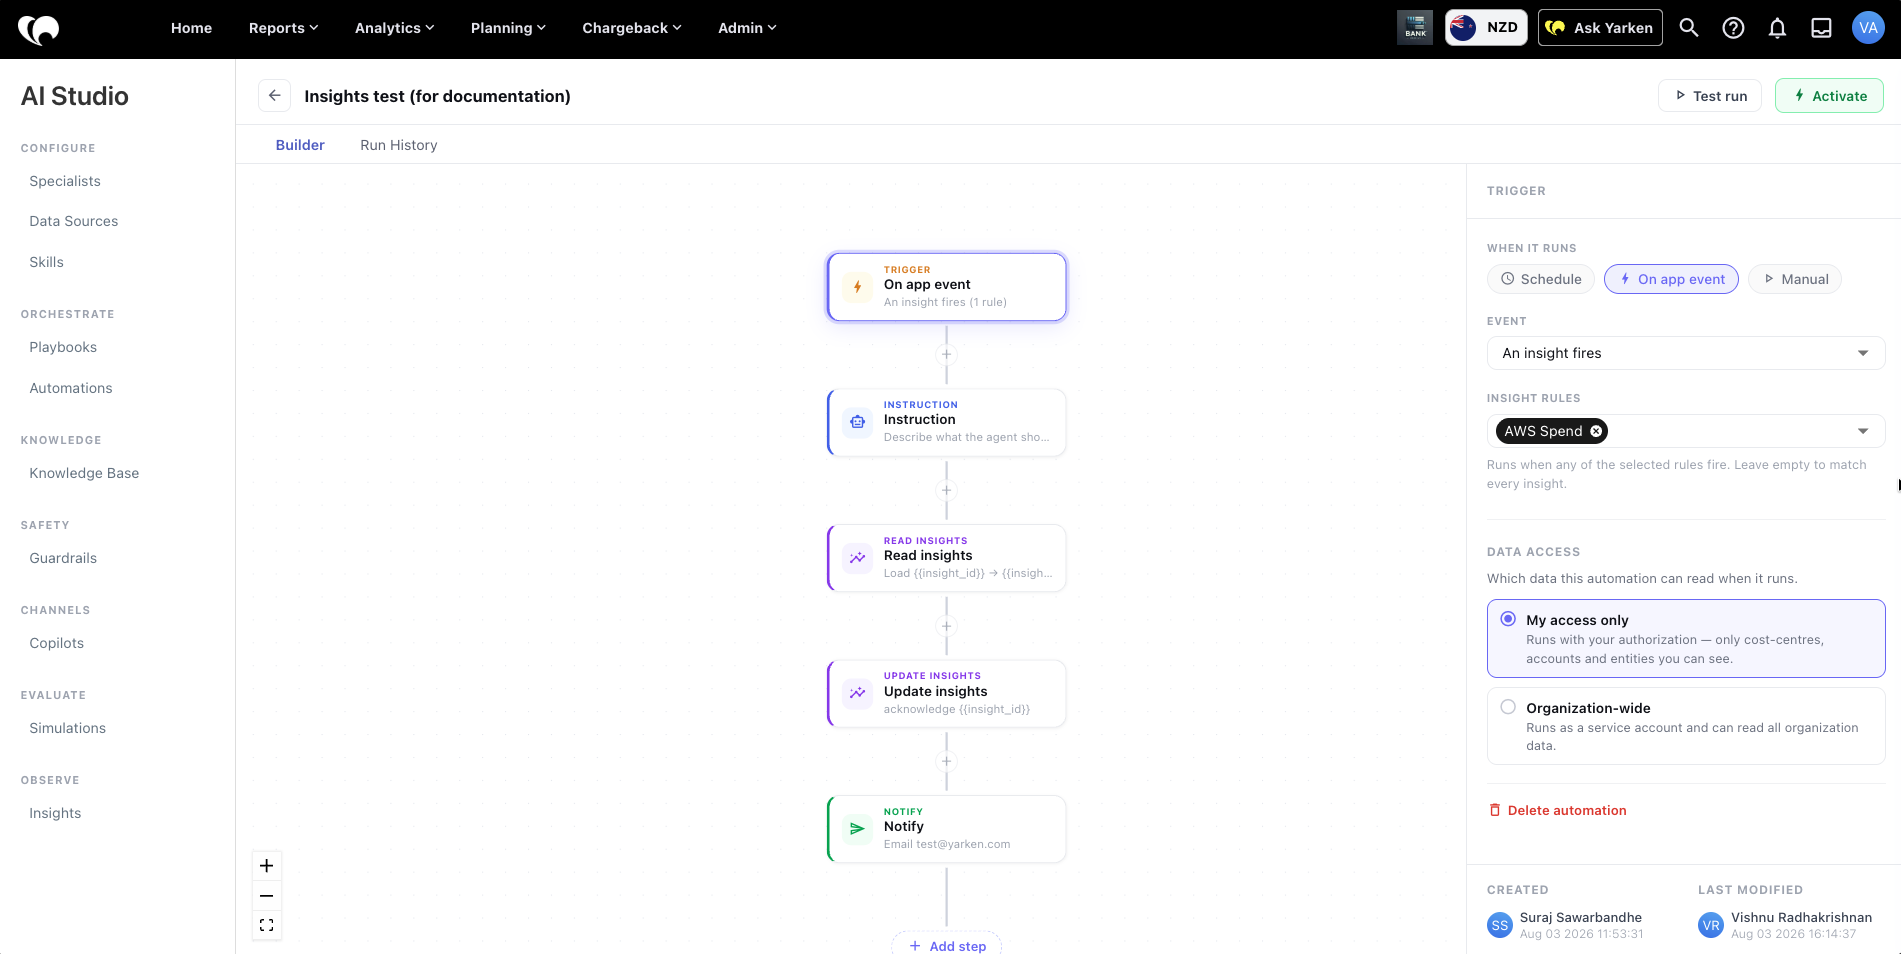
On app event |
Runs when a supported event occurs, such as An Insight fires. |
For An Insight fires, select one or more Insights Rules to limit the automation to those rules. Leave the rule selection empty when the automation should respond to Insights generated by any rule.
The rule runs according to its own configured frequency. The automation starts only when the rule generates a new Insight.
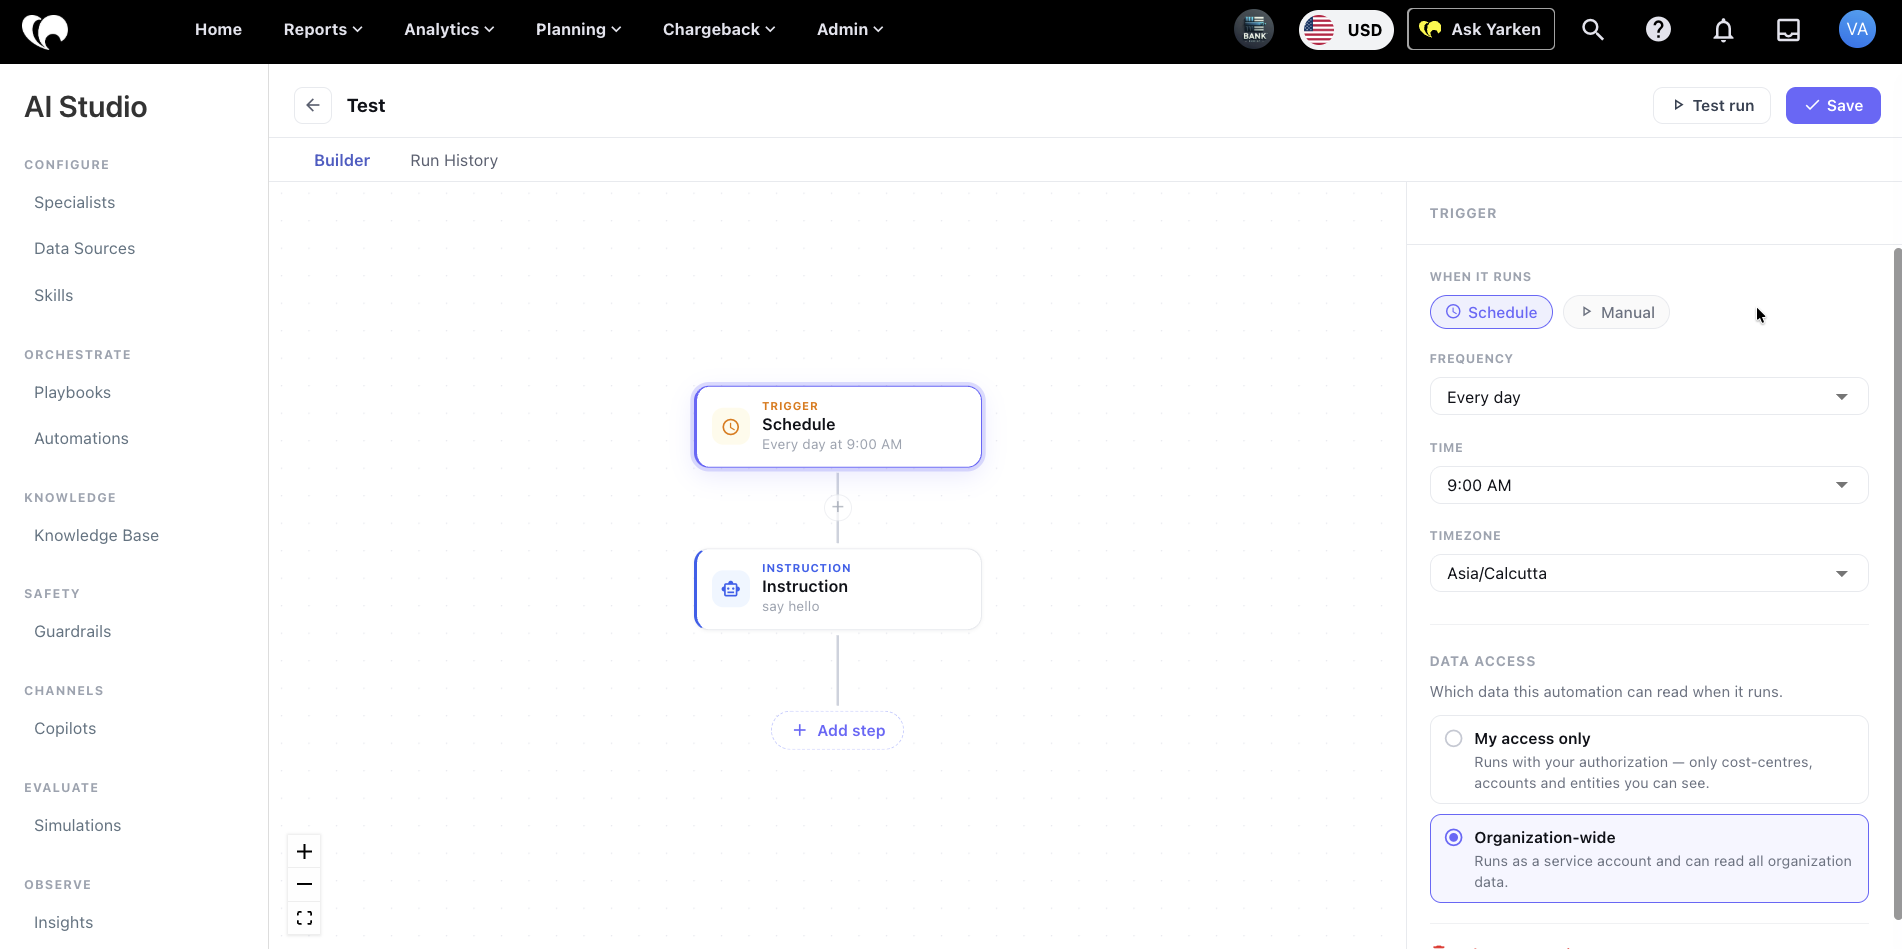
For scheduled Automations, configure:
-
Frequency.
-
Day.
-
Time.
-
Timezone.
Example shown:
-
Frequency: Every day.
-
Time: 9:00 AM.
-
Timezone: Asia/Calcutta.
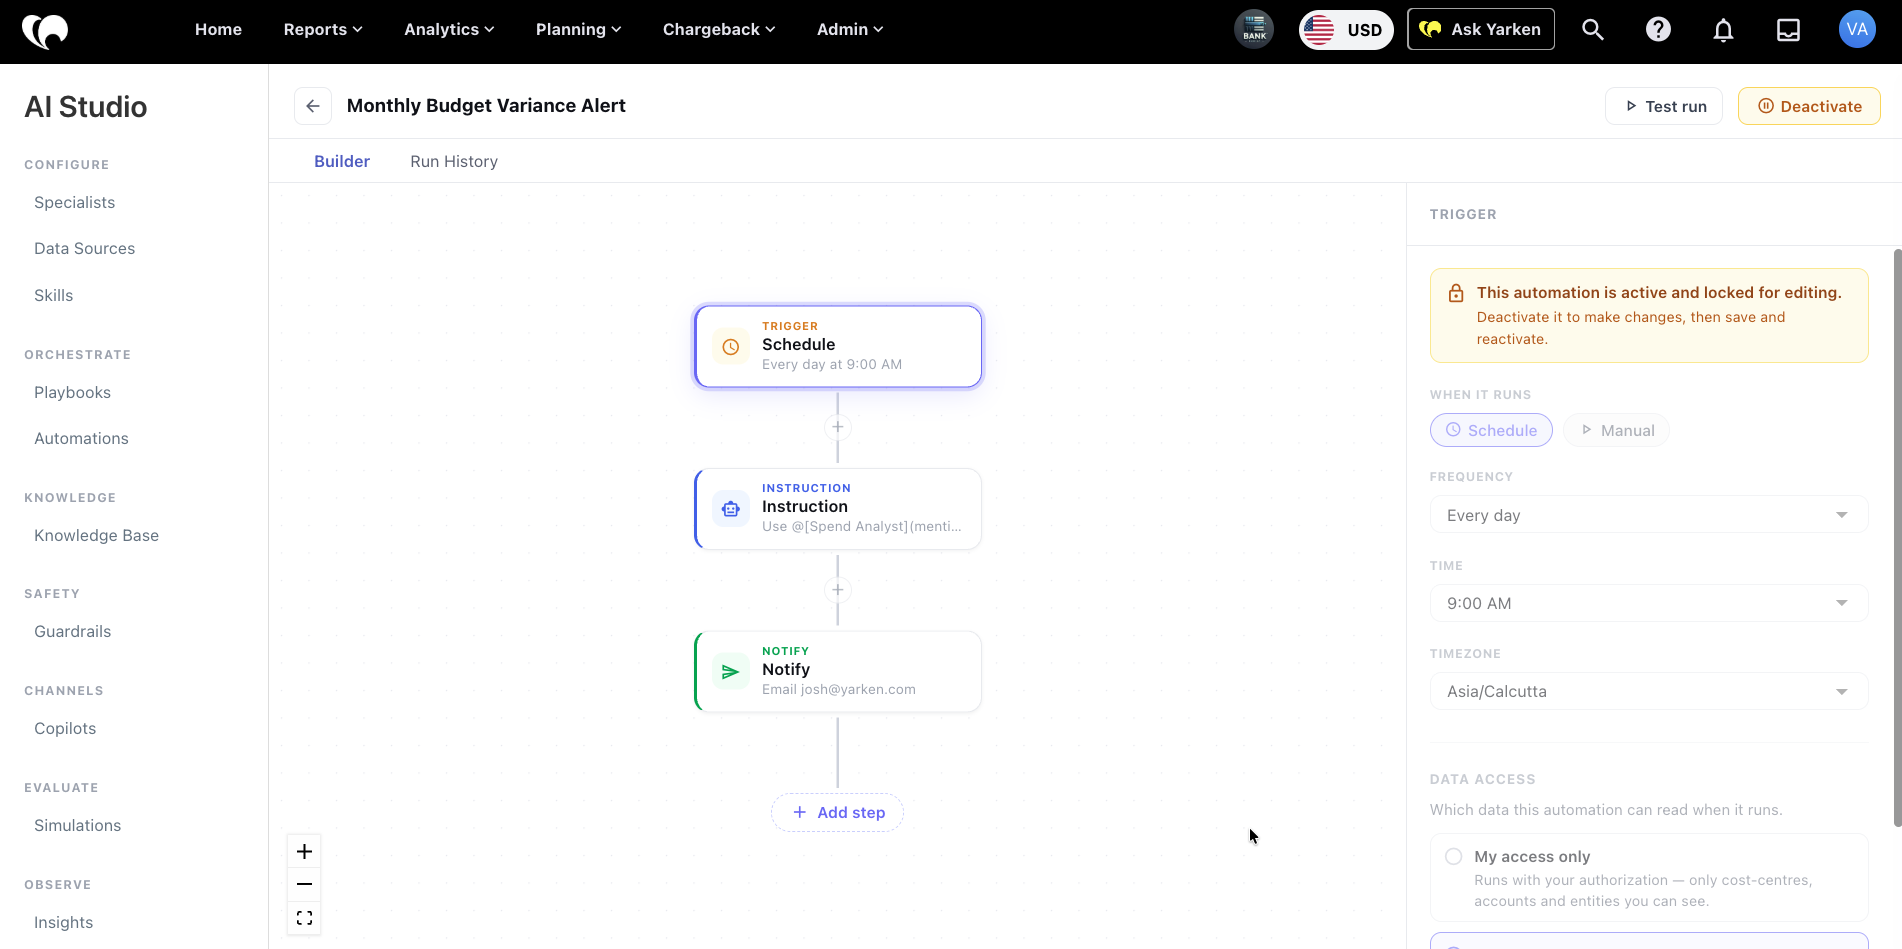
Active Automations may be locked for editing. Deactivate the Automation, make changes, save, and reactivate it.
Configure data access
Data access controls what data the Automation can read when it runs.
Current options shown include:
|
Option |
Description |
|---|---|
|
My access only |
Runs with the current user's authorization. The Automation can only access cost centers, accounts, and entities the user can see. |
|
Organization-wide |
Runs as a service account and can read all organization data available to that service account. |
Use organization-wide access only when the workflow requires broad reporting or monitoring.
Add workflow steps
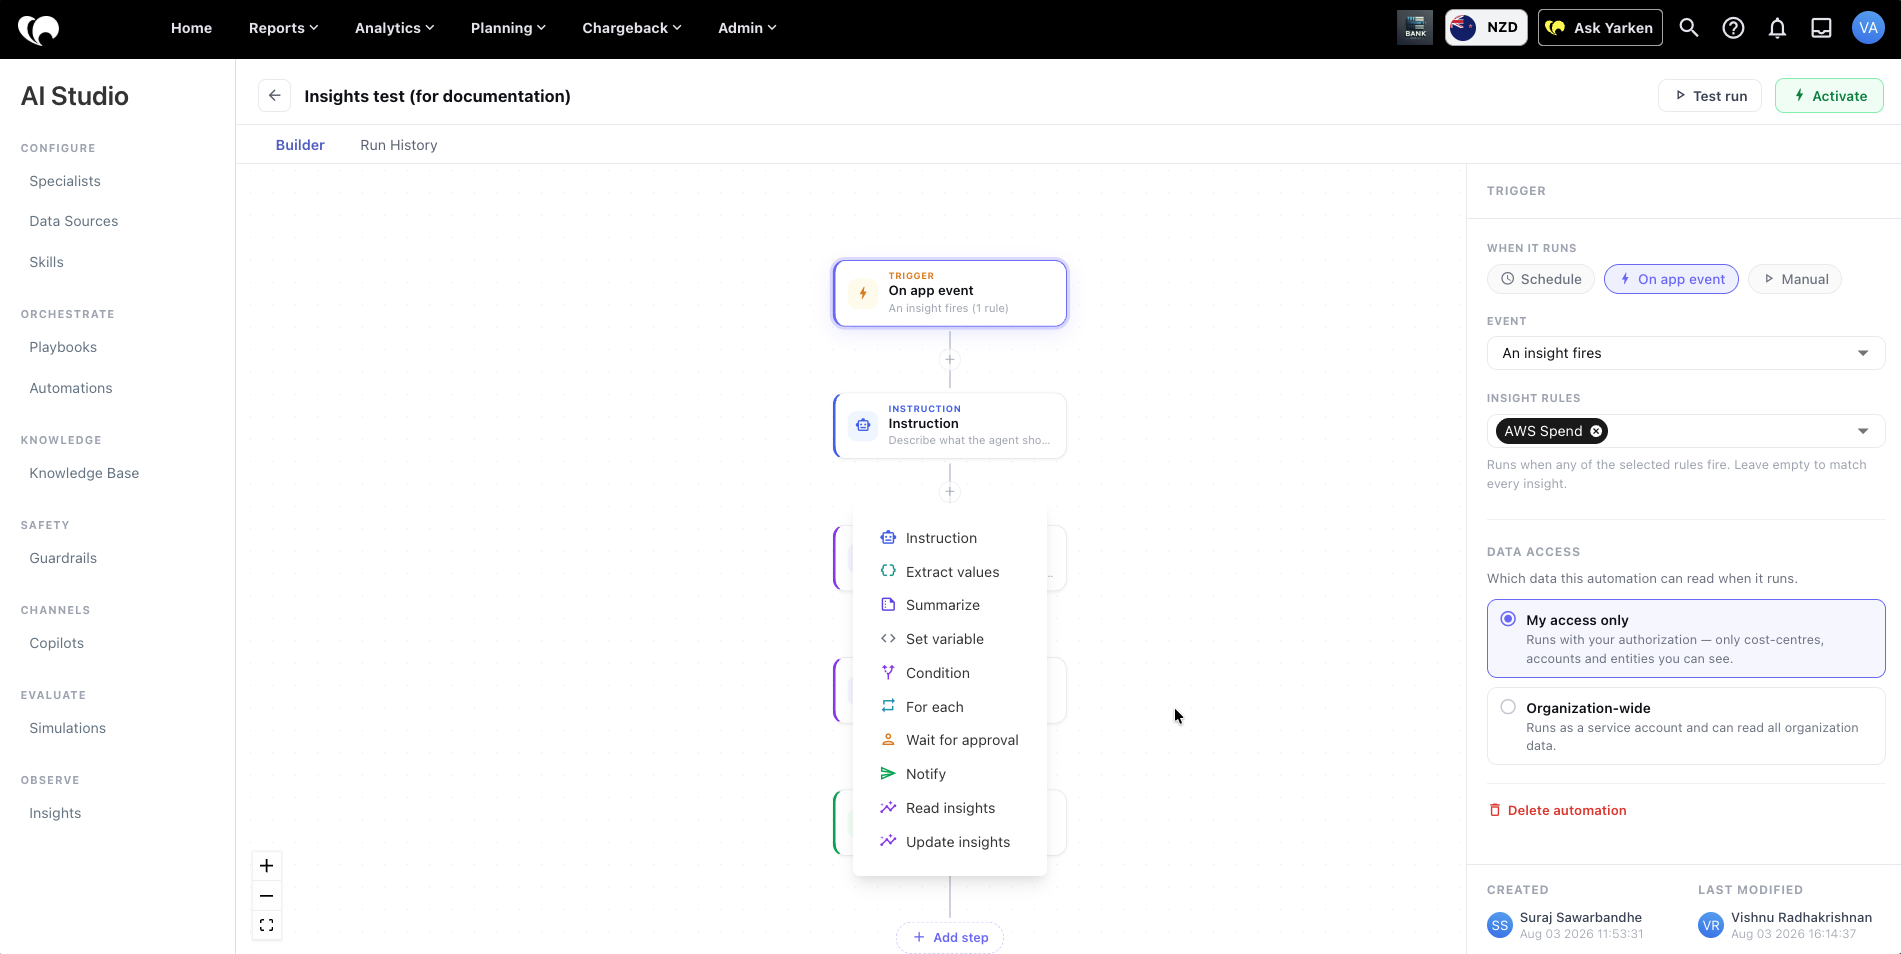
Use + Add step to add actions to the Automation flow.
Current step types shown include:
|
Step |
Purpose |
|---|---|
|
Instruction |
Run an instruction. Can reference Specialists, Data Sources, Skills, or variables. |
|
Extract values |
Capture values from a previous step's output and store them as variables. |
|
Summarize |
Summarize a previous output using AI summary or a deterministic template. |
|
Set variable |
Define a reusable variable for later steps. |
|
Condition |
Branch the workflow based on logic. |
|
For each |
Repeat a step over a set of values. |
|
Wait for approval |
Pause the workflow for human review or approval. |
|
Notify |
Send the result through a configured channel. |
|
Read insights |
Retrieve an Insight and store its details as a variable for later steps. |
|
Update insights |
Change an Insight’s status or severity, or add a comment to its history. |
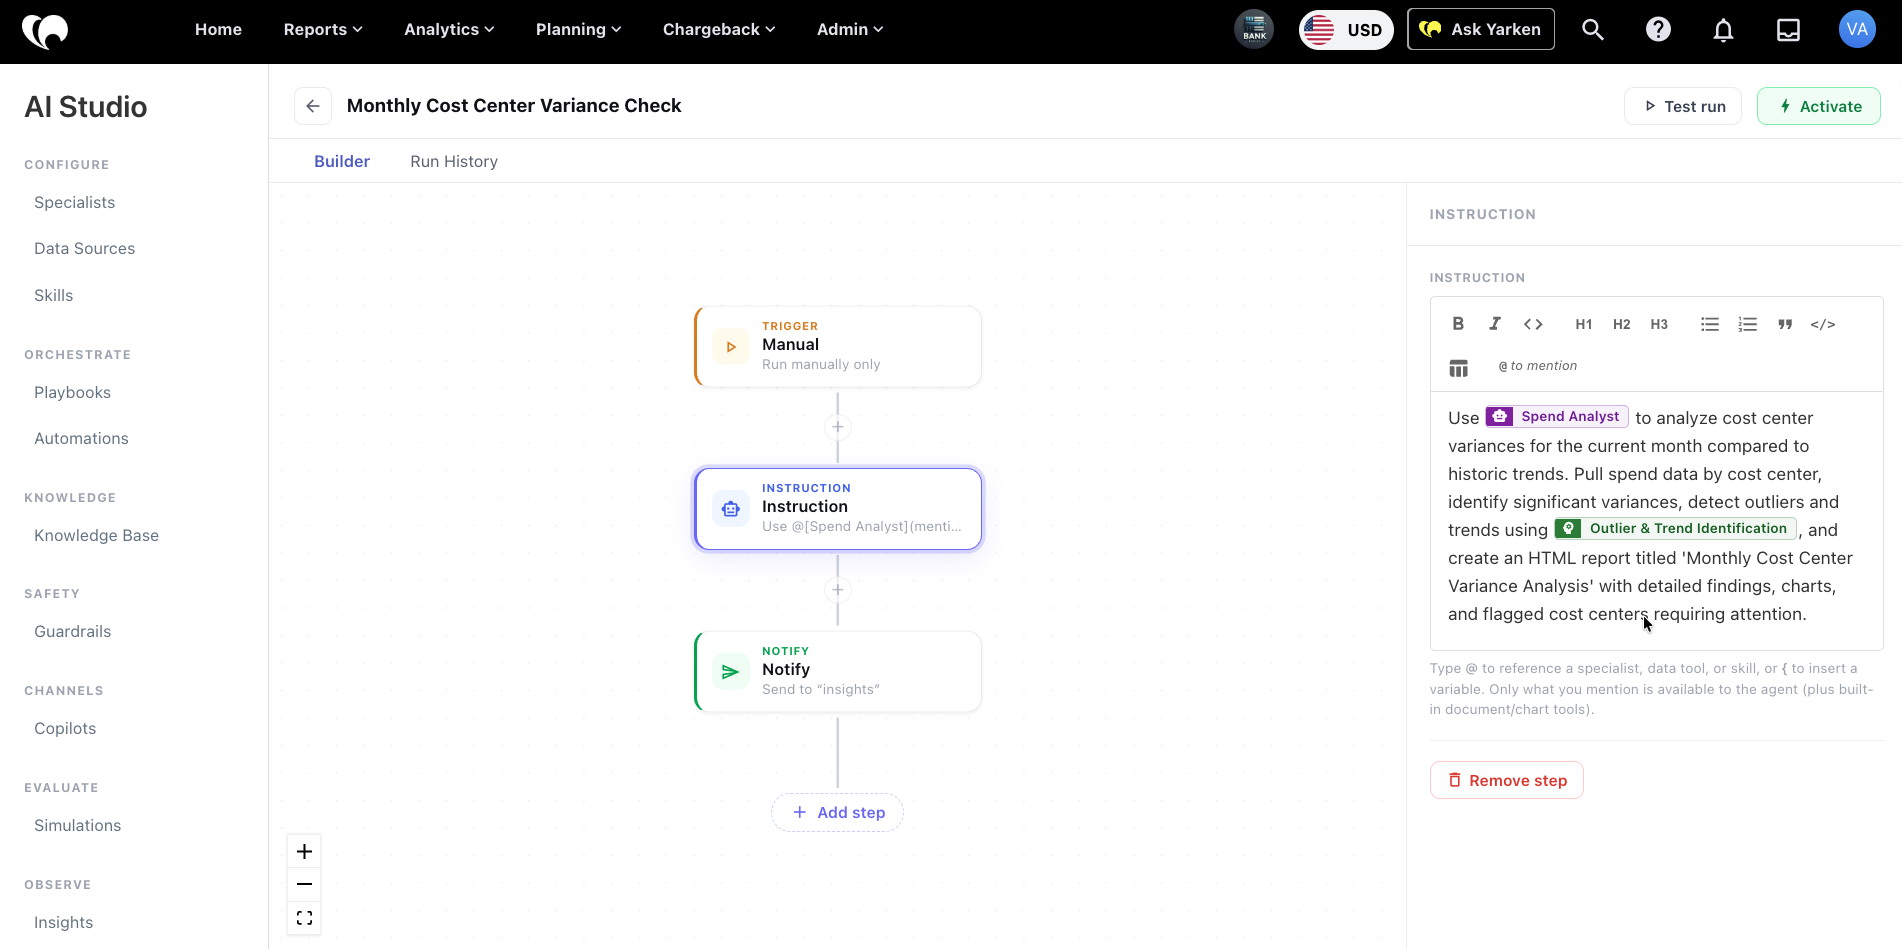
Instruction step
Use an Instruction step to define what the agent should do.
Instructions can reference available Specialists, Data Sources, Skills, or variables.
Example:
Use Spend Analyst to analyze cost center variances for the current month compared to historic trends. Pull spend data by cost center, identify significant variances, detect outliers and trends, and create an HTML report titled Monthly Cost Center Variance Analysis.
Extract values step
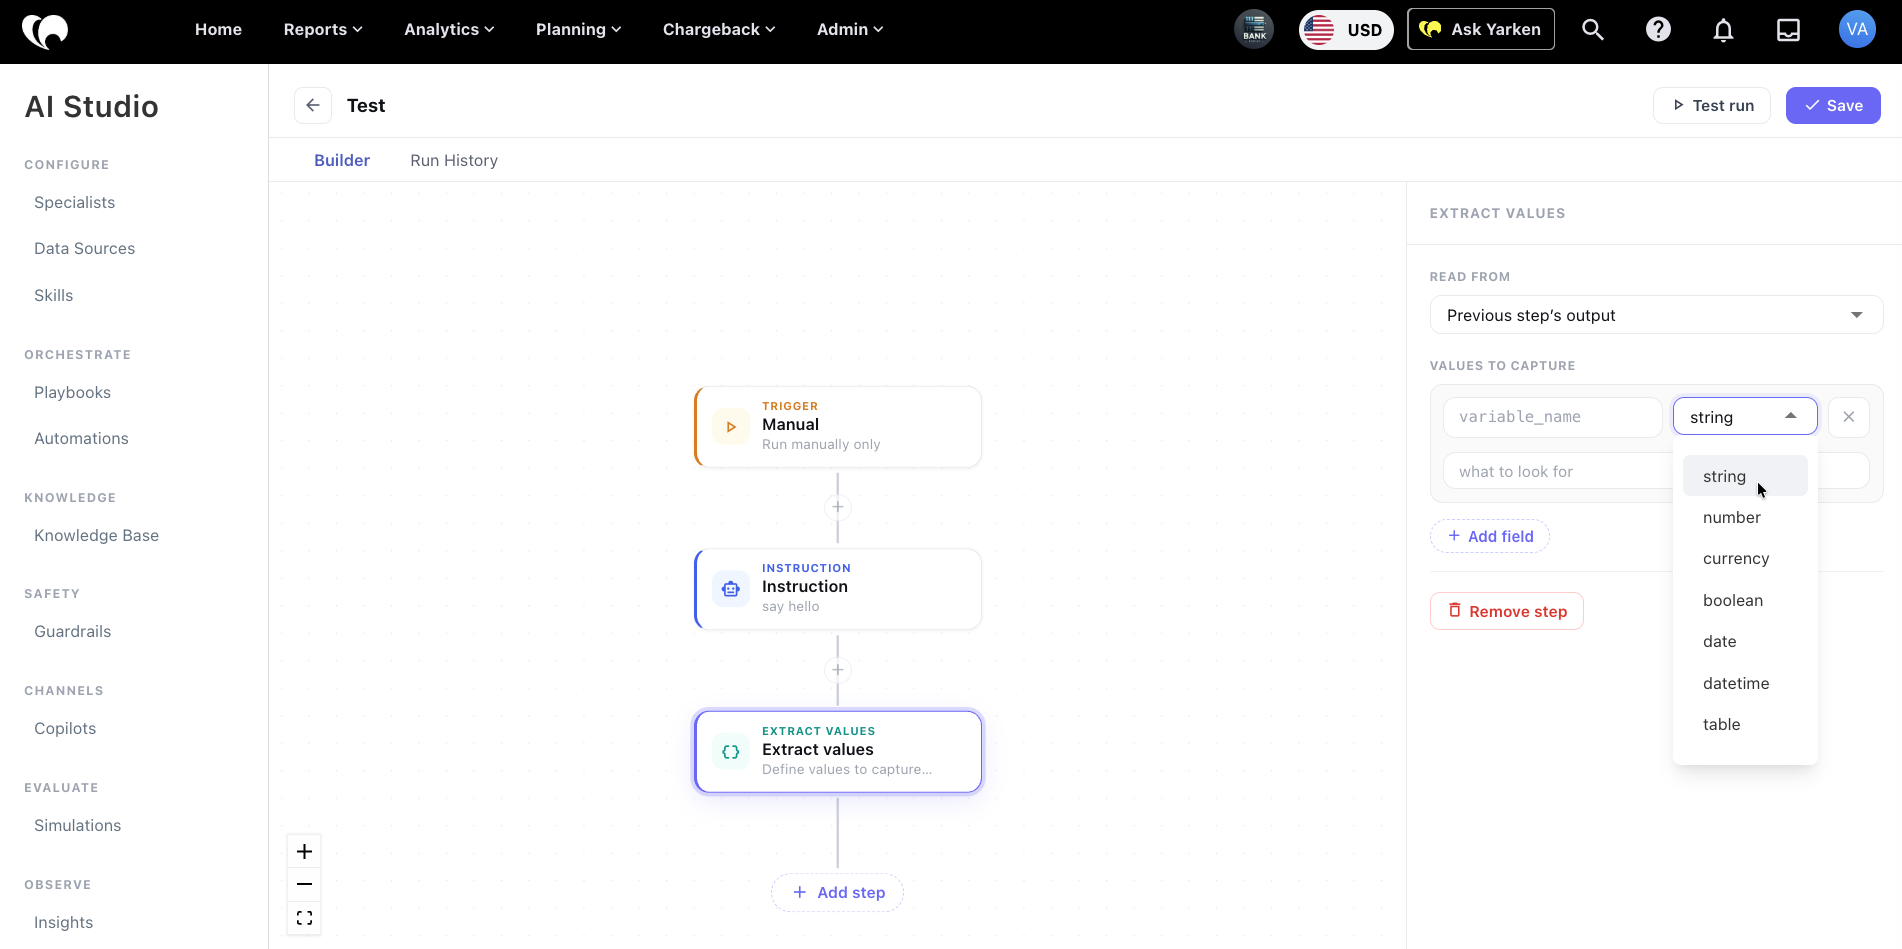
Use Extract values to capture structured variables from an earlier step.
Configure:
|
Field |
Description |
|---|---|
|
Read from |
Source output to read from, such as the previous step's output. |
|
Values to capture |
One or more variables to extract. |
|
Variable name |
Name used later in the workflow. |
|
Type |
Data type, such as string. |
|
What to look for |
Description of the value to extract. |
Use extracted values when later steps need a specific value from a longer response.
Summarize step
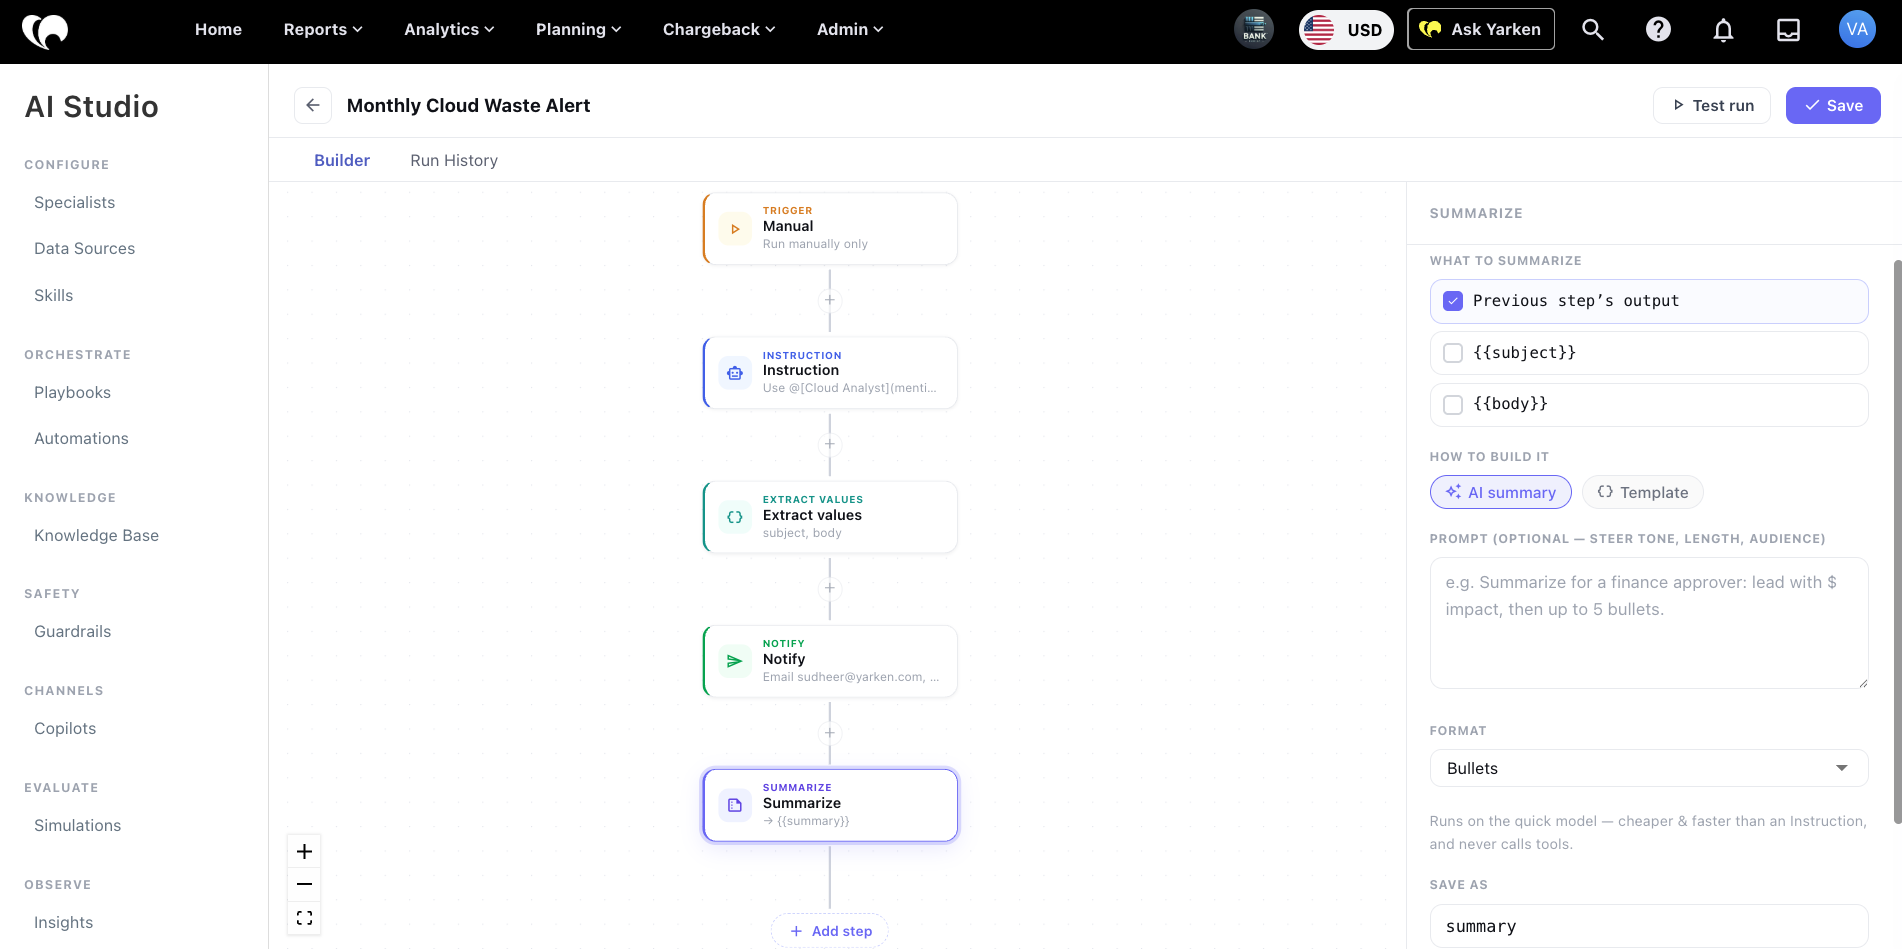
Use Summarize to create a shorter version of a previous output.
Configure:
|
Field |
Description |
|---|---|
|
What to summarize |
The source content, such as the previous step's output. |
|
How to build it |
Choose AI summary or Template. |
|
Prompt |
Optional guidance for tone, length, or audience. |
|
Format |
Output format, such as bullets. |
|
Save as |
Variable name used later in the workflow. |
AI summary
Use AI summary when the summary should be generated from the content with tone, length, or audience guidance.
Template
Use Template when the output should be deterministic and should not use AI rewriting.
Template outputs can include variables such as {{summary}}, {{total_spend}}, or other workflow values.
Set variable step
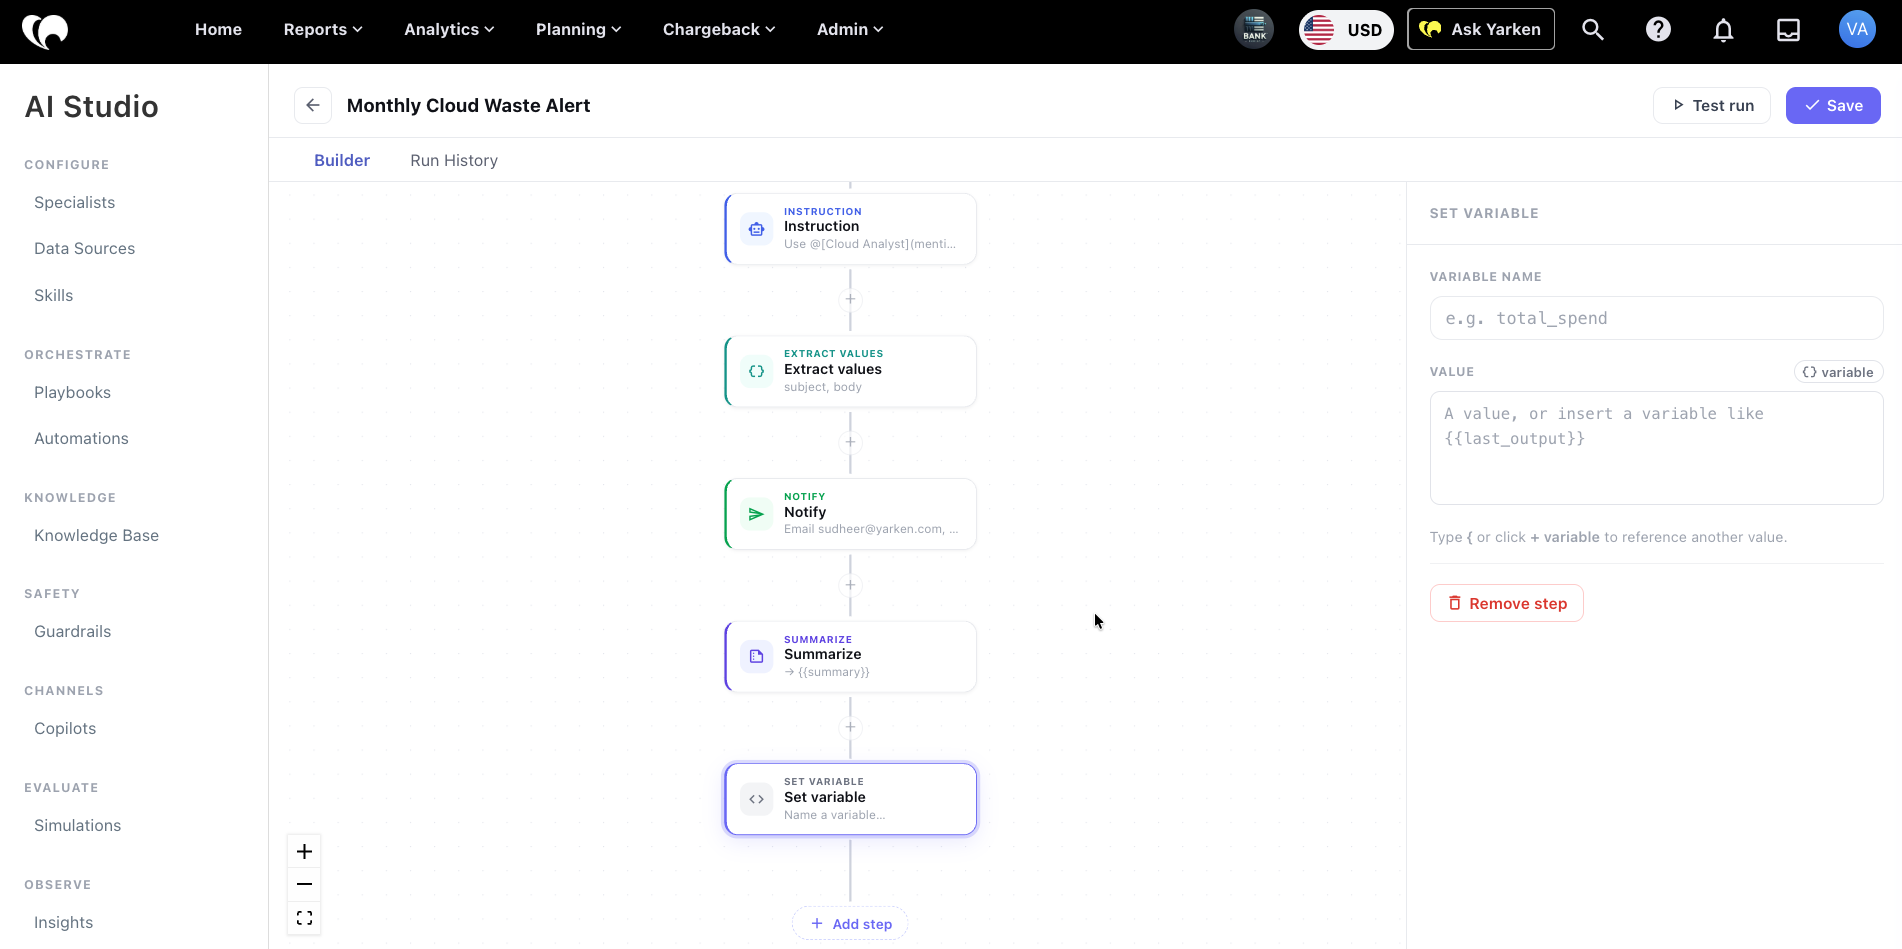
Use Set variable to create or update a workflow variable.
Configure:
|
Field |
Description |
|---|---|
|
Variable name |
Name of the variable. |
|
Value |
A fixed value or inserted variable. |
Use variables to pass values between steps.
Condition step
Use Condition to branch the workflow.
Current evaluation options shown include:
|
Option |
Description |
|---|---|
|
Compare values |
Compare values using a defined condition. |
|
Let AI decide |
Let AI evaluate whether the branch condition is met. |
A Condition step can include one or more branches. The first matching branch runs. All conditions inside a branch must match.
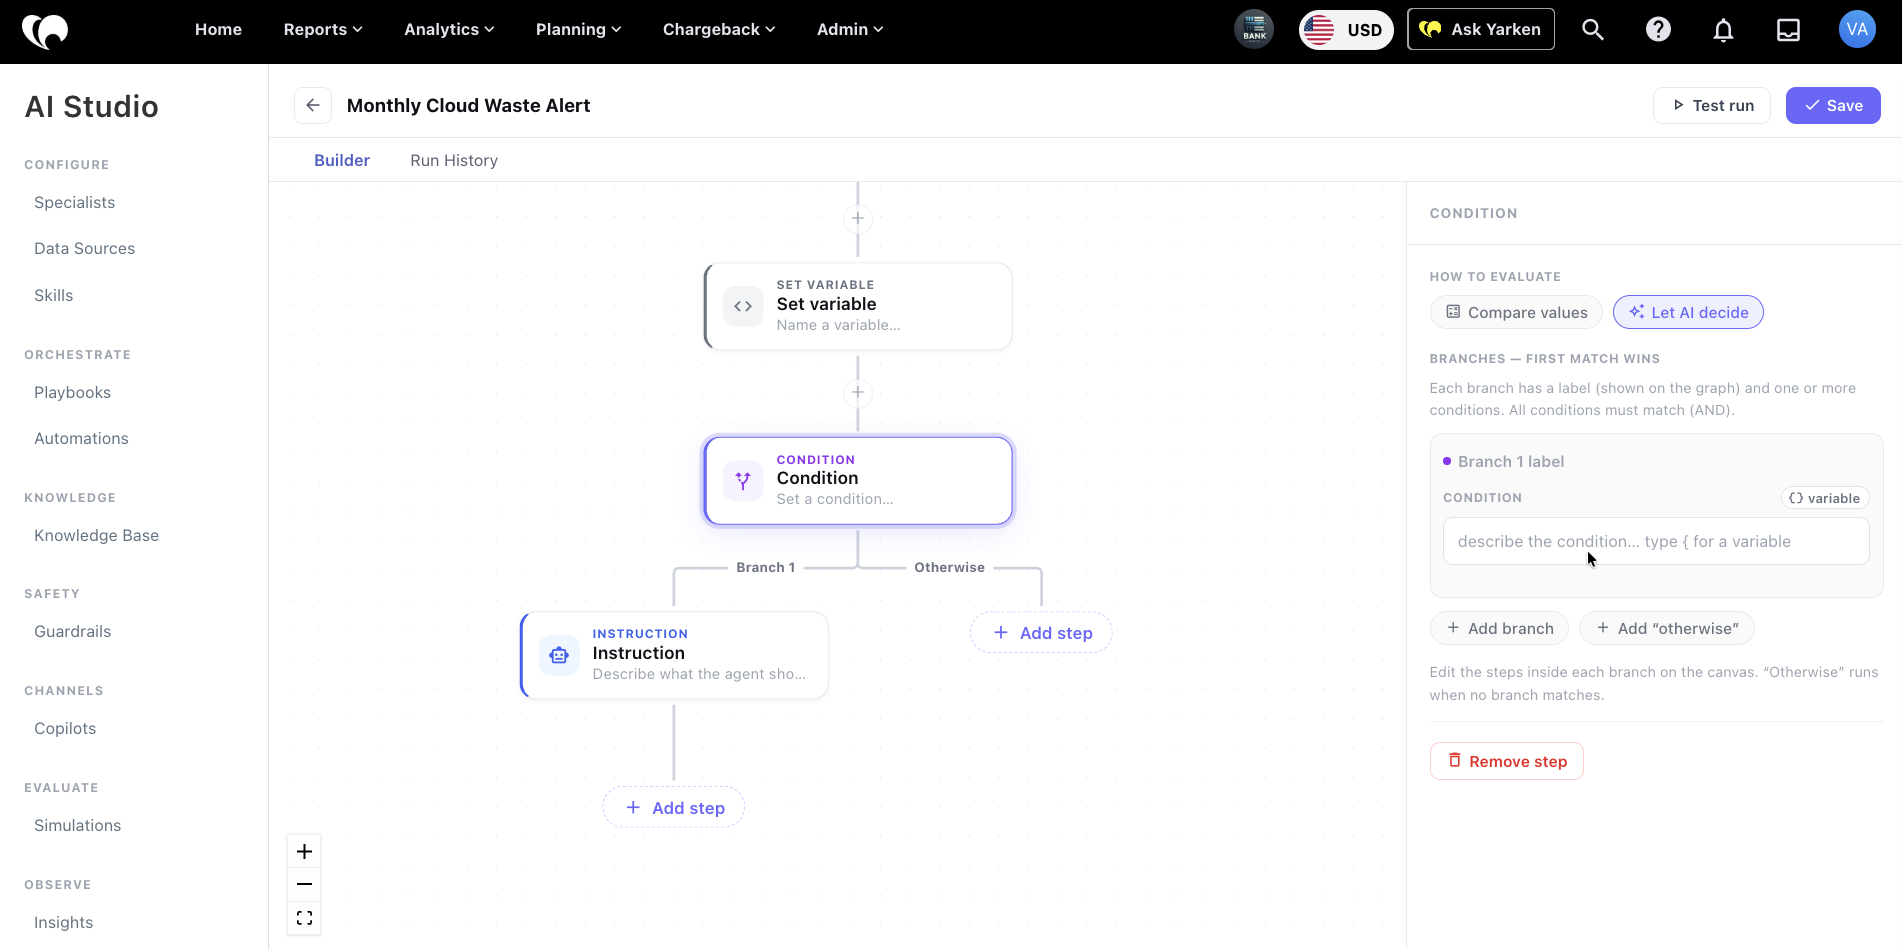
Condition configuration includes:
|
Field |
Description |
|---|---|
|
Branch label |
Name of the branch. |
|
Condition |
The condition that must match. Variables can be inserted. |
|
Add branch |
Adds another branch. |
|
Add otherwise |
Adds a fallback path when no branch matches. |
Use Conditions when the Automation needs to route different outcomes, such as variance above threshold, approval needed, or no action required.
For each step
Use For each to repeat actions for each item in a list or table.
Current configuration includes:
|
Field |
Description |
|---|---|
|
For each item in |
The table field to iterate over. Only table fields from an Extract step can be iterated. |
|
Call each item |
Name used to reference the current item inside the loop. |
Steps inside the For each group run once per item.
Use For each when the Automation needs to process each cost center, vendor, application, contract, account, or extracted row separately.
Wait for approval step
Use Wait for approval when a workflow needs human review before it continues.
Configure the following fields:
|
Field |
Description |
|---|---|
|
Question for the reviewer |
The decision prompt shown to the reviewer. Variables can be inserted. |
|
What the reviewer sees |
The output, analysis, or summary the reviewer needs to make the decision. |
|
Assign to |
Assign the approval request to one or more roles, people, or both. |
|
Choices |
Define the reviewer responses. Each choice creates a separate workflow branch. |
Roles can include Budget Owner, Cost Centre Owner, FinOps Admin, and Cloud Administrator. People can be selected by name or email address.
The selected reviewers receive an inbox notification. The automation pauses until someone responds.
The selected choice is available to later steps as {{human_decision}}. Any reviewer note is available as {{human_response}}.
Use Wait for approval before an automation sends, publishes, escalates, or updates information that requires review. For example, place it before Update insights when a person must approve a proposed status or severity change.
Notify step
Use Notify to send an Automation output by email or through an administrator-configured Microsoft Teams or Slack channel.
|
Field |
Options or purpose |
|---|---|
|
Channel |
Email, Microsoft Teams, or Slack. |
|
Send to |
For email, select a Yarken platform user, an administrator-configured distribution list or notification group, or an allowed specific email address. For Teams or Slack, select a configured channel or group. |
|
Recipient group |
Select the configured group that should receive the message. |
|
Subject |
Optional subject. Workflow variables can be inserted. |
|
Message |
Optional message body. Workflow variables can be inserted. |
|
Attachments |
Attach the generated report as a file. |
Choose notification recipients
Automation notifications support the following governed recipient types:
|
Recipient type |
How it works |
Administrator requirement |
|---|---|---|
|
Yarken platform user |
Select an existing user from User Management. The email is sent to the address associated with that user’s Yarken account. |
The user must exist in User Management. |
|
Distribution list or configured notification channel |
Select a distribution list, notification group, or channel configured by an administrator in Settings. |
The destination must already be configured and enabled. |
|
Specific email address |
Enter an individual email address only when specific recipients are enabled and the address uses an allowed domain. |
An administrator must enable specific email recipients and configure the permitted domains. |
Specific email recipients are disabled by default. With the default setting, use Yarken platform users or administrator-configured distribution lists and notification channels.
Allow specific email recipients
An administrator controls whether an Automation can send to manually entered individual email addresses.
-
Go to Admin > Settings.
-
Under AI, select Automations.
-
Set Enable Specific Email Recipients to Enabled.
-
In Allowed Domains for Automation Notifications, enter the approved domains as a comma-separated list.
-
Return to the Automation and use Test run to validate the recipient and message before activation.
The allowed-domains field is optional and supports up to 500 characters. It applies to individual-email Automation notifications. The yarken.com domain is always allowed when additional domains are listed.
Only add domains approved for Automation delivery. Distribution lists and notification channels remain governed by their administrator-managed configuration.
Build the notification message
If the Message field is blank, the full report is sent. If a message is provided, it becomes the message body and the full report remains attached when Attachments is enabled.
Charts created in the report are embedded inline in email automatically. Slack and Microsoft Teams currently receive a plain-text summary.
For channel setup, see Notification Channels (Admin Settings).
Read insights step
Use Read insights to retrieve an Insight and store its details for later workflow steps.
Configure the following fields:
|
Field |
Description |
|---|---|
|
Insight ID |
The ID of the Insight to retrieve. For An Insight fires triggers, use |
|
Store as variable |
The name used to reference the Insight in later steps. The default is |
Later steps can reference fields such as {{insight.summary}} and {{insight.severity}}.
Use Read insights before instructions, conditions, approvals, updates, or notifications that require Insight context.
Update insights step
Use Update insights to change an Insight’s status or severity, or add a comment.
Configure the following fields:
|
Field |
Description |
|---|---|
|
Insight ID |
The Insight to update. Use |
|
Action |
Select Acknowledge, Resolve, Reopen, or Add comment only. |
|
Severity |
Select a severity or choose No change. |
|
Comment |
Add a reason, analysis summary, reviewer response, or other history note. |
Add comment only does not change the Insight’s status. Selecting No change retains the current severity.
Status changes, severity changes, and comments are recorded in the Insight history. Automated actions appear in the Insight timeline as Performed by automation.
Test and activate
Use Test run to validate an Automation before activation.
Use Activate to make the Automation available to run according to its trigger.
Use Deactivate when the Automation should stop running or must be edited.
Active Automations may be locked for editing. Deactivate first, make changes, save, and reactivate.
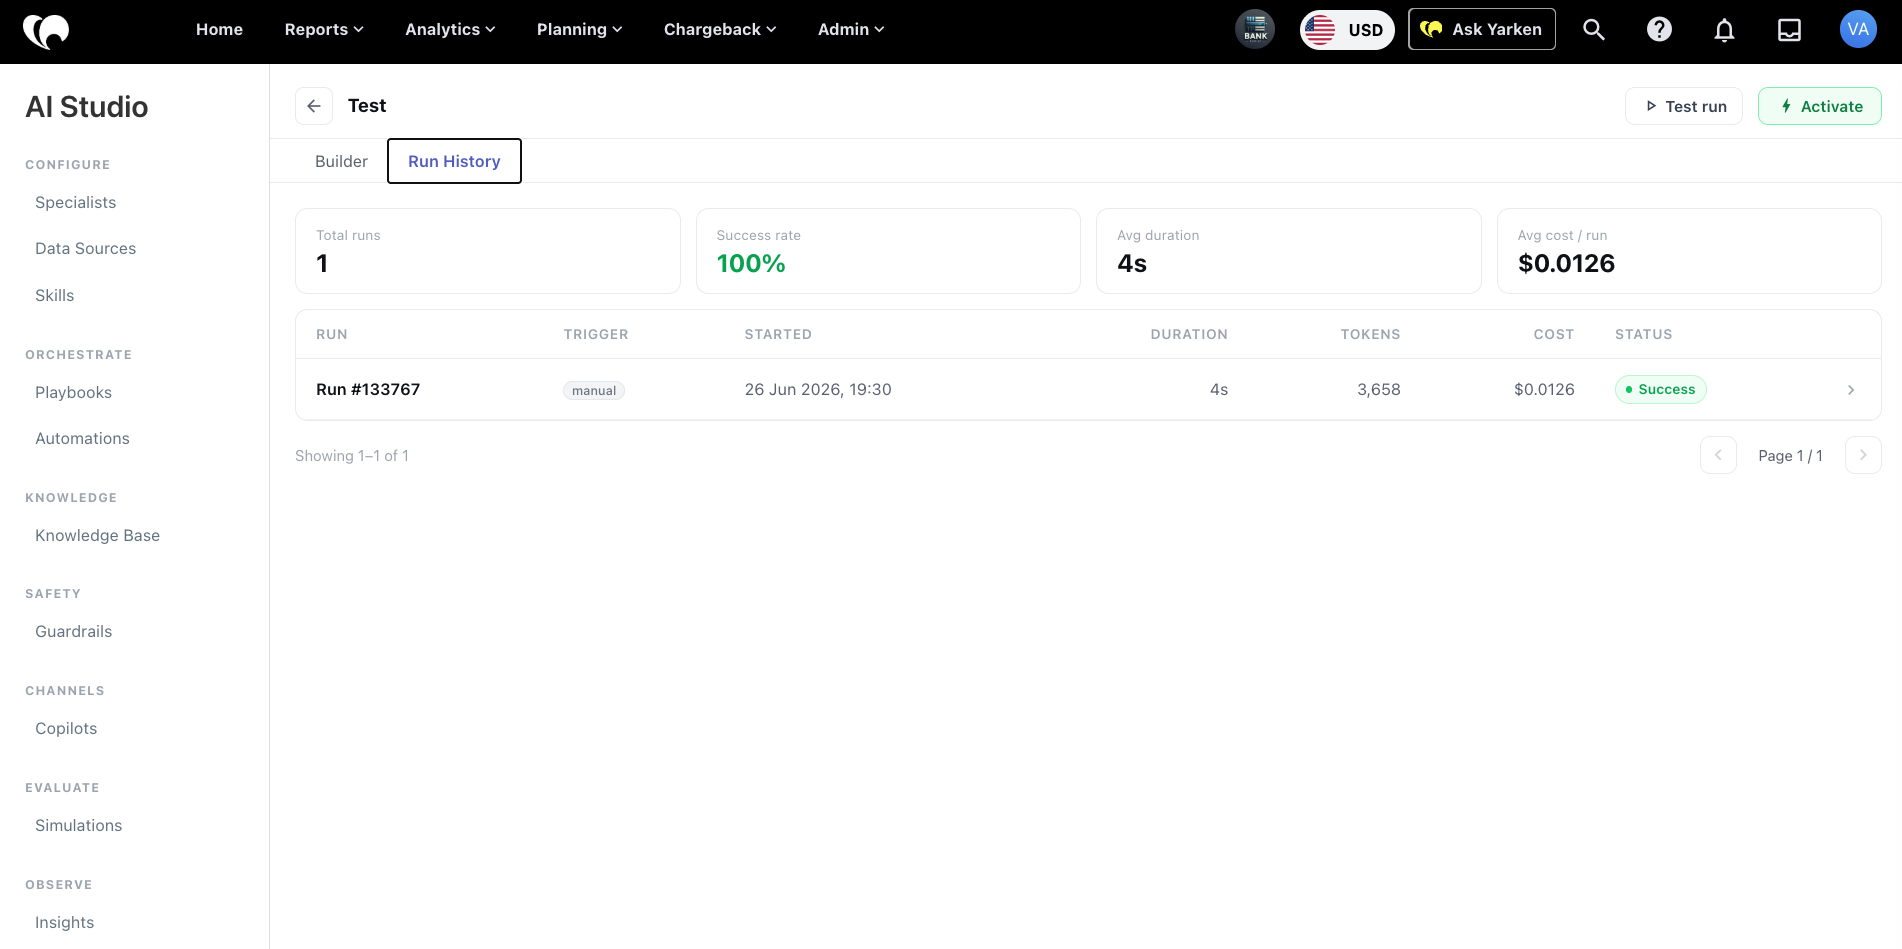
Run History
Use Run History to review Automation performance.
The current Run History view shows:
|
Metric |
Description |
|---|---|
|
Total runs |
Number of runs recorded. |
|
Success rate |
Percentage of successful runs. |
|
Average duration |
Average run time. |
|
Average cost per run |
Average run cost. |
Each run row can show:
-
Run ID.
-
Trigger type.
-
Started date and time.
-
Duration.
-
Tokens.
-
Cost.
-
Status.
Statuses shown include Success and Failed.
Delete an automation
To delete an Automation:
-
Open the Automation.
-
Select Delete automation.
Deleting an Automation removes it and its configuration. Use deactivation when the Automation may be needed later.
Configuration guidance
Before activating an Automation, confirm that:
-
The trigger is clear.
-
Data access is appropriate.
-
Each step has a defined purpose.
-
Variables are named clearly.
-
Conditions and fallback branches are tested.
-
Approval routing is assigned to the right role or person.
-
Notification recipients are correct.
-
Reports or outputs are attached only when required.
-
The Automation has passed a test run.
-
Run History is reviewed after activation.
Governance notes
Automations can run without a user actively asking a question.
Review data access, recipients, schedule, approval routing, and generated outputs before activation. Use organization-wide access only for approved operational workflows.
Next step
Related articles