
You can automate how your team responds to anomalies by creating an automation in AI Studio (Beta) that runs when an Insight is triggered. This helps reduce manual triage, keeps response steps consistent, and notifies the right people quickly.
Use this page to set up an automation that starts when an Insight fires, reads the Insight details, applies AI instructions, optionally waits for approval, updates the Insight, and sends notifications.
What this automation can do
-
Trigger automatically when a selected Insights Rule detects an anomaly
-
Read Insight details and use them as context for AI instructions
-
Invoke a Specialist, tool, or skill by using
@in the instructions -
Update the Insight by acknowledging, resolving, or reopening it, changing its severity, or adding a comment
-
Pause for human approval before continuing
-
Send notifications through Email, Microsoft Teams, or Slack
Note:
The automation does not run the Insights Rule. The rule continues to run according to its configured frequency. When the rule generates a new Insight, the application event starts the automation.
Common use cases
Use Insight-triggered automations to:
-
Escalate high-impact anomalies by increasing their severity and notifying an operational team.
-
Acknowledge known or expected low-severity patterns and add an explanatory comment.
-
Use the Insight dimension or dimension value to notify the appropriate business or technical team.
-
Add a consistent, timestamped comment that records how the Insight was reviewed and what action the workflow took.
Before you begin
-
Make sure the Insight Rule you want to use already exists.
-
Confirm you have access to AI Studio > Automations.
-
Prepare the instruction text you want the automation to follow.
-
Decide whether the workflow should update the Insight directly or wait for approval first.
Step-by-step procedure
-
Go to AI Studio > Automations.
-
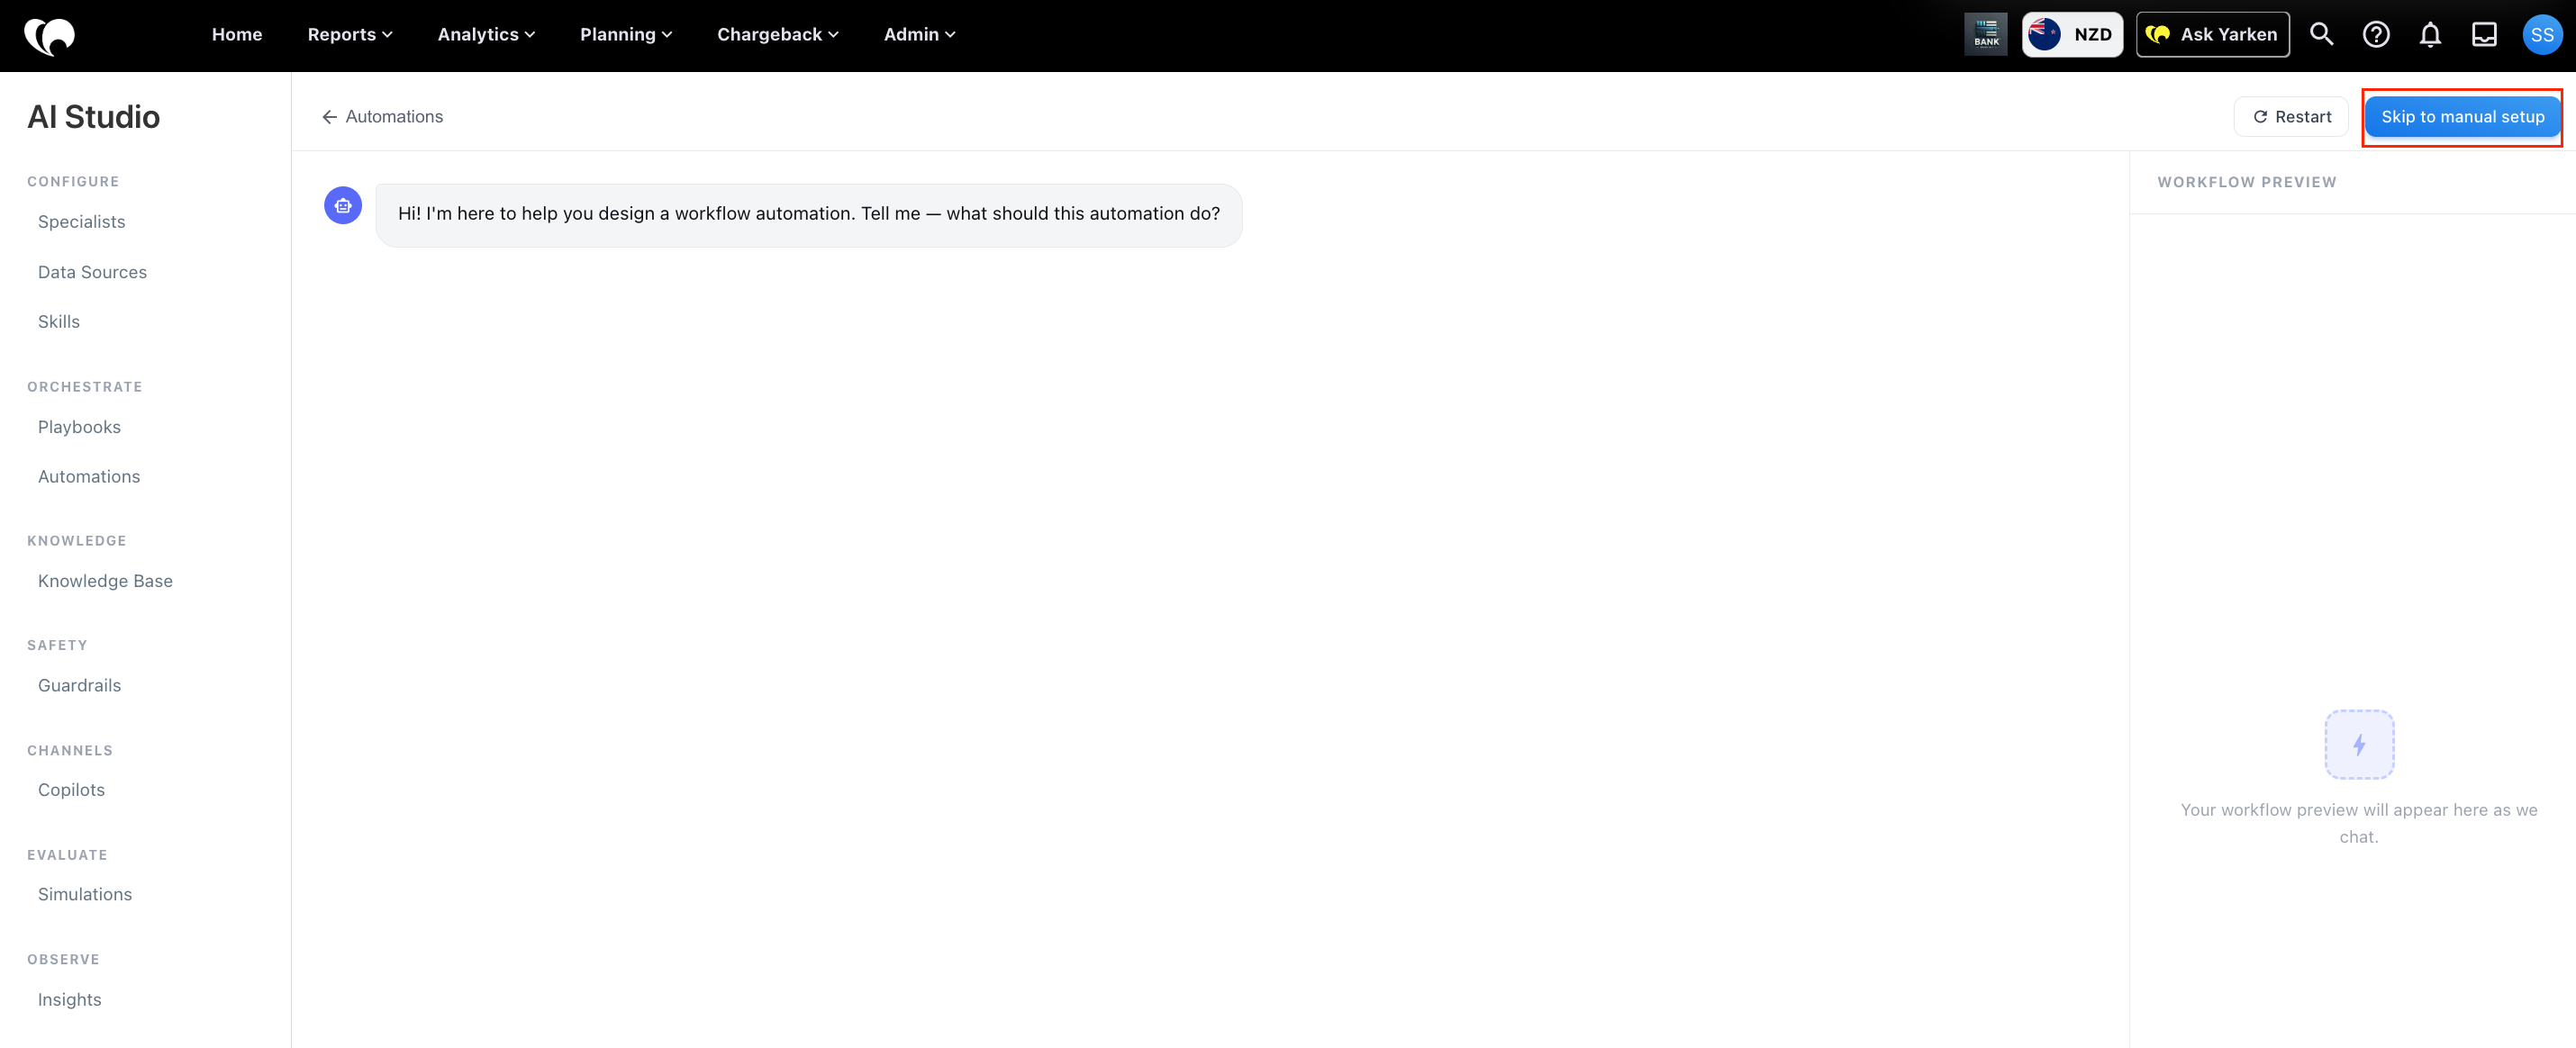
Click + New Automation and select Skip to manual setup.
-
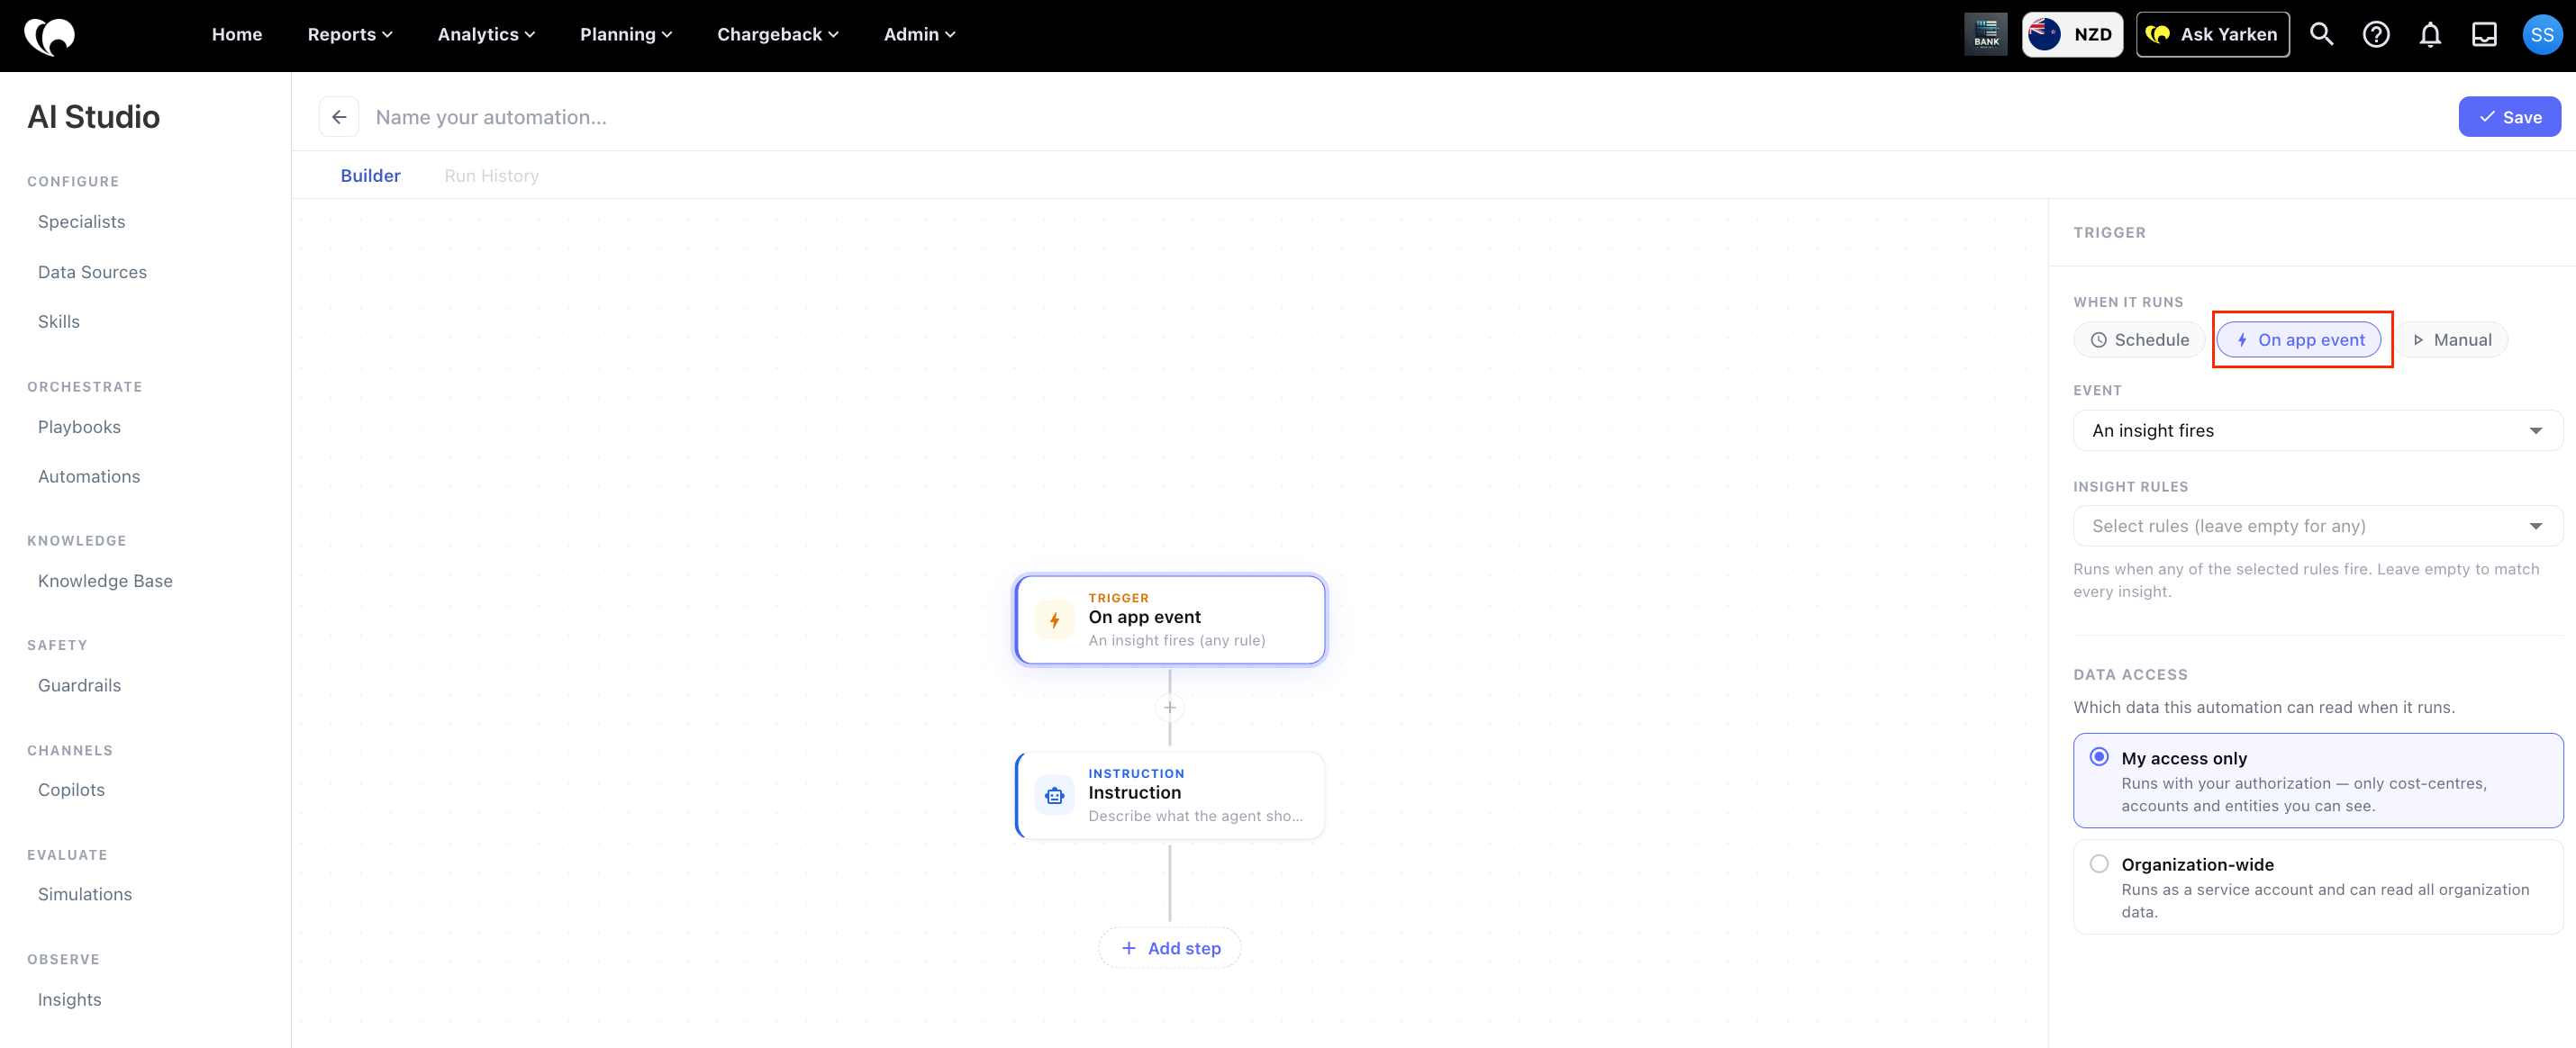
Select On app event as the trigger.
-
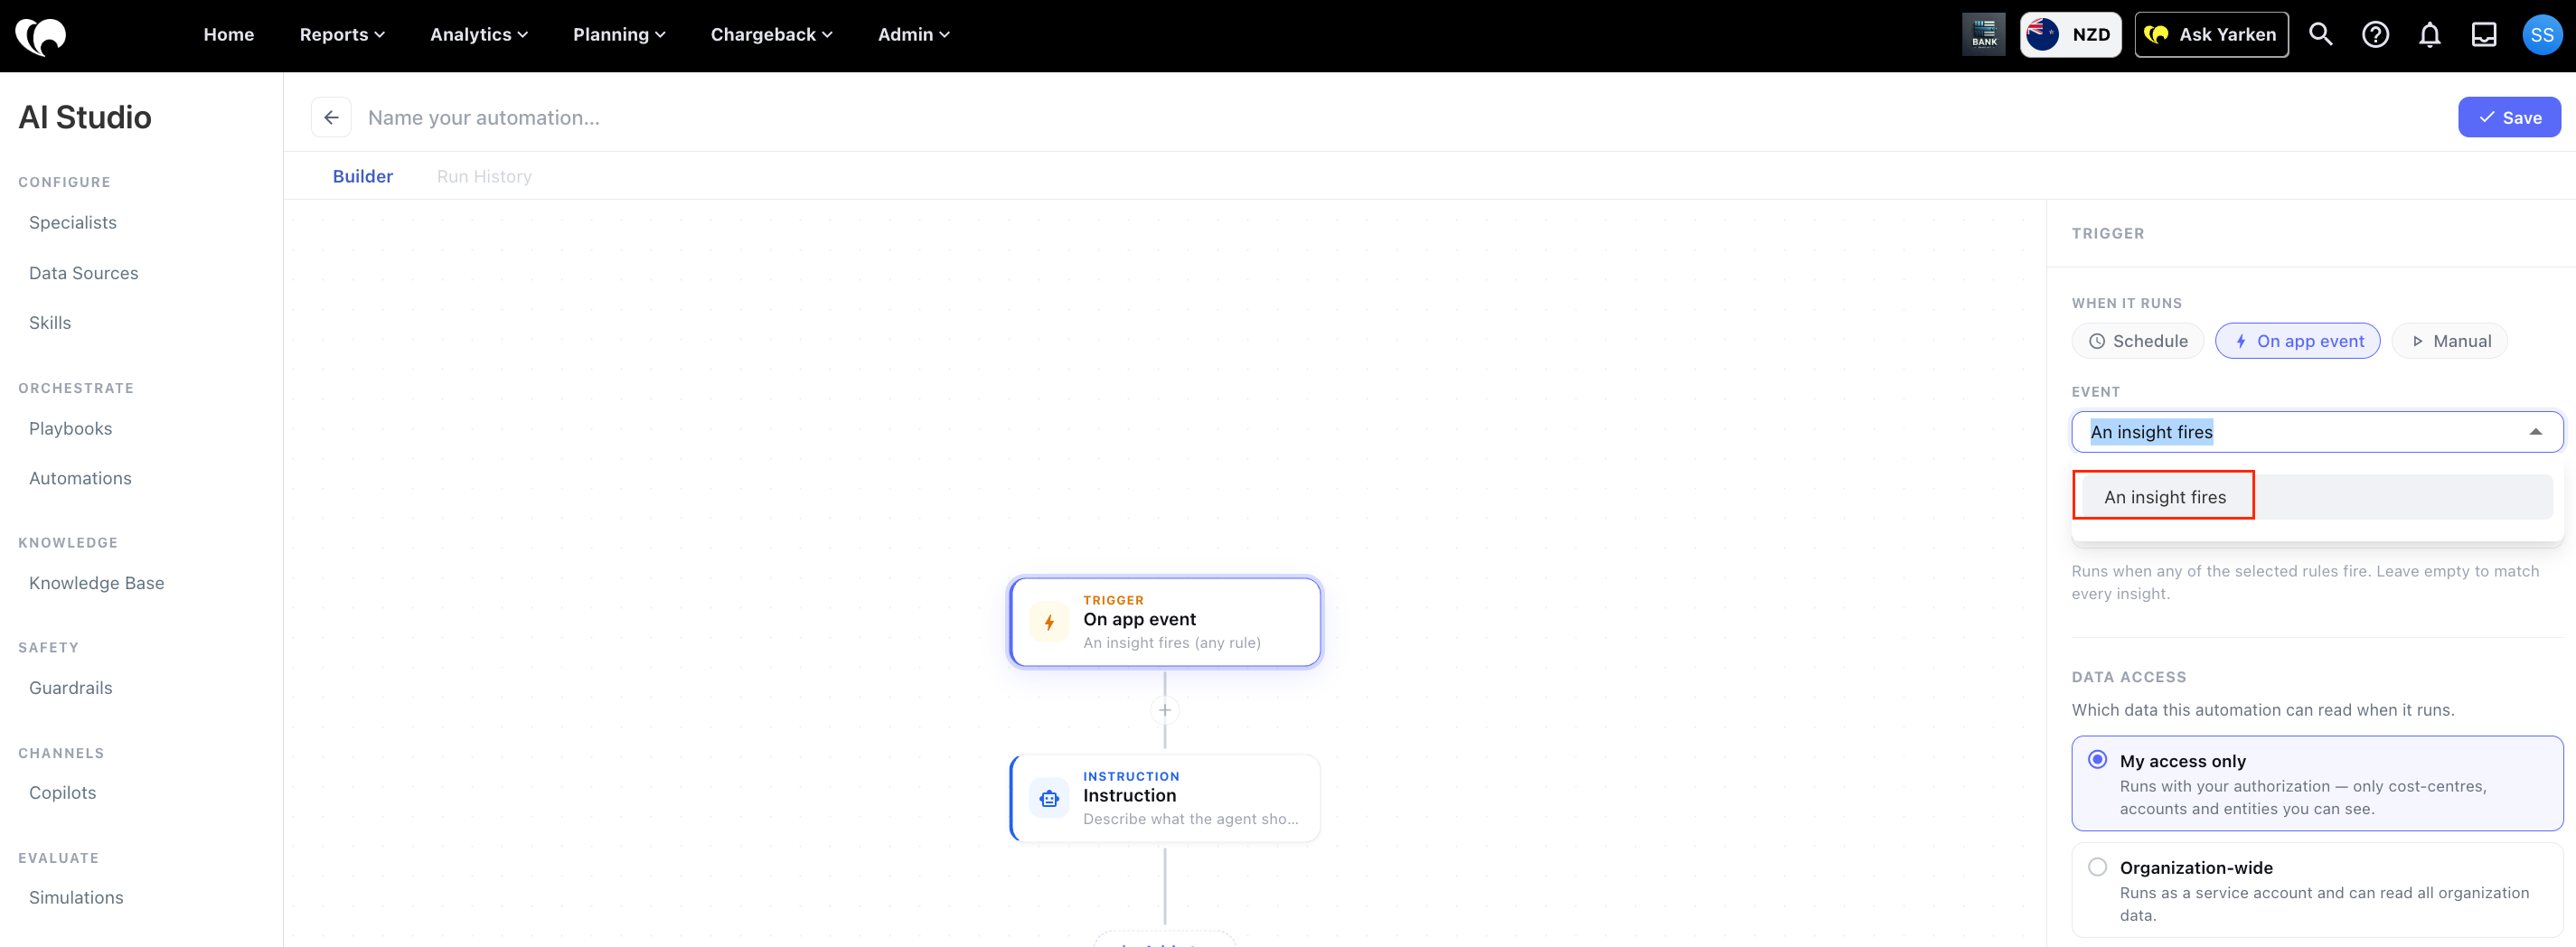
Set the event to An Insight fires.
-
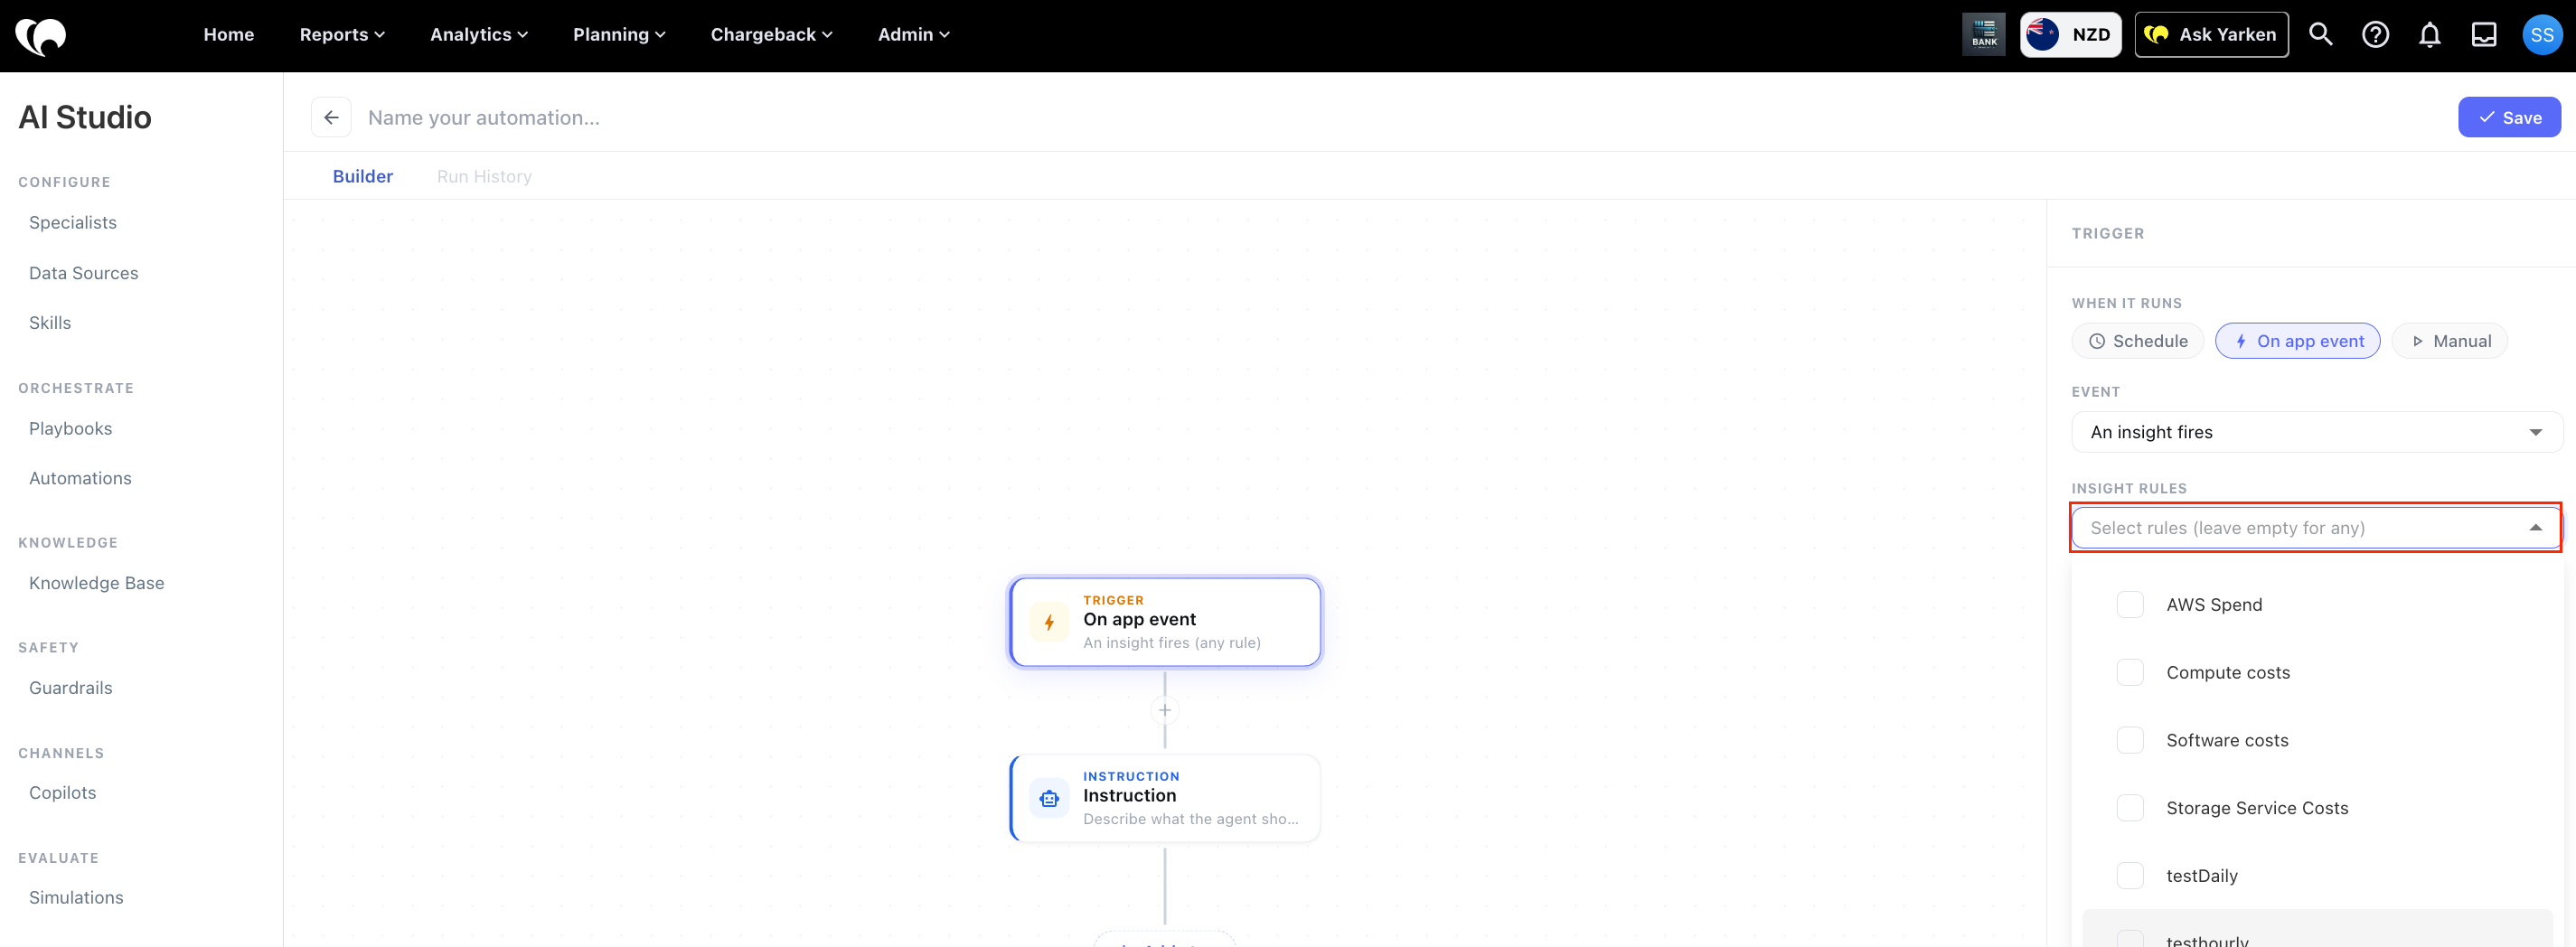
Select the Insights Rules that should trigger this automation.
Choose which Insights trigger the automation
You can configure the automation to respond to:
-
Specific Insights Rules — Select one or more rules when the workflow should run only for anomalies generated by those rules.
-
All Insights Rules — Leave the rule selection empty when the workflow should run whenever any new Insight is generated.
Use a specific rule when the automation contains logic intended for a particular metric, dimension, or business process. Use the generic option only when the workflow instructions can safely handle different types of Insights.
-
Click + Add Steps to build the workflow.
-
Select Read insights as a step.
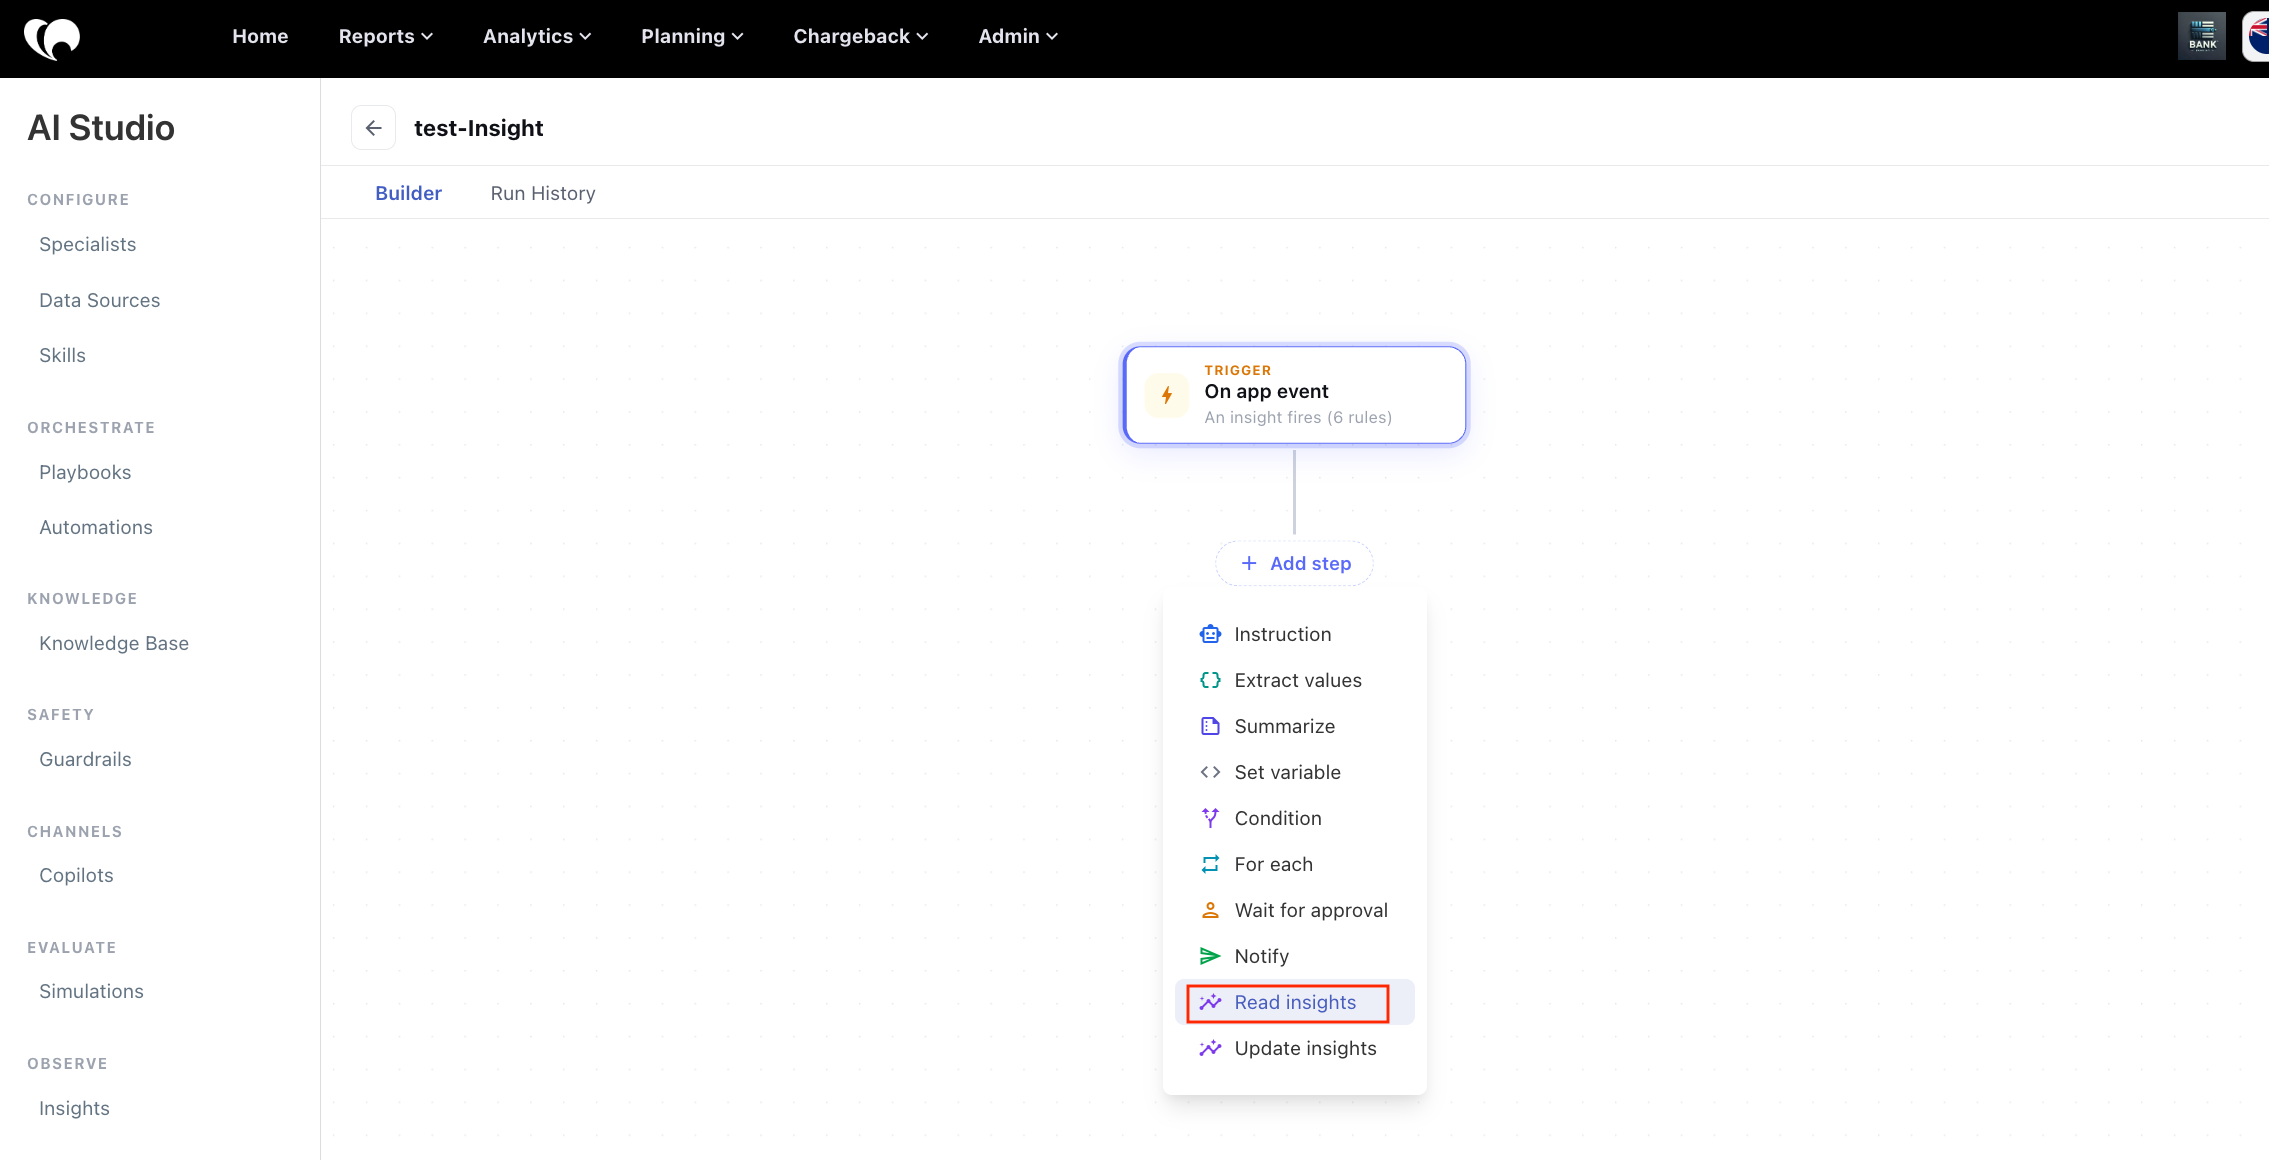
The Read insights step retrieves the complete Insight context and makes it available to later workflow steps.
-
Enter the Insight ID and choose to store it as a variable so it can be used in later steps.
-
Add your Instructions. You can mention a specialist, tool, or skill by typing
@followed by its name.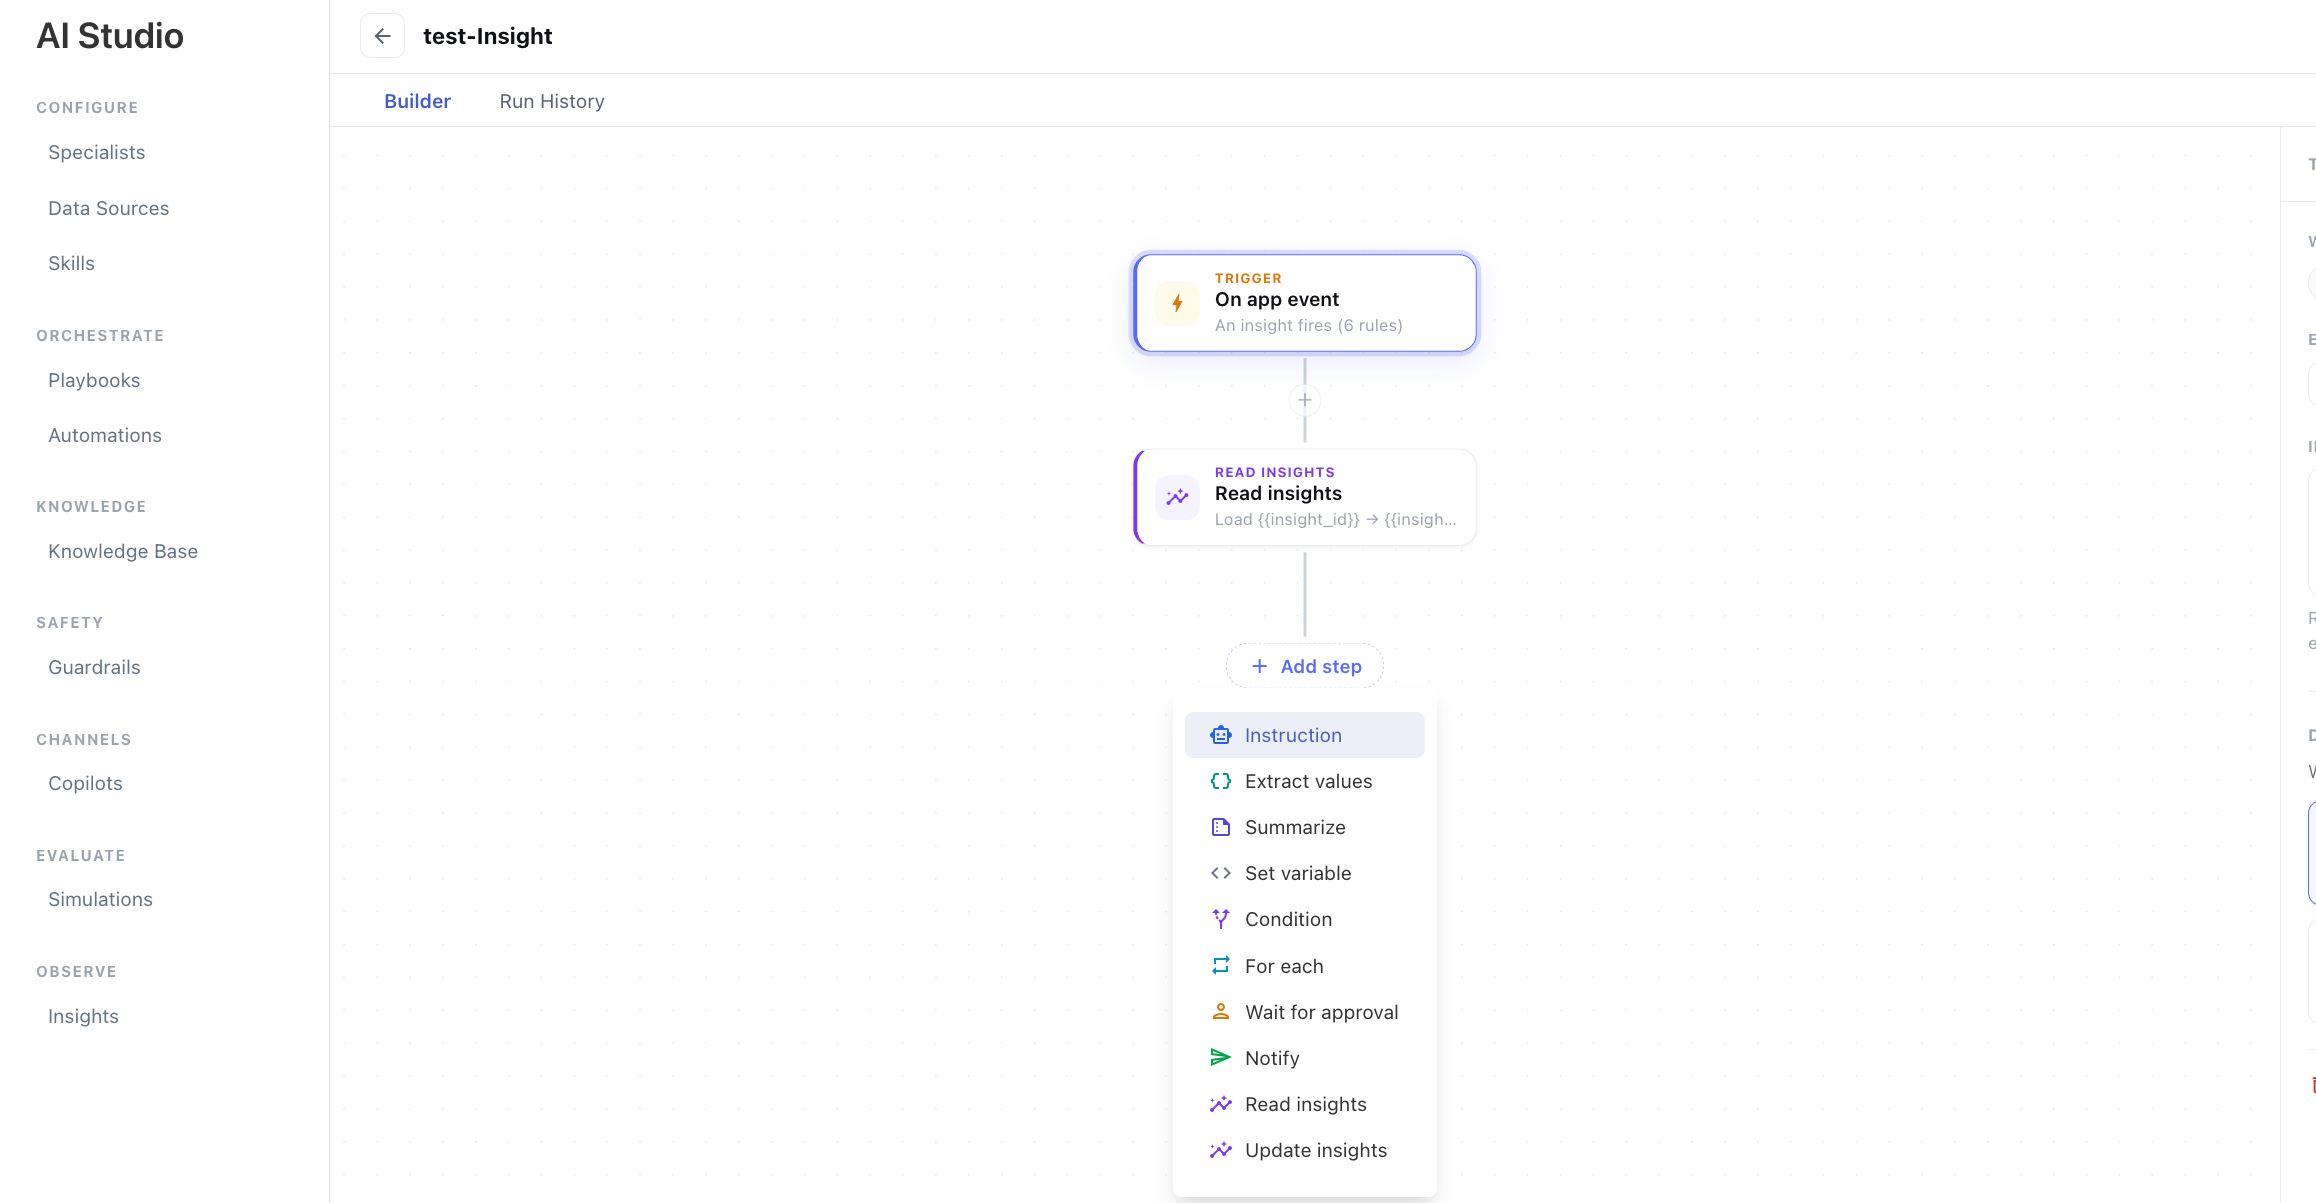
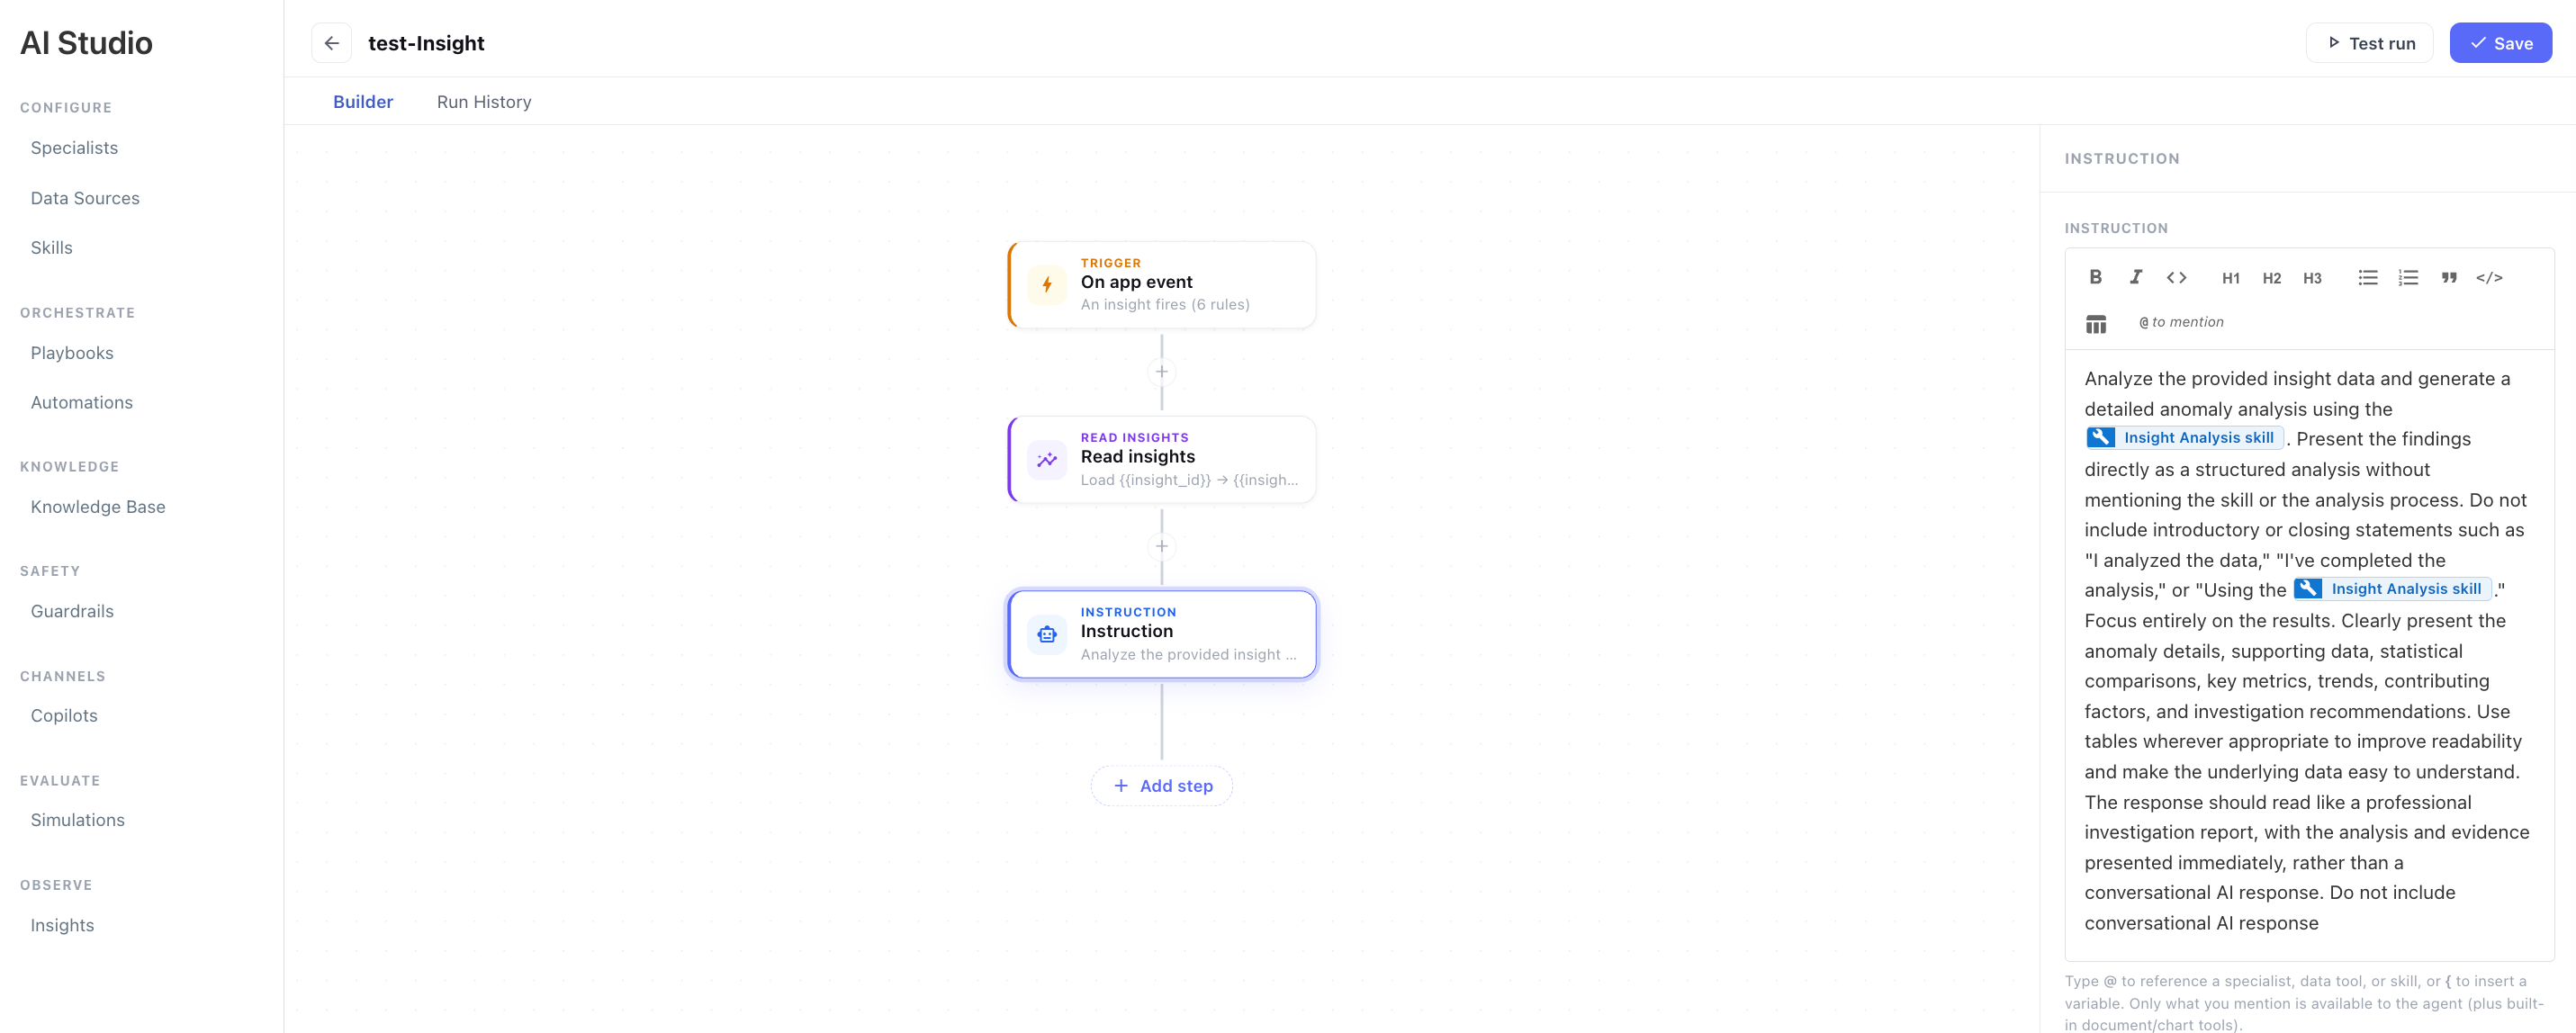
-
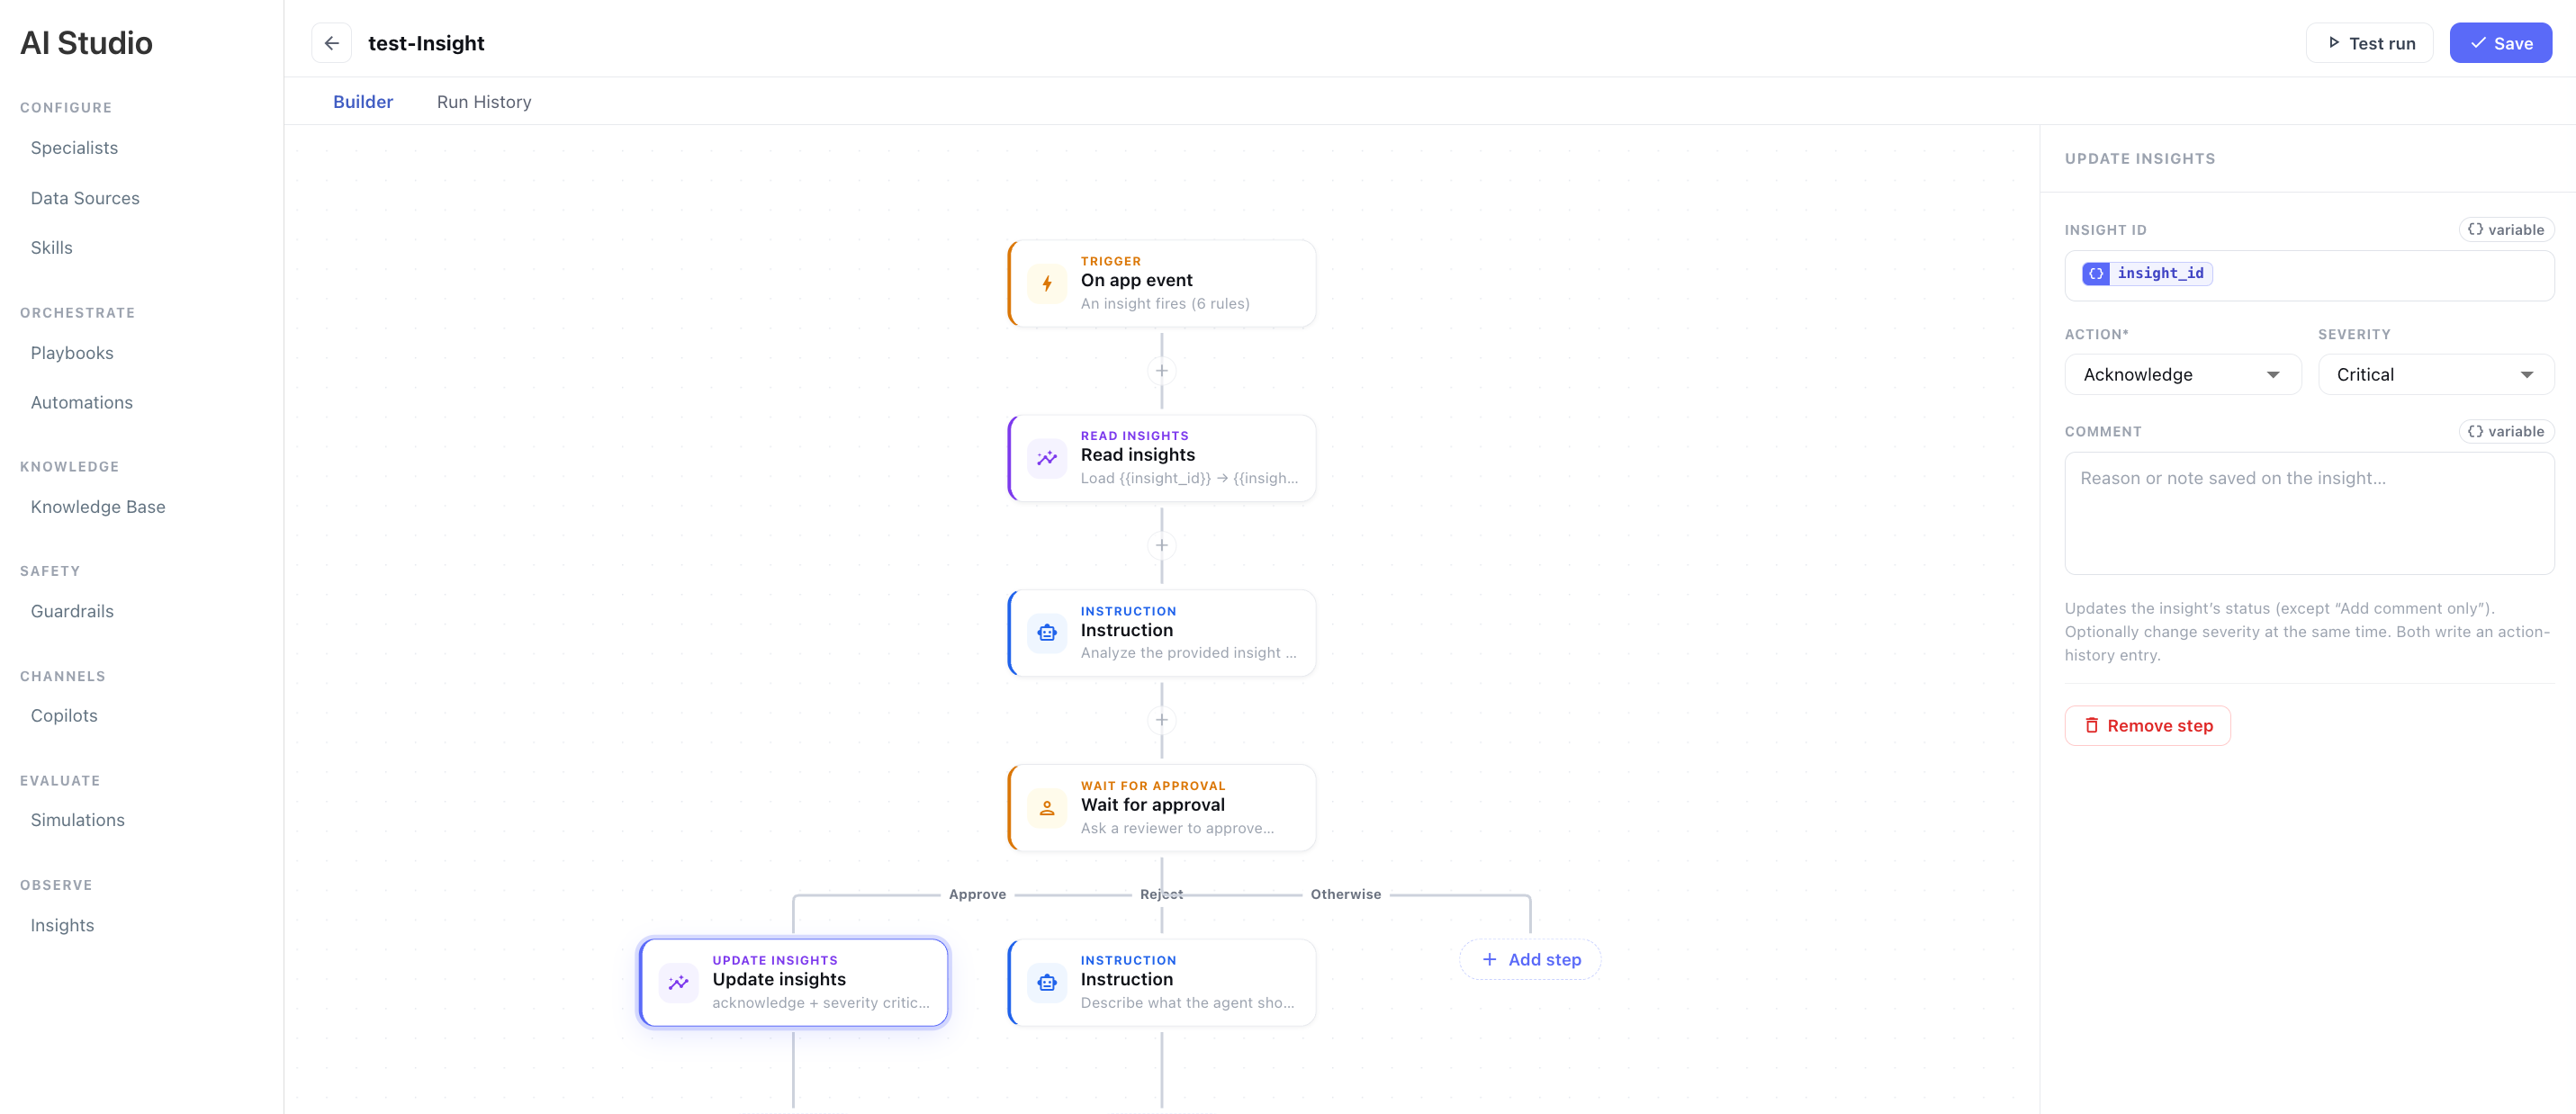
Add Wait for approval when a reviewer must approve the proposed Insight update. Under Assign to, select the roles or people who should receive the inbox notification.
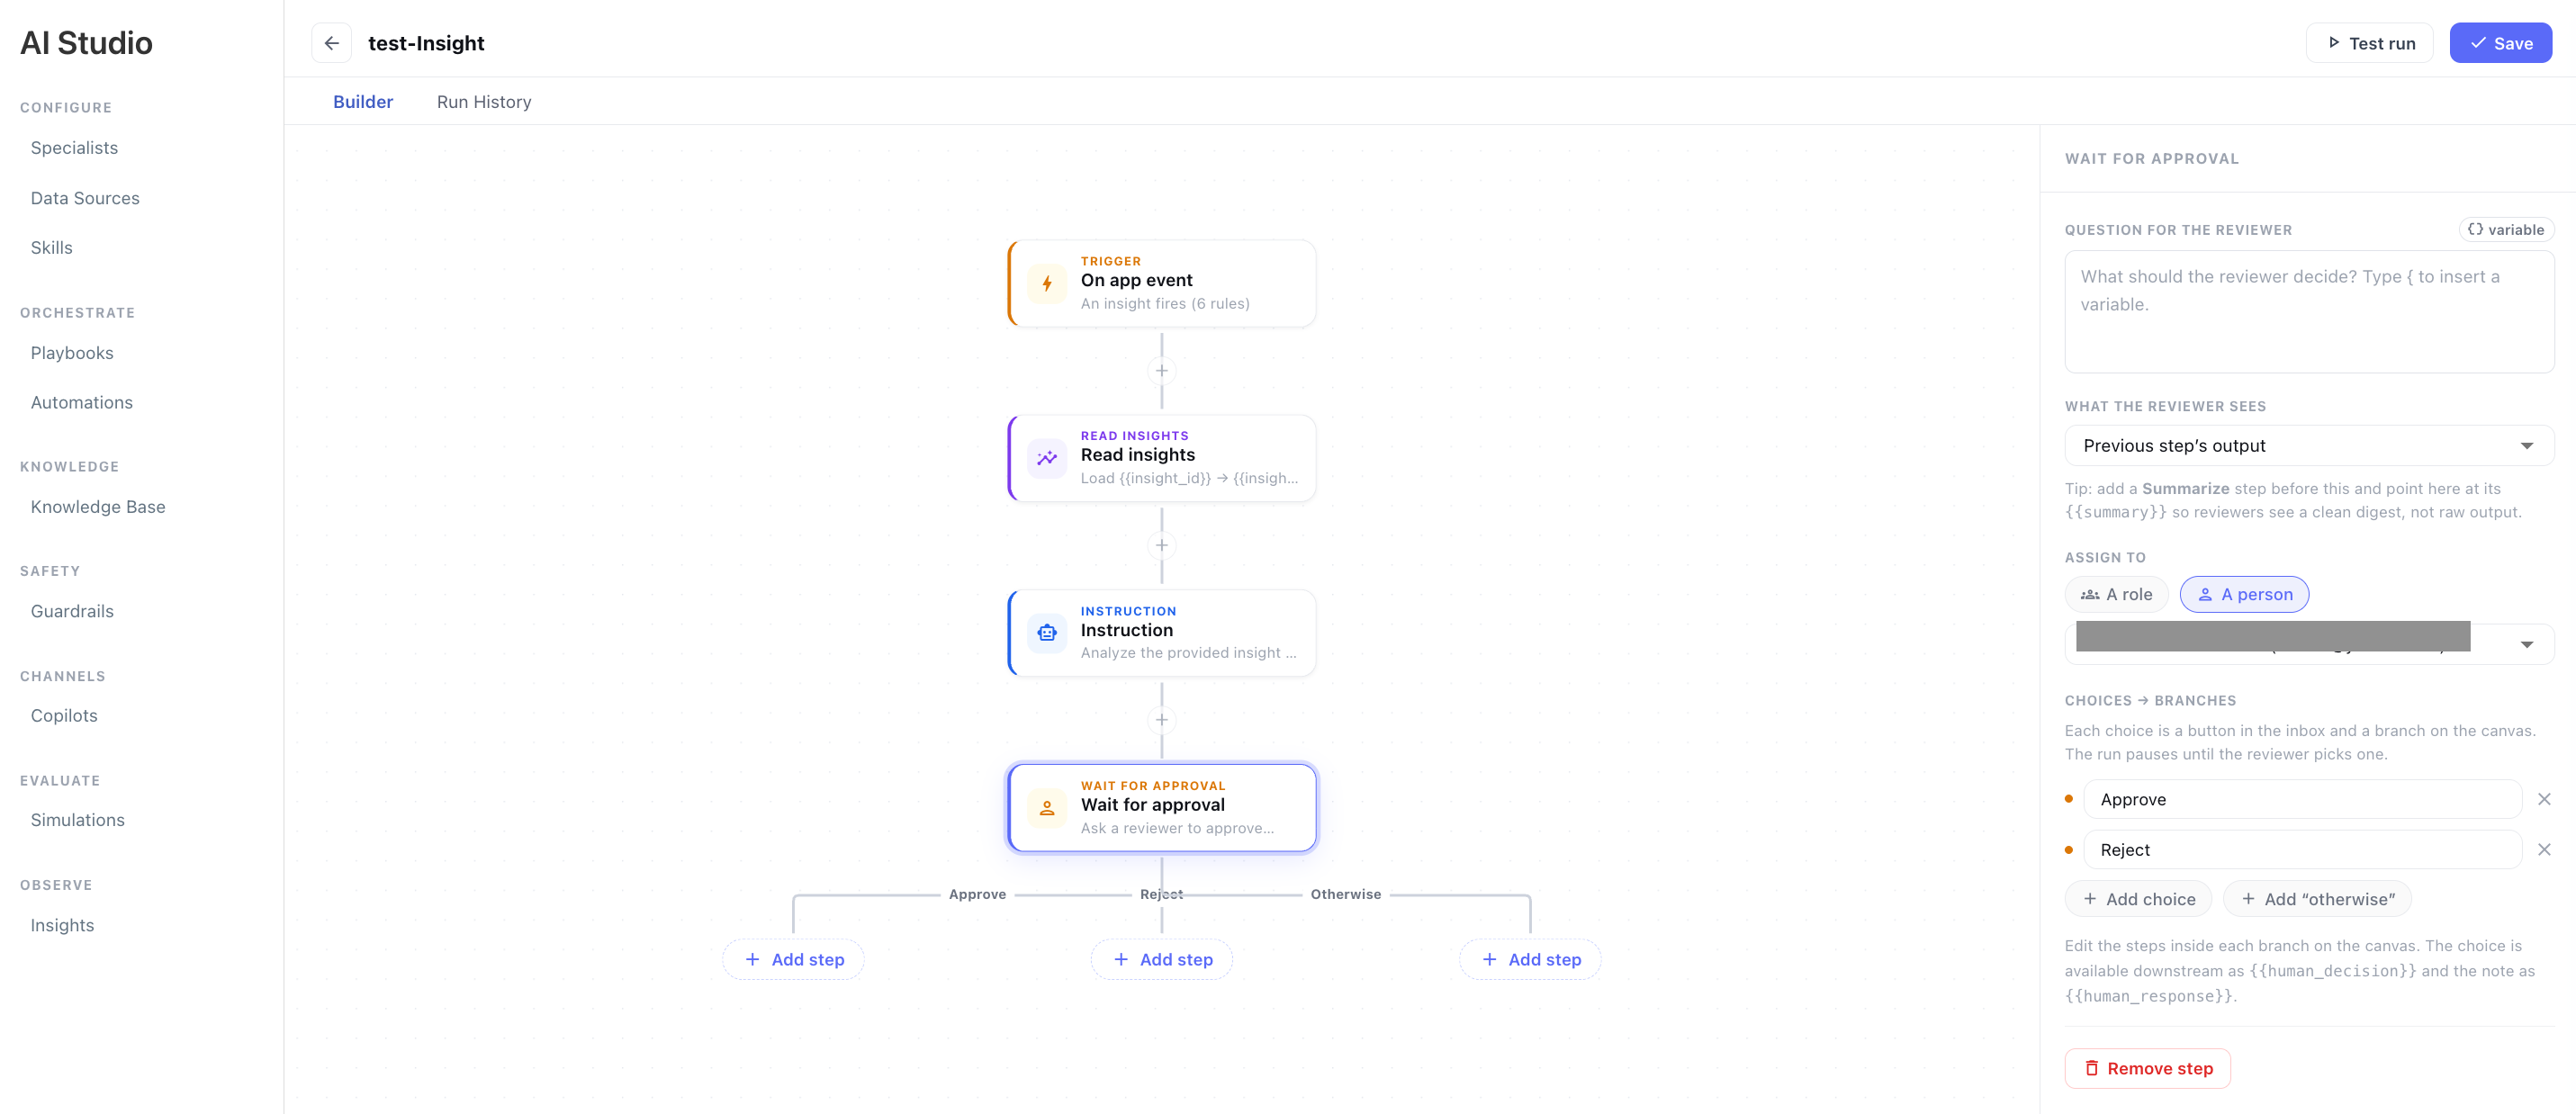
-
Add Update insights to acknowledge, resolve, or reopen the Insight, change its severity, or add a comment.
-
If needed, add a notification step to send the result through Email, Teams, or Slack to a channel, group, or individual recipient.
-
Click Save.
-
Use Test run if you want to validate the workflow before relying on it in production.
The automation runs only when the selected anomaly is triggered. If the Insight Rule does not fire, the automation does not start.
-
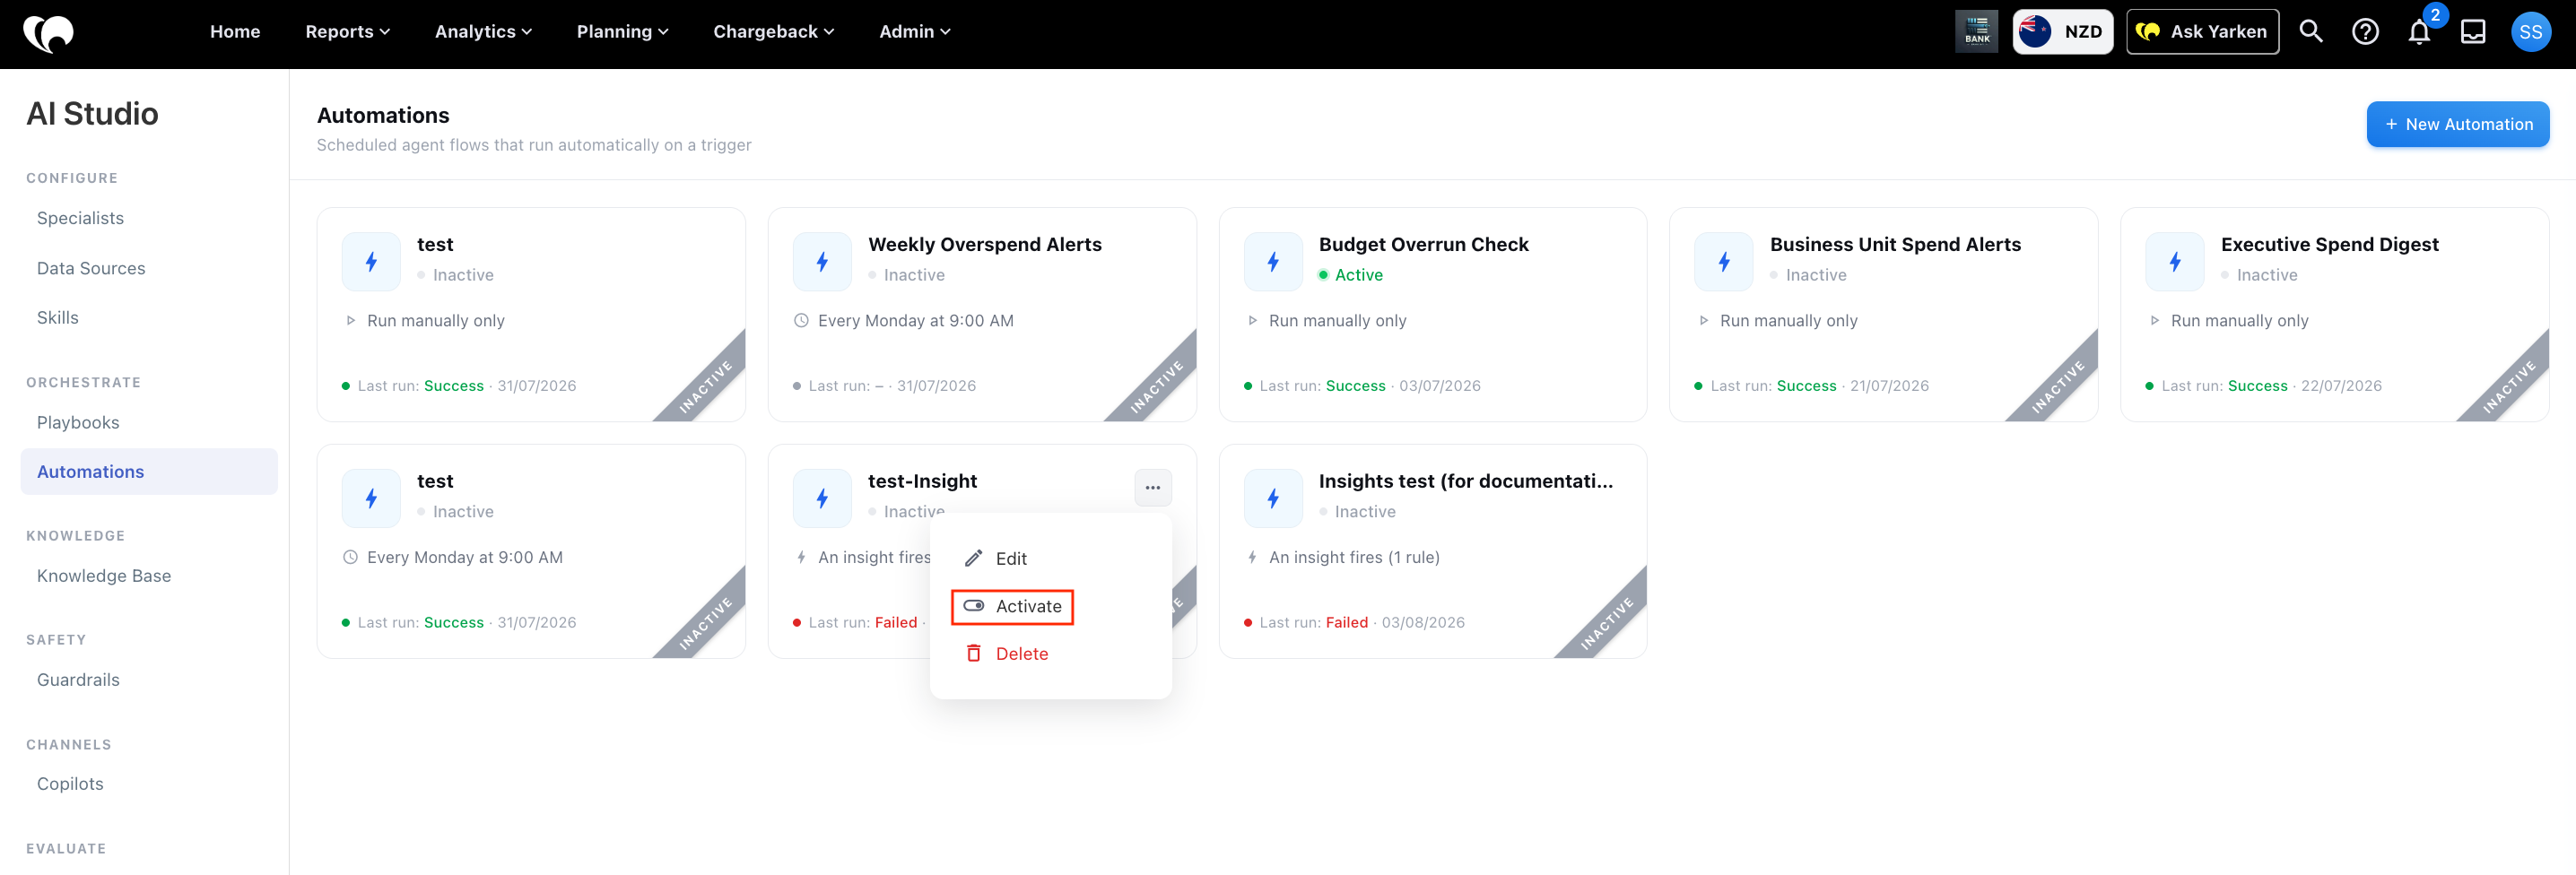
After testing the workflow successfully, select Activate. The automation does not respond to new Insight events while it is inactive.
Configure notification recipients
Before adding Notify, confirm where the result may be sent:
-
Yarken platform users are selected from User Management and receive email at the address associated with their account.
-
Administrator-configured distribution lists, notification groups, Microsoft Teams channels, and Slack channels can be selected where supported.
-
A manually entered individual email address requires Enable Specific Email Recipients to be enabled under Admin > Settings > AI > Automations.
-
When specific recipients are enabled, the email domain must be permitted by Allowed Domains for Automation Notifications. The yarken.com domain remains allowed when additional domains are listed.
Enable Specific Email Recipients is disabled by default. Keep the default unless the organization has approved individual-email Automation delivery.
For the full recipient and domain procedure, see AI Studio - Automations.
For channel and distribution-group setup, see Notification Channels (Admin Settings).
Configure the Insight workflow steps
Use Read insights to load the Insight context into the automation. Add Wait for approval when a reviewer must approve a proposed change. Use Update insights to apply the approved action.
Read insights
The Read insights step retrieves the Insight generated by the trigger and makes its details available to later steps.
Configure the following fields:
|
Field |
Description |
|---|---|
|
Insight ID |
The ID of the Insight to retrieve. For An Insight fires triggers, Yarken supplies |
|
Store as variable |
The name used to reference the retrieved Insight in later steps. The default is |
Later steps can reference fields from the stored Insight. For example:
-
{{insight.summary}} -
{{insight.severity}}
Use these fields in instructions, conditions, approval requests, comments, and notifications.
Wait for approval
Add Wait for approval when a person should review the analysis or proposed update before the automation changes the Insight.
Configure the following fields:
|
Field |
Description |
|---|---|
|
Question for the reviewer |
The decision the reviewer needs to make. You can insert variables from earlier steps. |
|
What the reviewer sees |
The Insight context, analysis, recommendation, or summary required for the decision. |
|
Assign to |
The roles or people who should receive the approval request. |
|
Choices |
The responses available to the reviewer. Each choice creates a separate workflow branch. |
Under Assign to, you can select:
-
One or more roles, such as Budget Owner, Cost Centre Owner, FinOps Admin, or Cloud Administrator
-
One or more people, selected by name or email address
The selected reviewers receive an inbox notification. The automation pauses until someone responds.
The selected choice is available to later steps as {{human_decision}}. Any note entered by the reviewer is available as {{human_response}}.
Use these variables to control branches or add the reviewer’s decision to the Insight history.
Update insights
Use Update insights to change the Insight after the required analysis or approval is complete.
Configure the following fields:
|
Field |
Description |
|---|---|
|
Insight ID |
The Insight to update. For an Insight-triggered automation, use |
|
Action |
Select Acknowledge, Resolve, Reopen, or Add comment only. |
|
Severity |
Select Low, Medium, High, or Critical. Select No change to retain the current severity. |
|
Comment |
Add a reason, analysis summary, reviewer response, or other note to the Insight history. Variables can be inserted. |
The available actions are:
|
Action |
Result |
|---|---|
|
Acknowledge |
Marks the Insight as acknowledged. |
|
Resolve |
Marks the Insight as resolved. |
|
Reopen |
Returns the Insight to active review. |
|
Add comment only |
Adds a history entry without changing the status. |
You can change the severity while performing a status action. Both status and comment updates create entries in the Insight history.
Example workflow
A common setup follows this flow:
On app event → Read insights → Instruction → Wait for approval → Update insights → Notify
Example scenario: A cloud cost anomaly triggers the automation. The automation reads the Insight and asks a Specialist to analyze the likely cause. It then sends the proposed severity or status change to a FinOps Admin or Cloud Administrator for approval. If approved, Update insights applies the change and records the analysis or reviewer note as a comment. The final outcome is sent to the selected notification channel.
Writing effective instructions
-
Be specific about the outcome you want.
-
Tell the automation whether it should only analyze the Insight or also update it.
-
Use
@mentions to bring in the right specialist, skill, or tool. -
Ask for a concise summary if the result will be posted to a notification channel.
-
Include approval logic when the action could affect operations or customer communication.
What users will see in Insights
When an automation updates an Insight, the action appears in the Insight Timeline with the label Performed by automation. This makes automated changes visible to users reviewing the incident history.
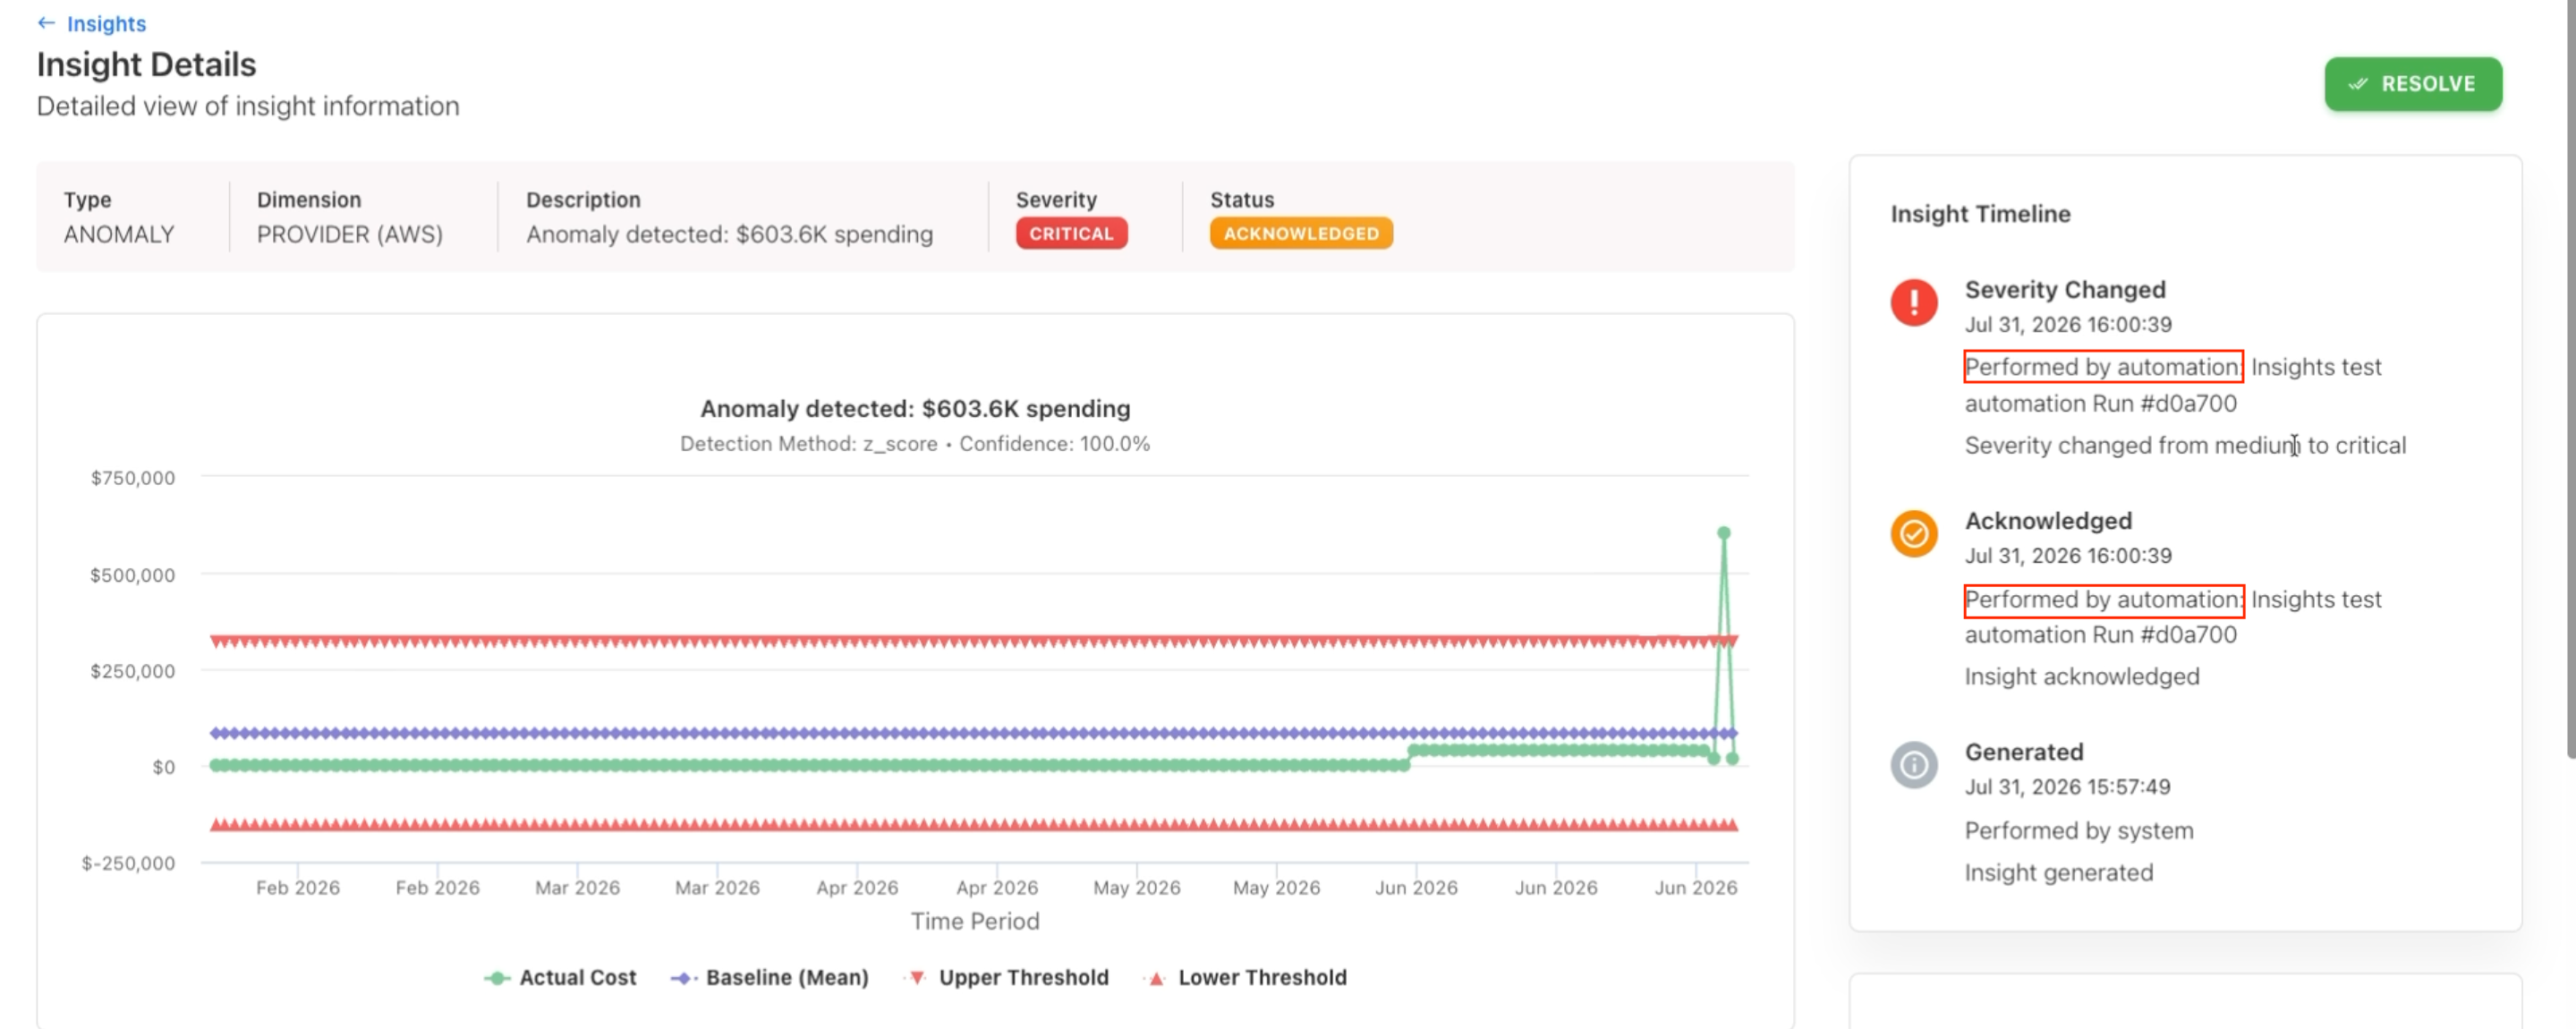
The automation output can also be viewed in JSON format within the Automation screen, which is useful for validation and troubleshooting.
-20260804-103808.png?cb=7e03b905a3688e78c4dc3ae07d6a998c)
Best practices
-
Start with a test workflow for one Insight Rule before expanding to multiple rules.
-
Use approval steps for actions that change ownership, severity, or customer-facing communication.
-
Keep instructions focused and easy to evaluate.
-
Send notifications only to approved Yarken users, administrator-configured destinations, or specifically allowed email domains.
-
Review the JSON output during testing to confirm the workflow is using the expected context.
A well-designed automation can reduce triage time, improve consistency, and help teams respond faster to important anomalies.
Related content