
General prerequisites
These apply to all Cloud Storage Pipelines:
-
You must have the admin rights within the application to create and manage pipelines.
-
The data you plan to import must follow a supported format, such as CSV, GZ, or Parquet.
-
The data mapping templates should be define. For more information about the data mapping template, refer Data Mapping Templates.
-
Required Connections must be configured in advance for the selected cloud storage or API source. For more information on how to configure Cloud Storage connection, refer Creating a new Pipeline Connection | Create Cloud Storage Connection (manual only).
Create a Cloud Storage Pipeline
Cloud Storage Pipelines allow you to automatically fetch usage and billing files from cloud object storage and import them into the application. During setup, you select the storage provider, configure access, choose a data mapping template, define the schedule, and assign a pipeline name. Once created, the pipeline runs automatically based on the configured frequency.
Azure Blob Storage
Prerequisites
Before creating an Azure Cloud Storage Pipeline, ensure you have:
-
A valid Azure Storage account with Blob Storage enabled.
-
An Azure connection configured in YäRKEN using:
-
Storage account name
-
Access key
-
-
Access to the container and folder path where usage files are stored.
-
Azure usage files available in Blob Storage, such as:
-
Azure Usage Details or
-
Azure Cost Management Export
-
-
A data mapping template to define how Azure file fields map to YäRKEN fields.
-
File location details, including container name and file path or naming convention.
Procedure
To create,
-
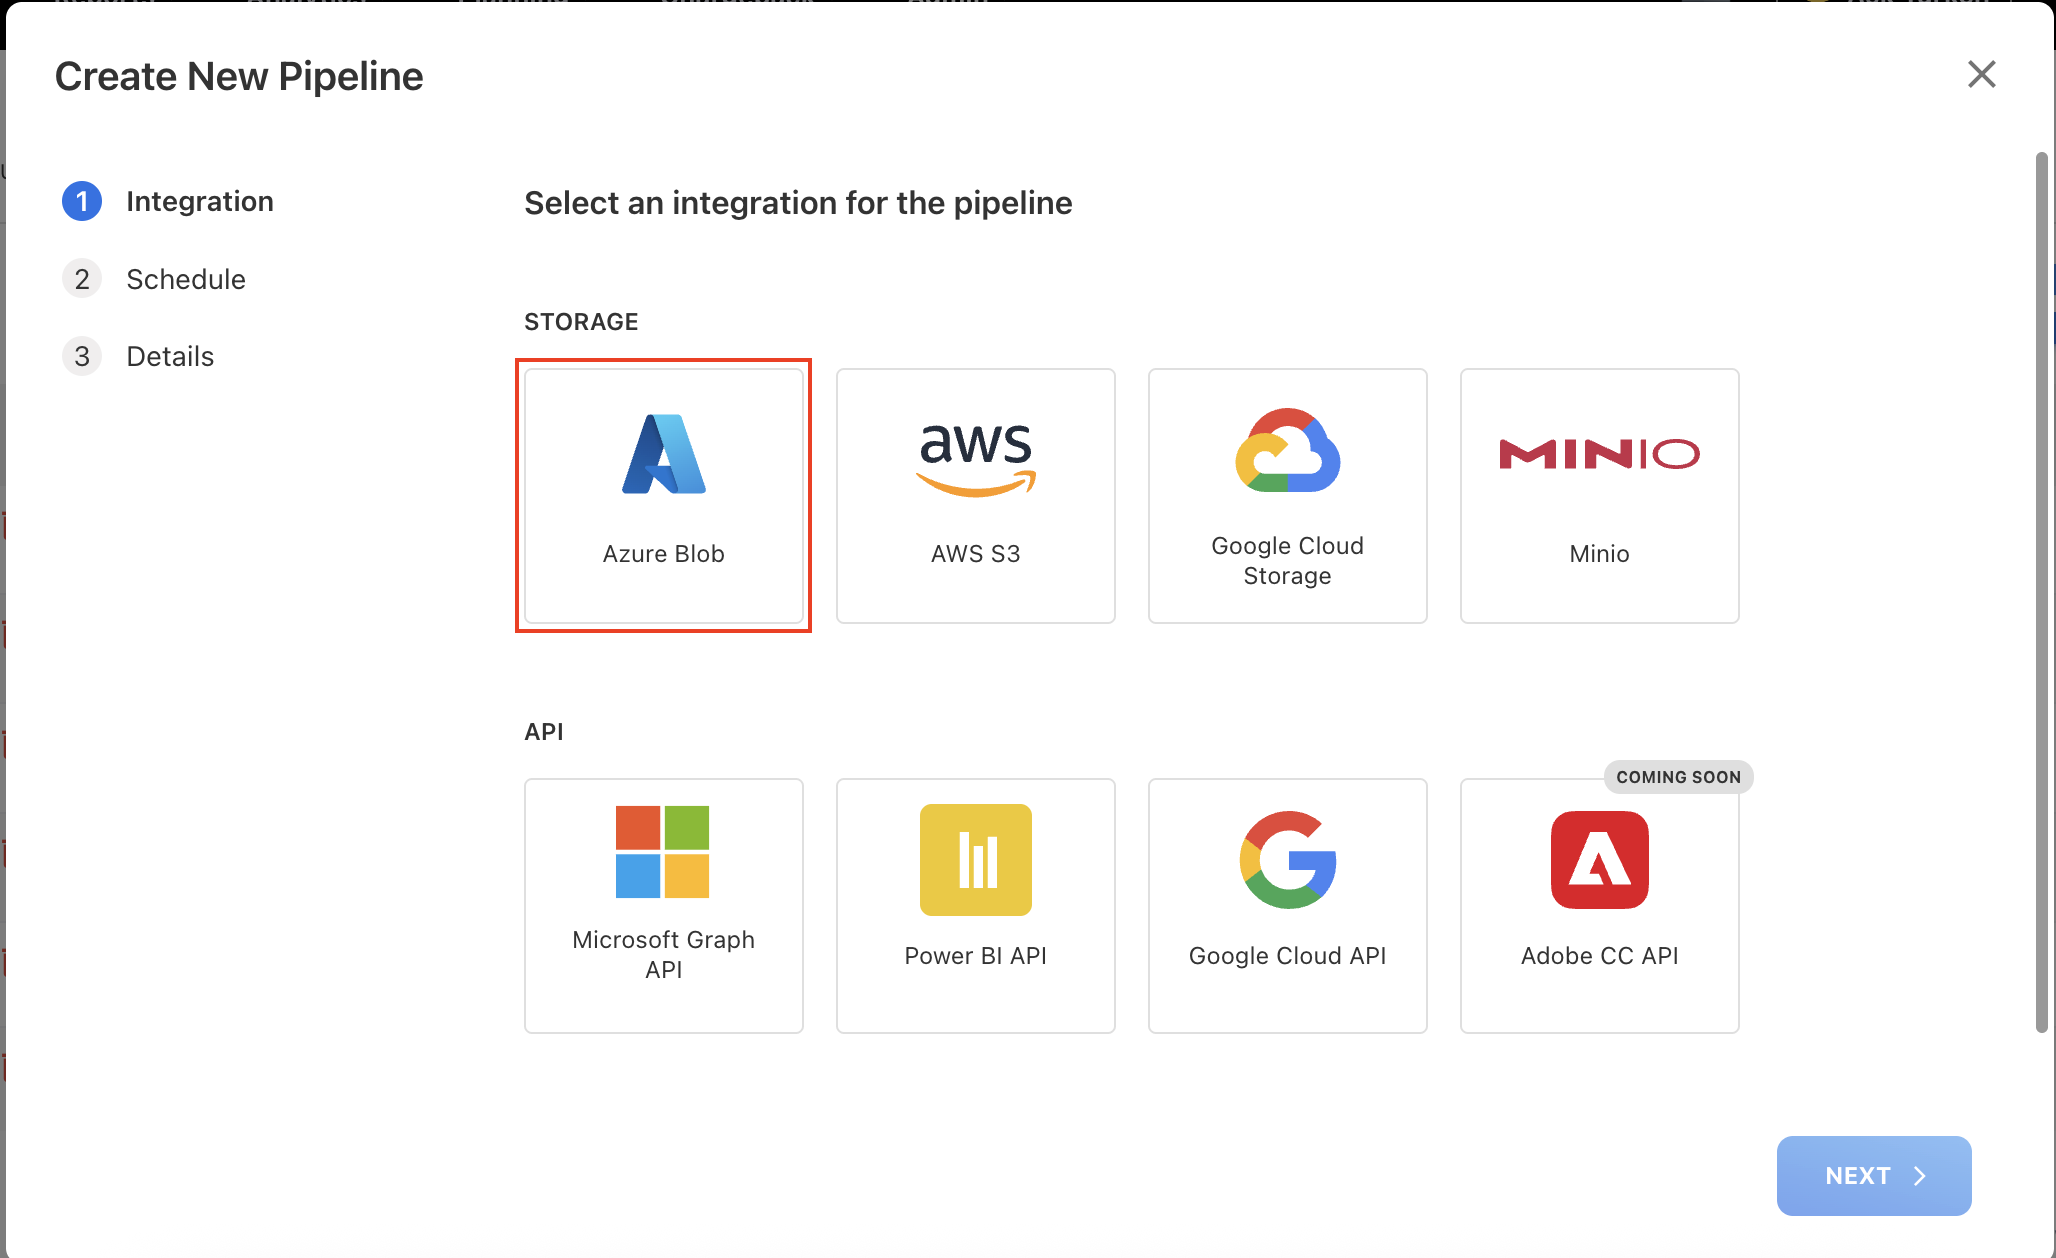
Navigate to Admin > Pipelines > Pipelines.
-
On the Pipelines page, click + NEW PIPELINE.
-
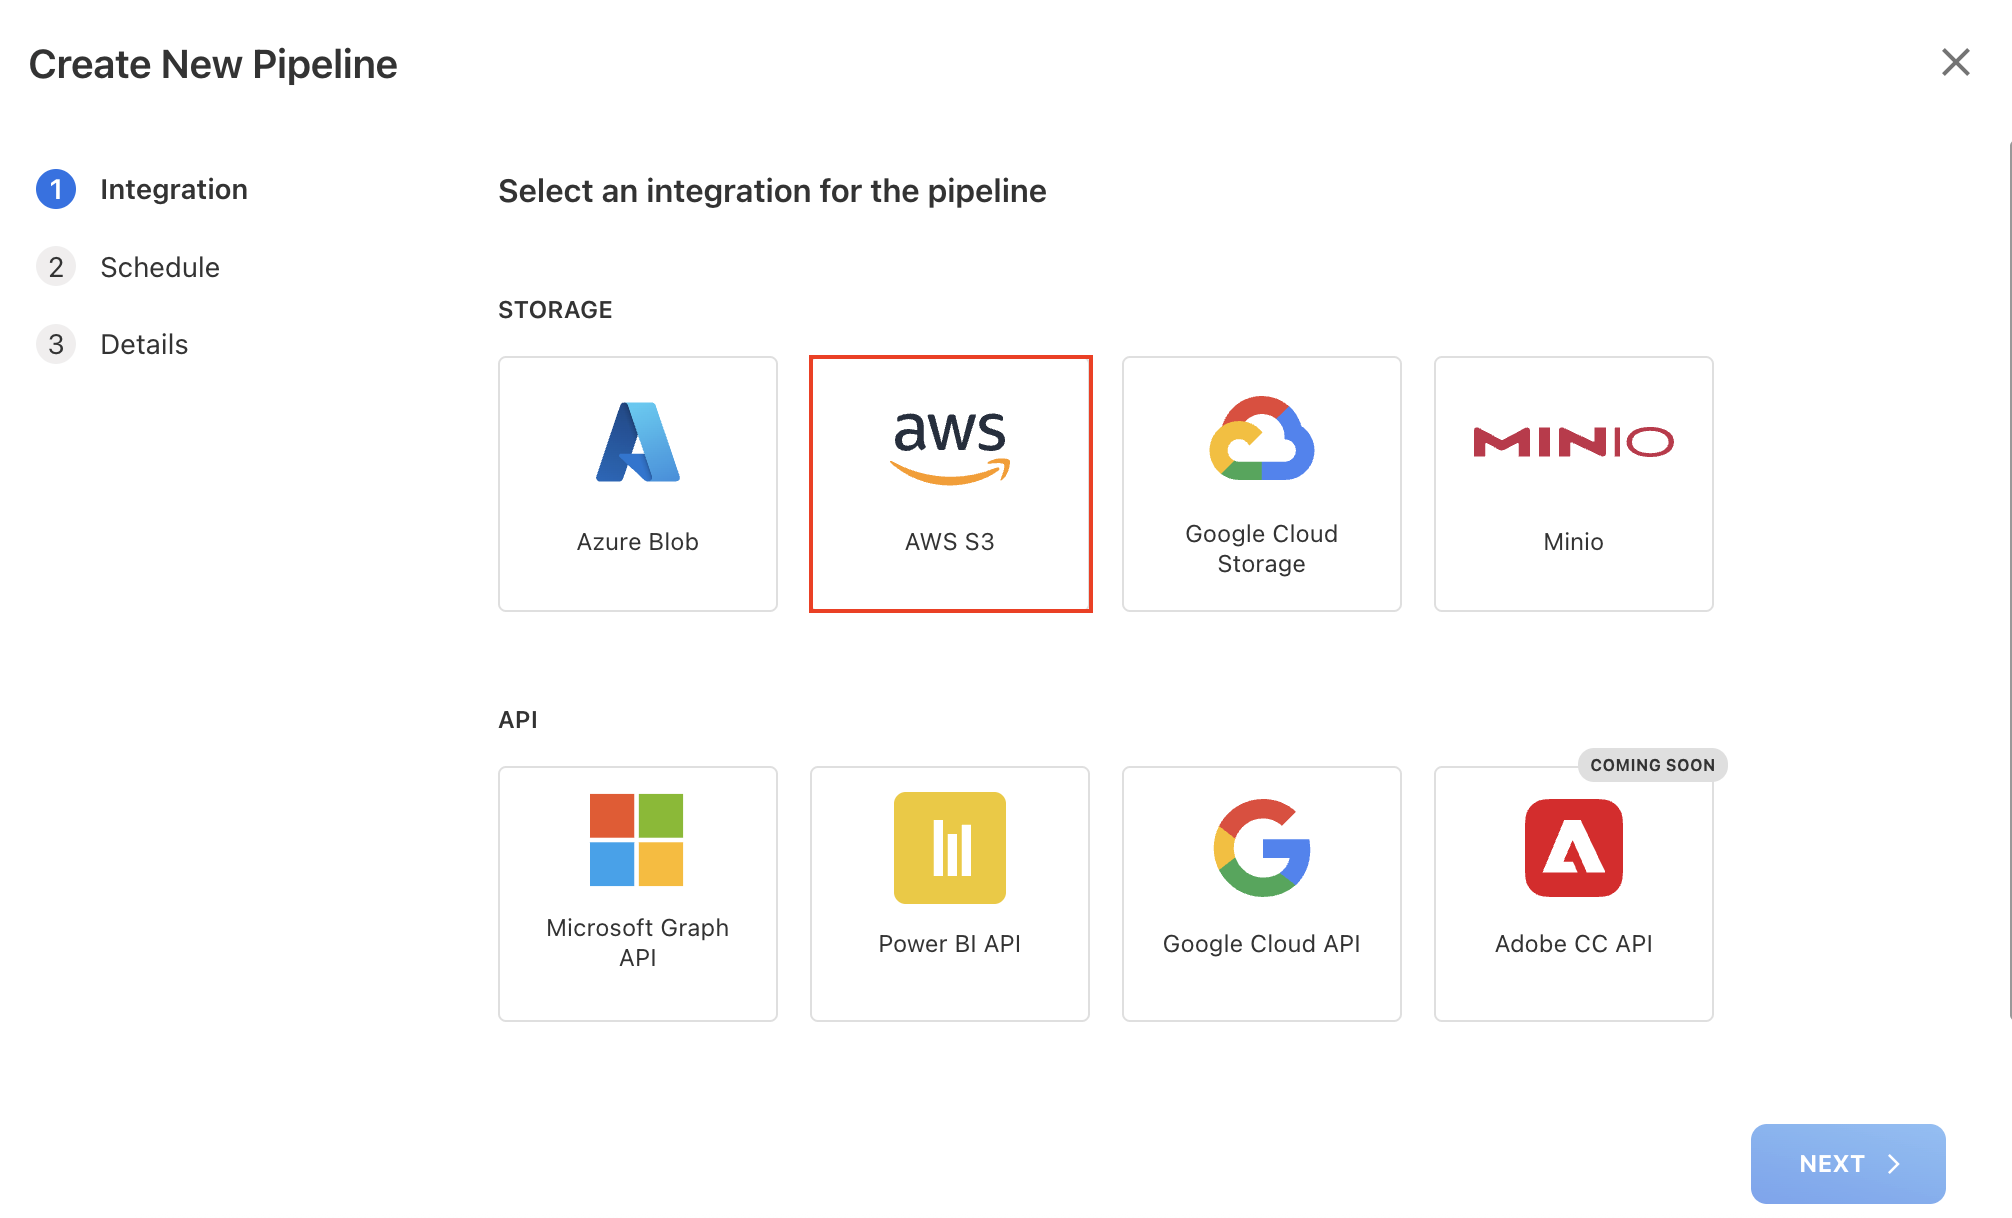
On the Create New Pipeline dialog box, choose the storage type as Azure Blob and click NEXT.
-
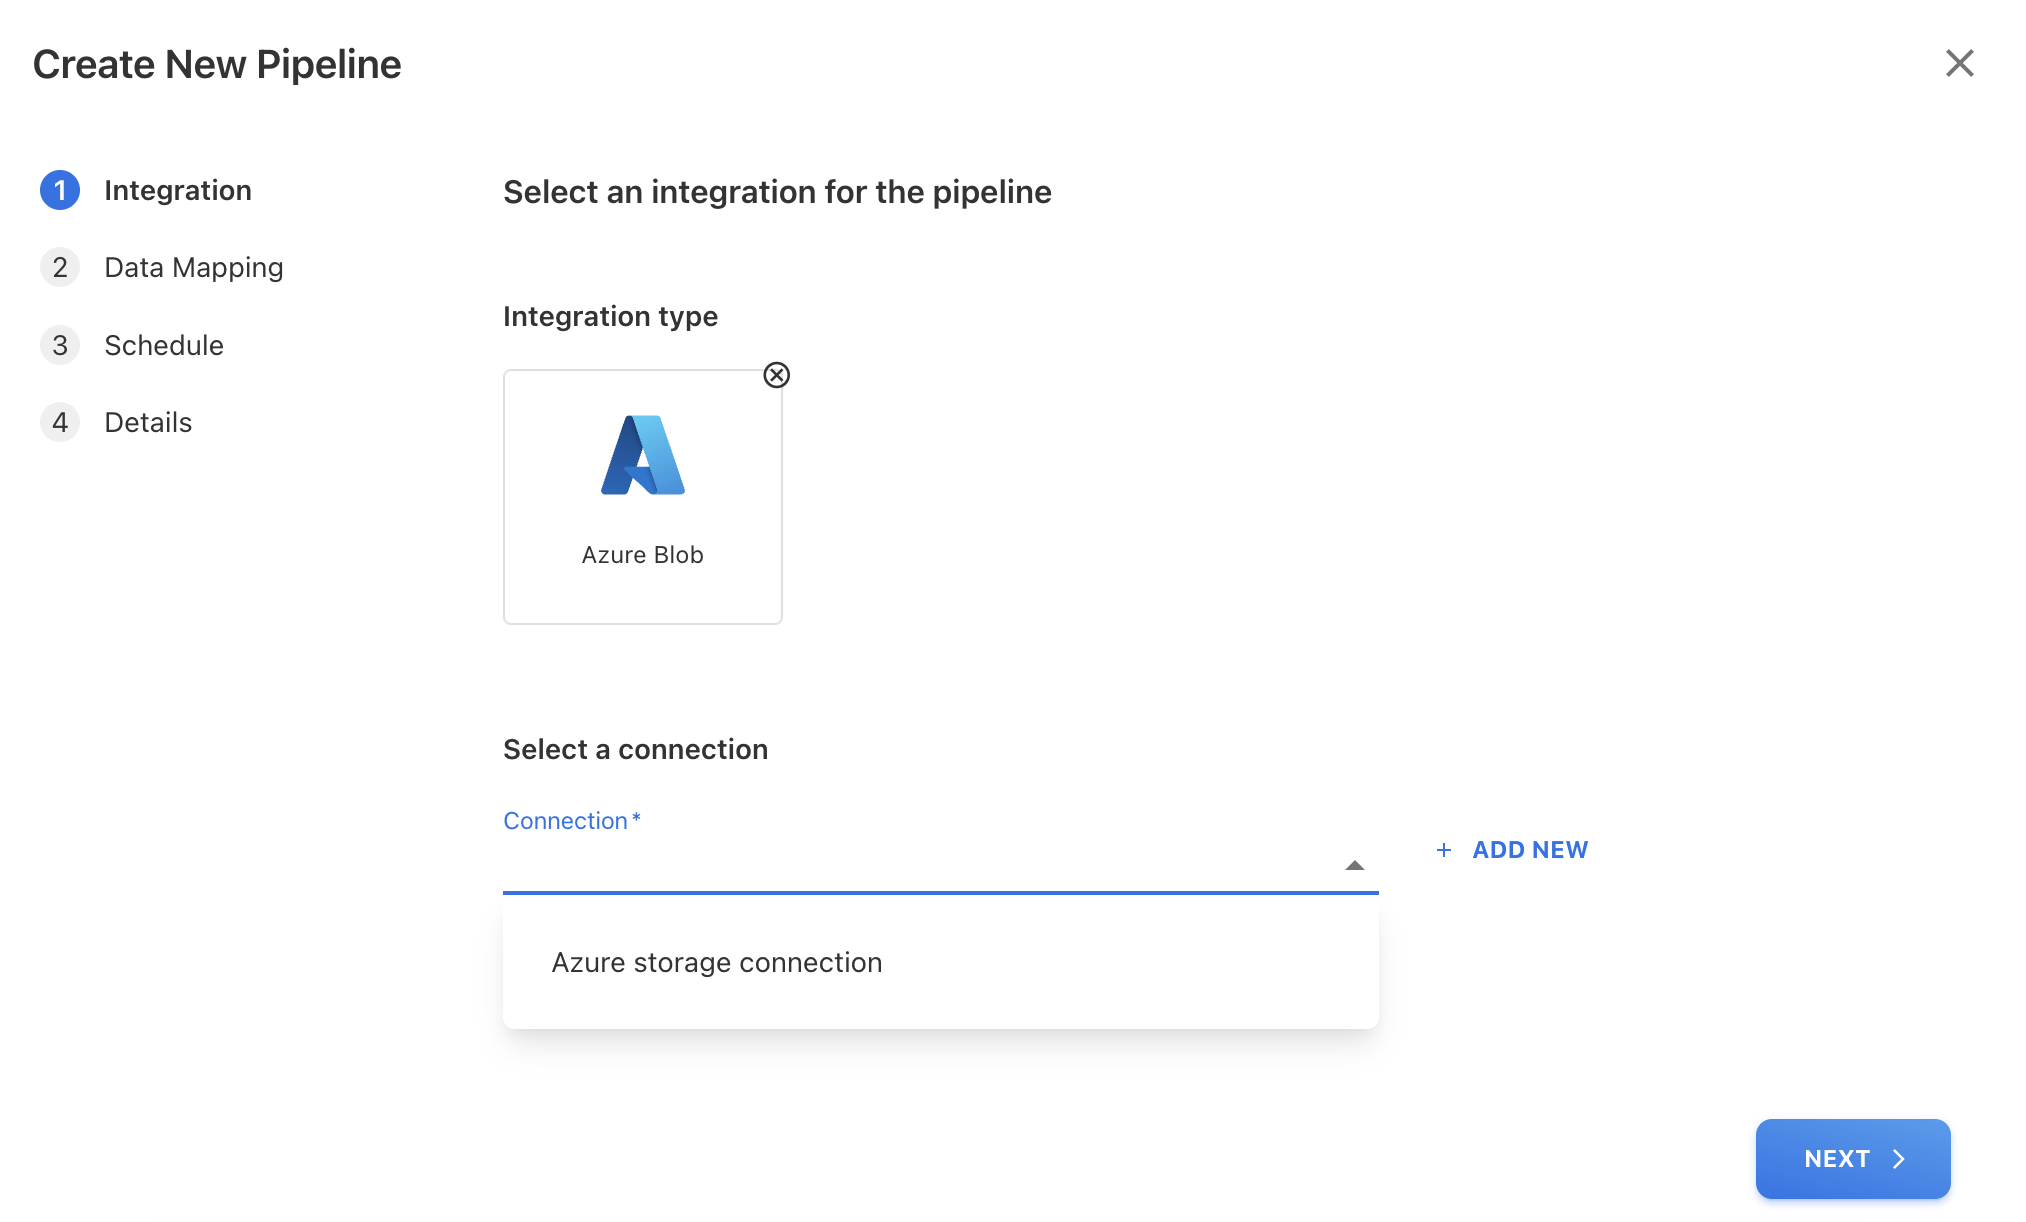
Select an existing configured Connection or create a new. For more information on how to configure a connection prior to creating the pipeline, refer Creating a new Pipeline Connection | Create Cloud Storage Connection (manual only).
-
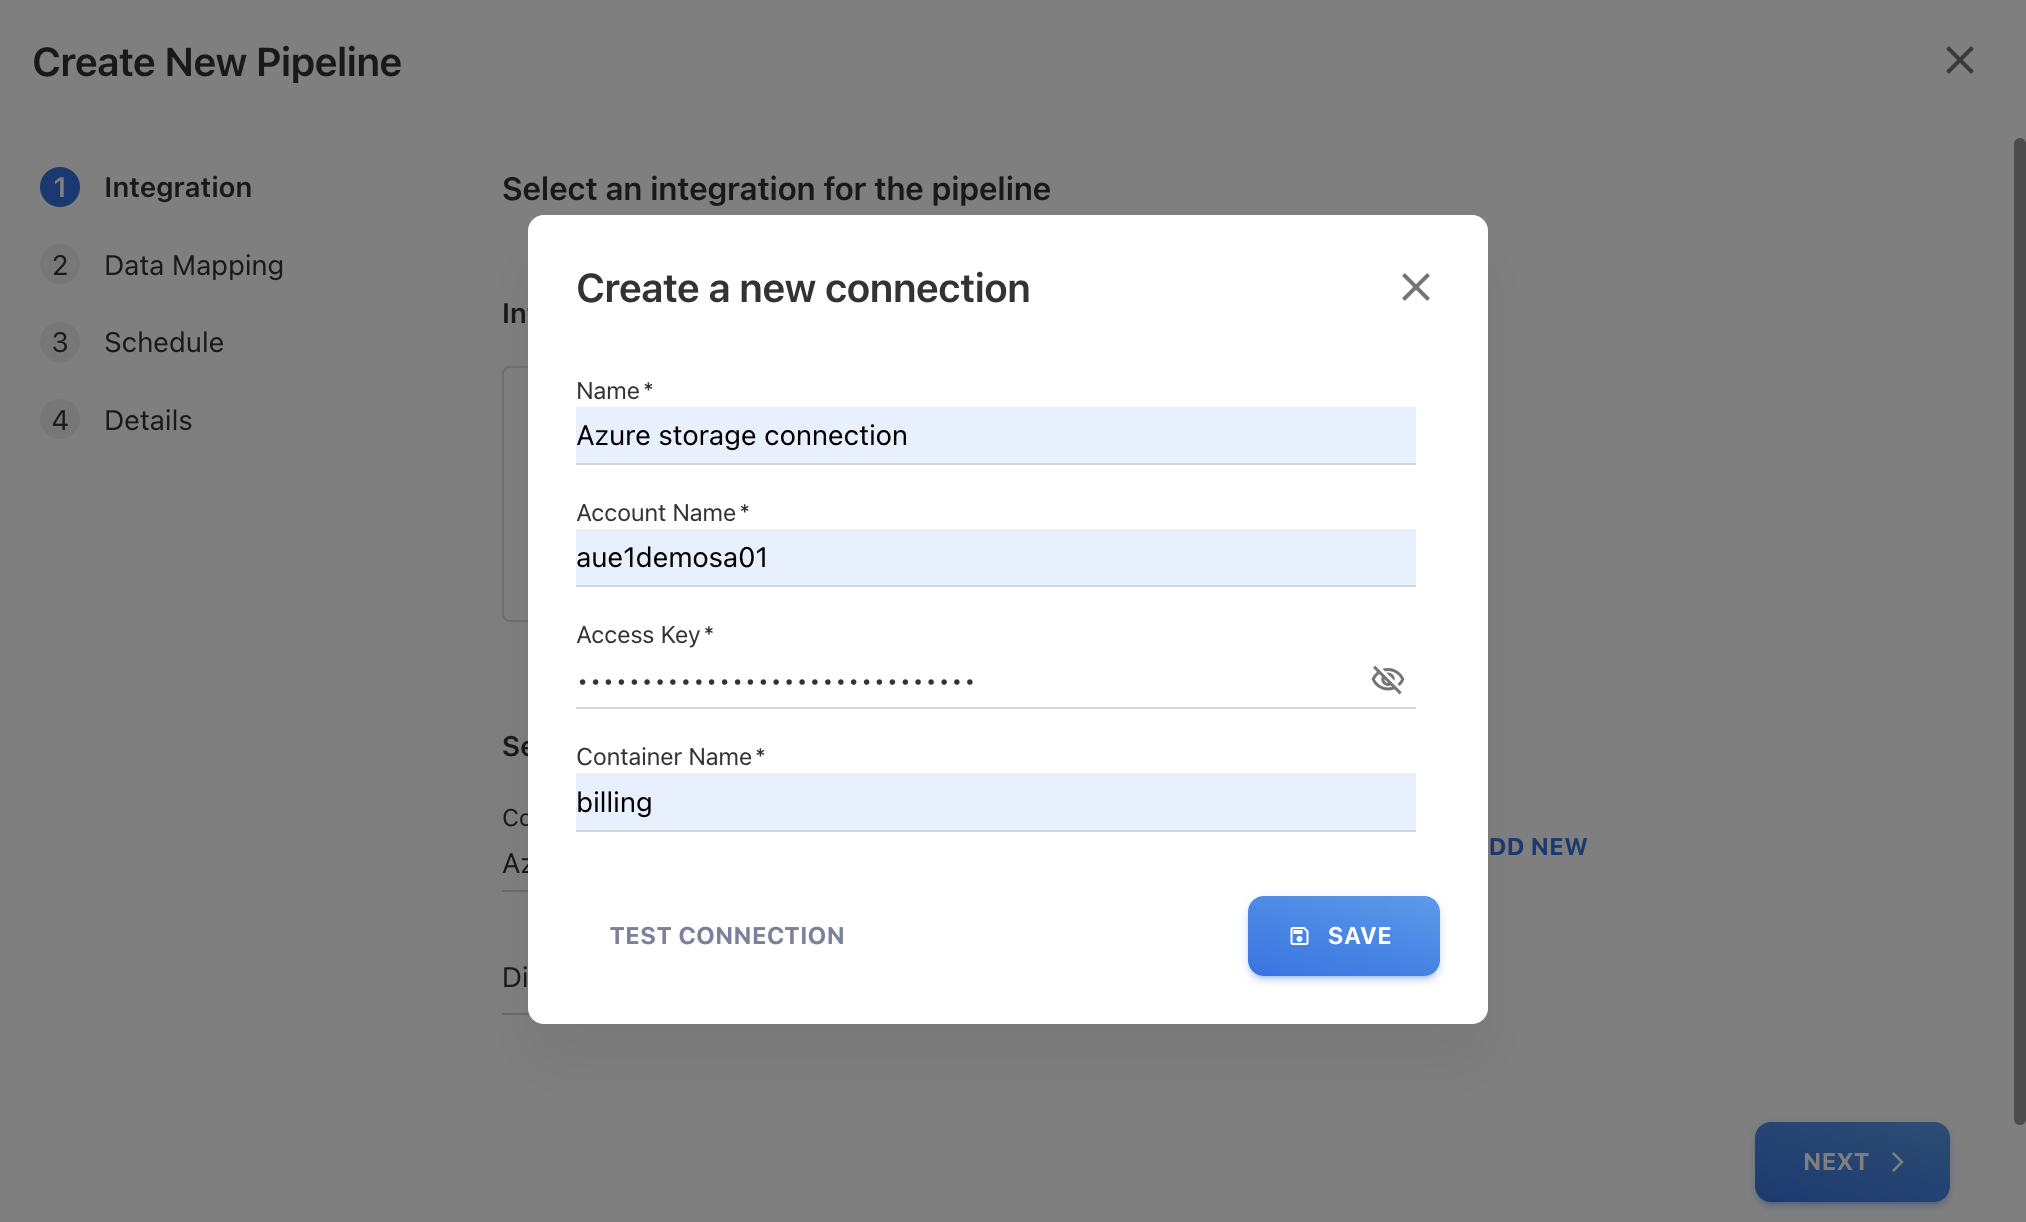
(Optional) To create a new connection, click + ADD NEW and enter the below details on Create a new connection dialog box:
-
Name: The name of the connection.
-
Account Name: The Azure Storage Account Name for accessing the storage container.
-
Access Key: The Azure Storage Account Access Key for accessing the storage account data.
-
Container Name: The name of the container within the Azure Storage Account where the exported files are stored, for example, billing.
-
Click SAVE.
-
-
-
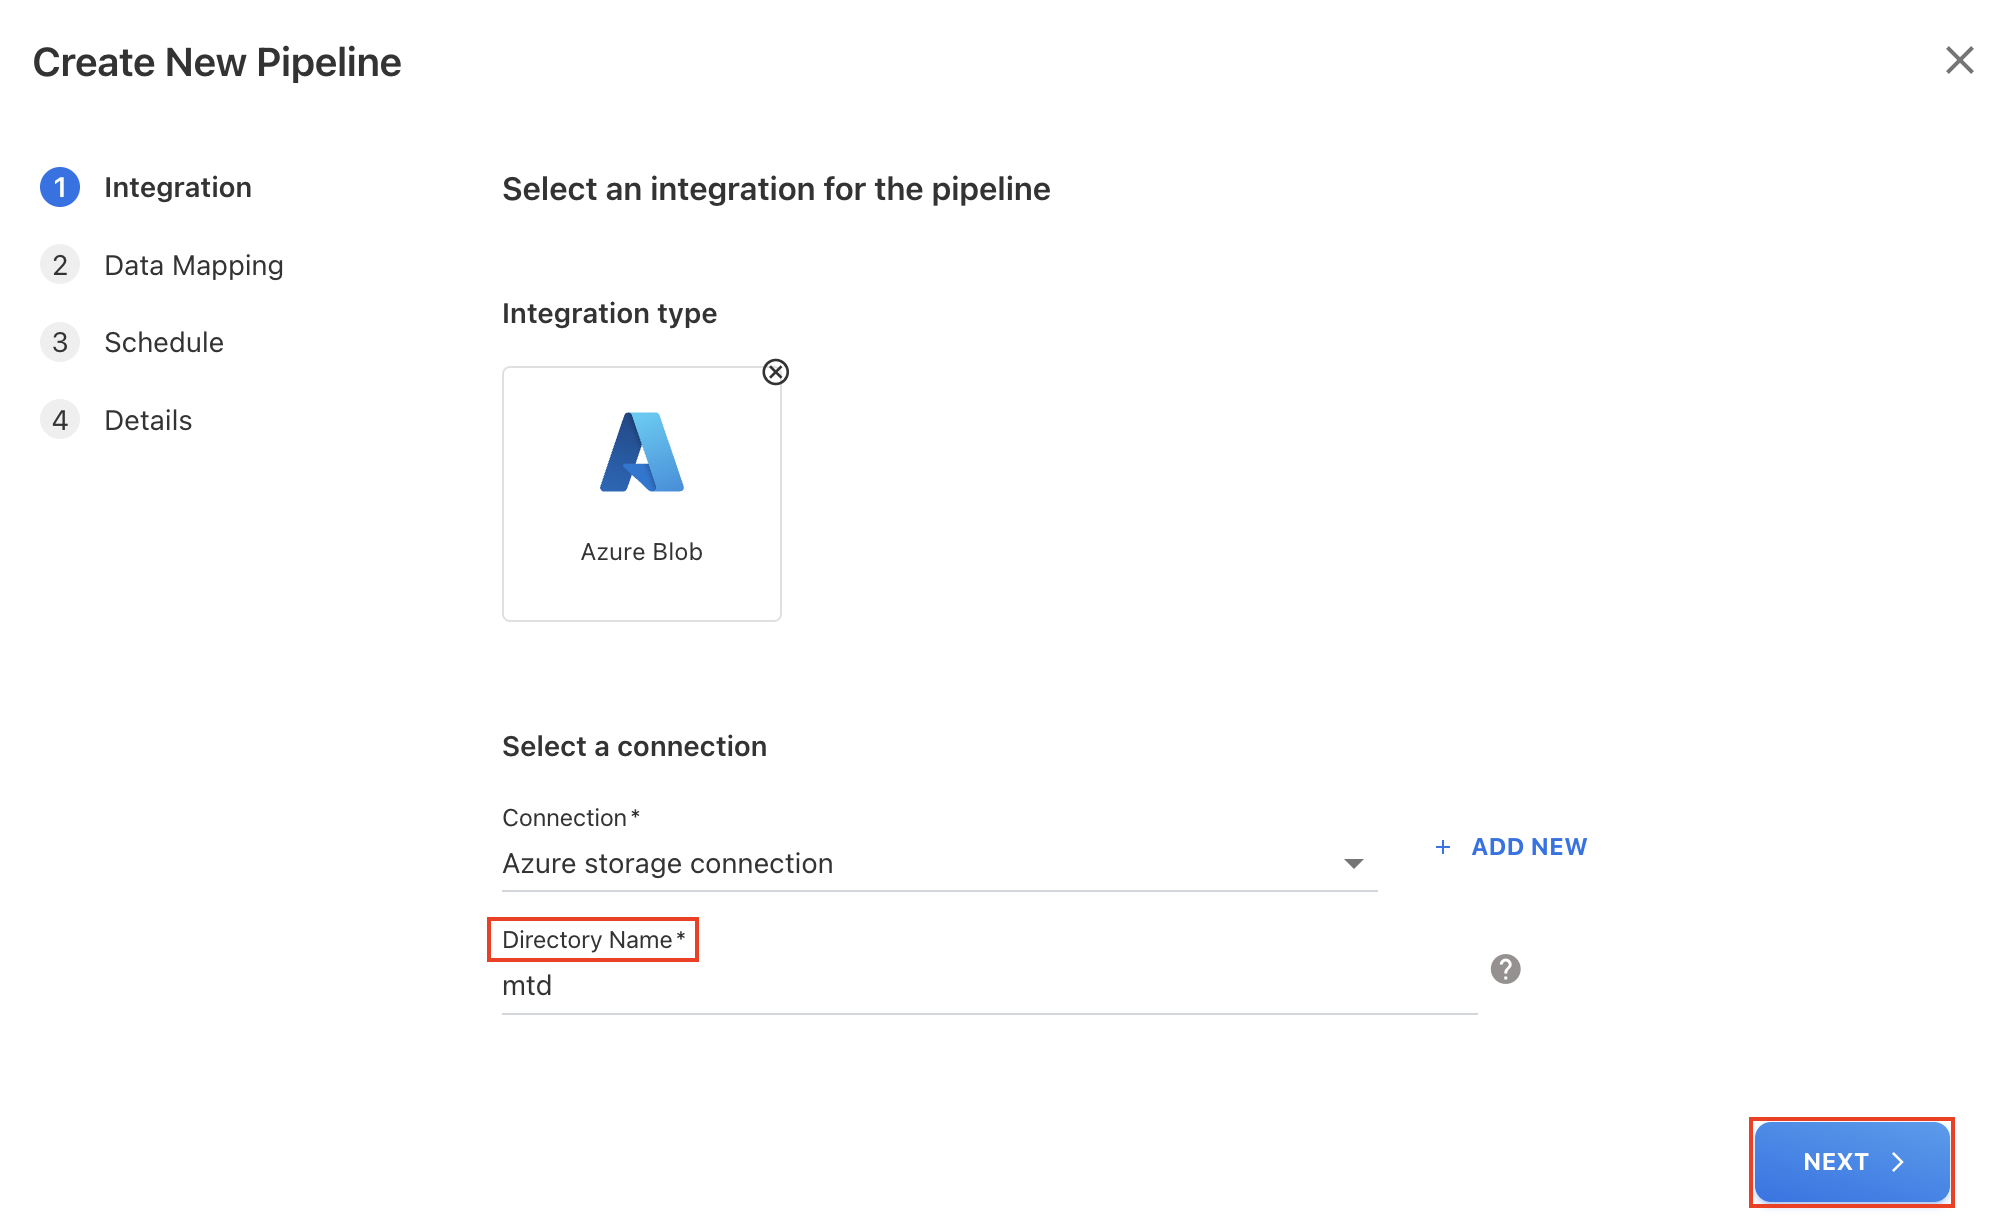
Enter a Directory Name from which you want to retrieve files and select NEXT.
-
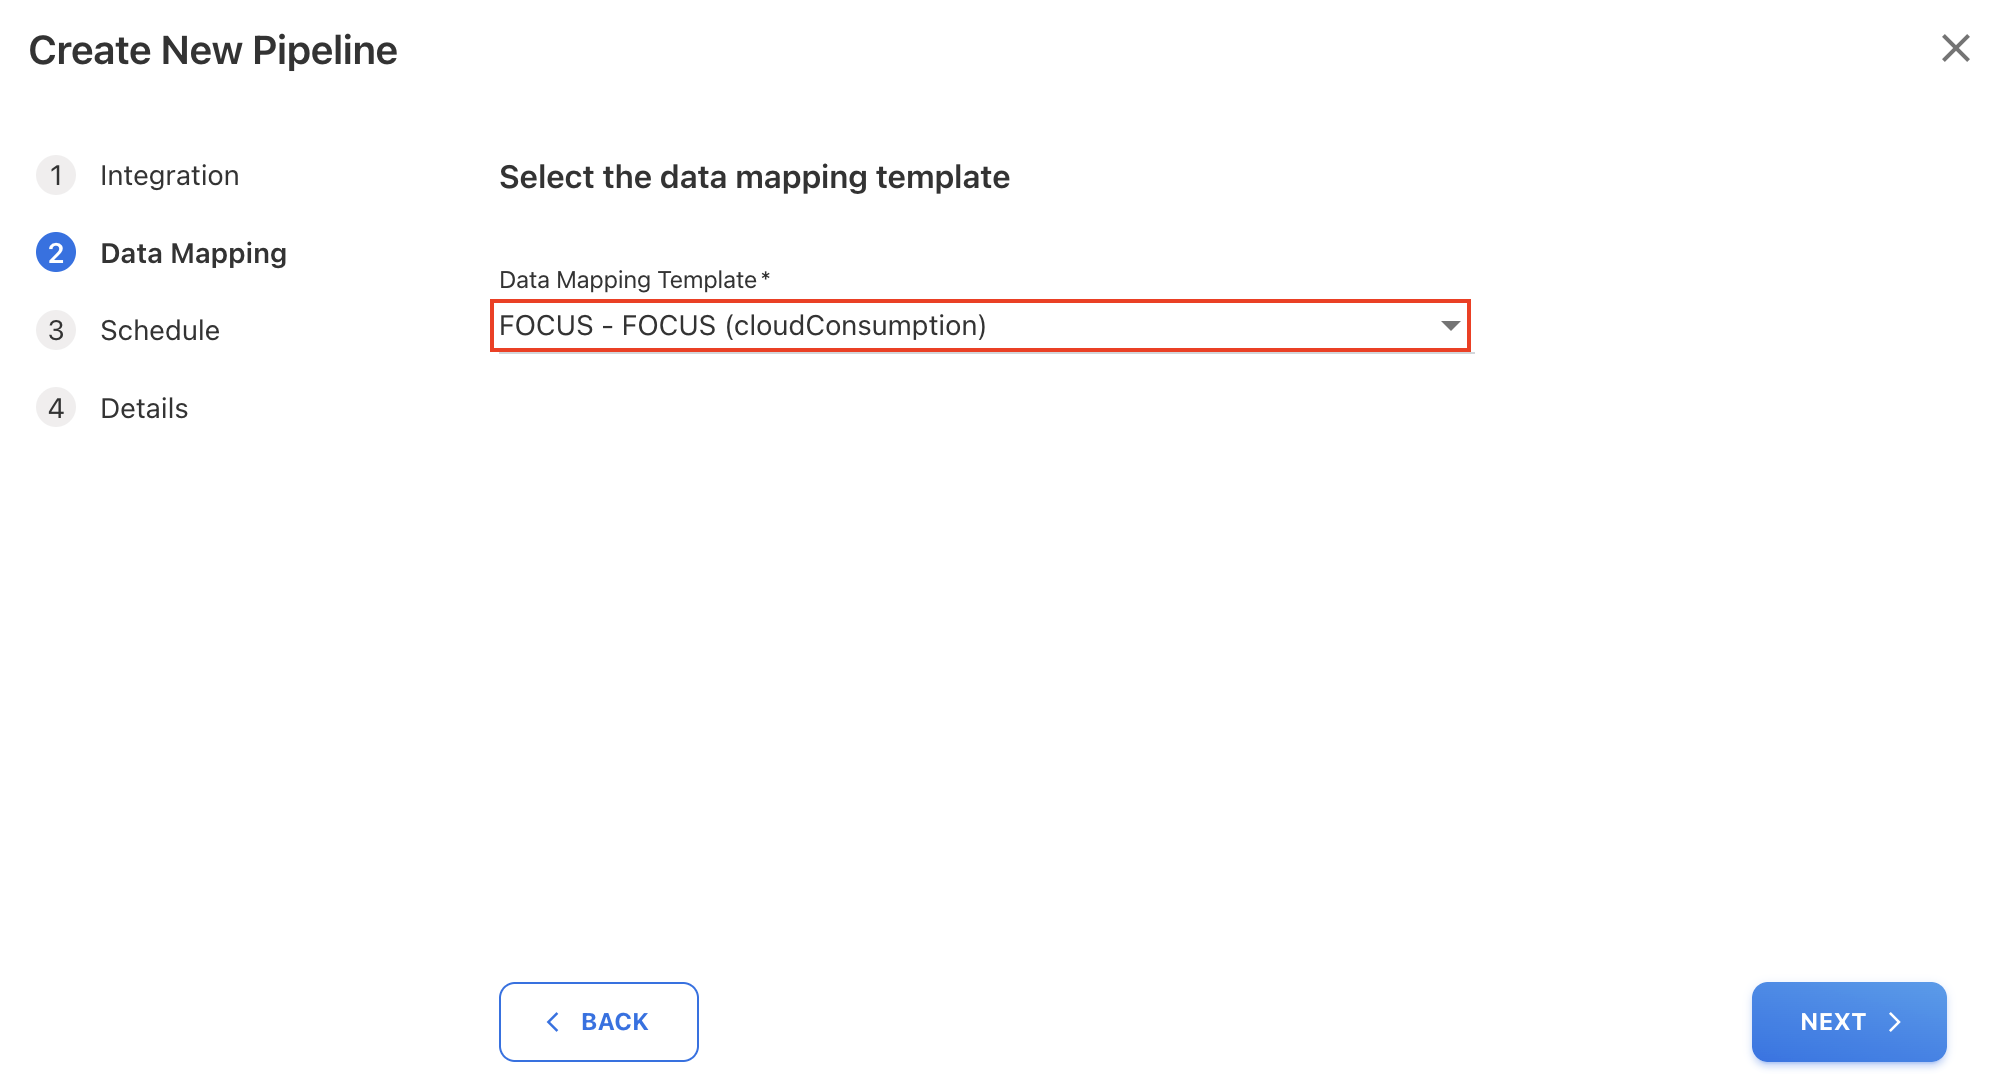
Select a Data Mapping Template from the dropdown list and click NEXT. For more information on Data Mapping Template, refer Data Mapping Templates.
-
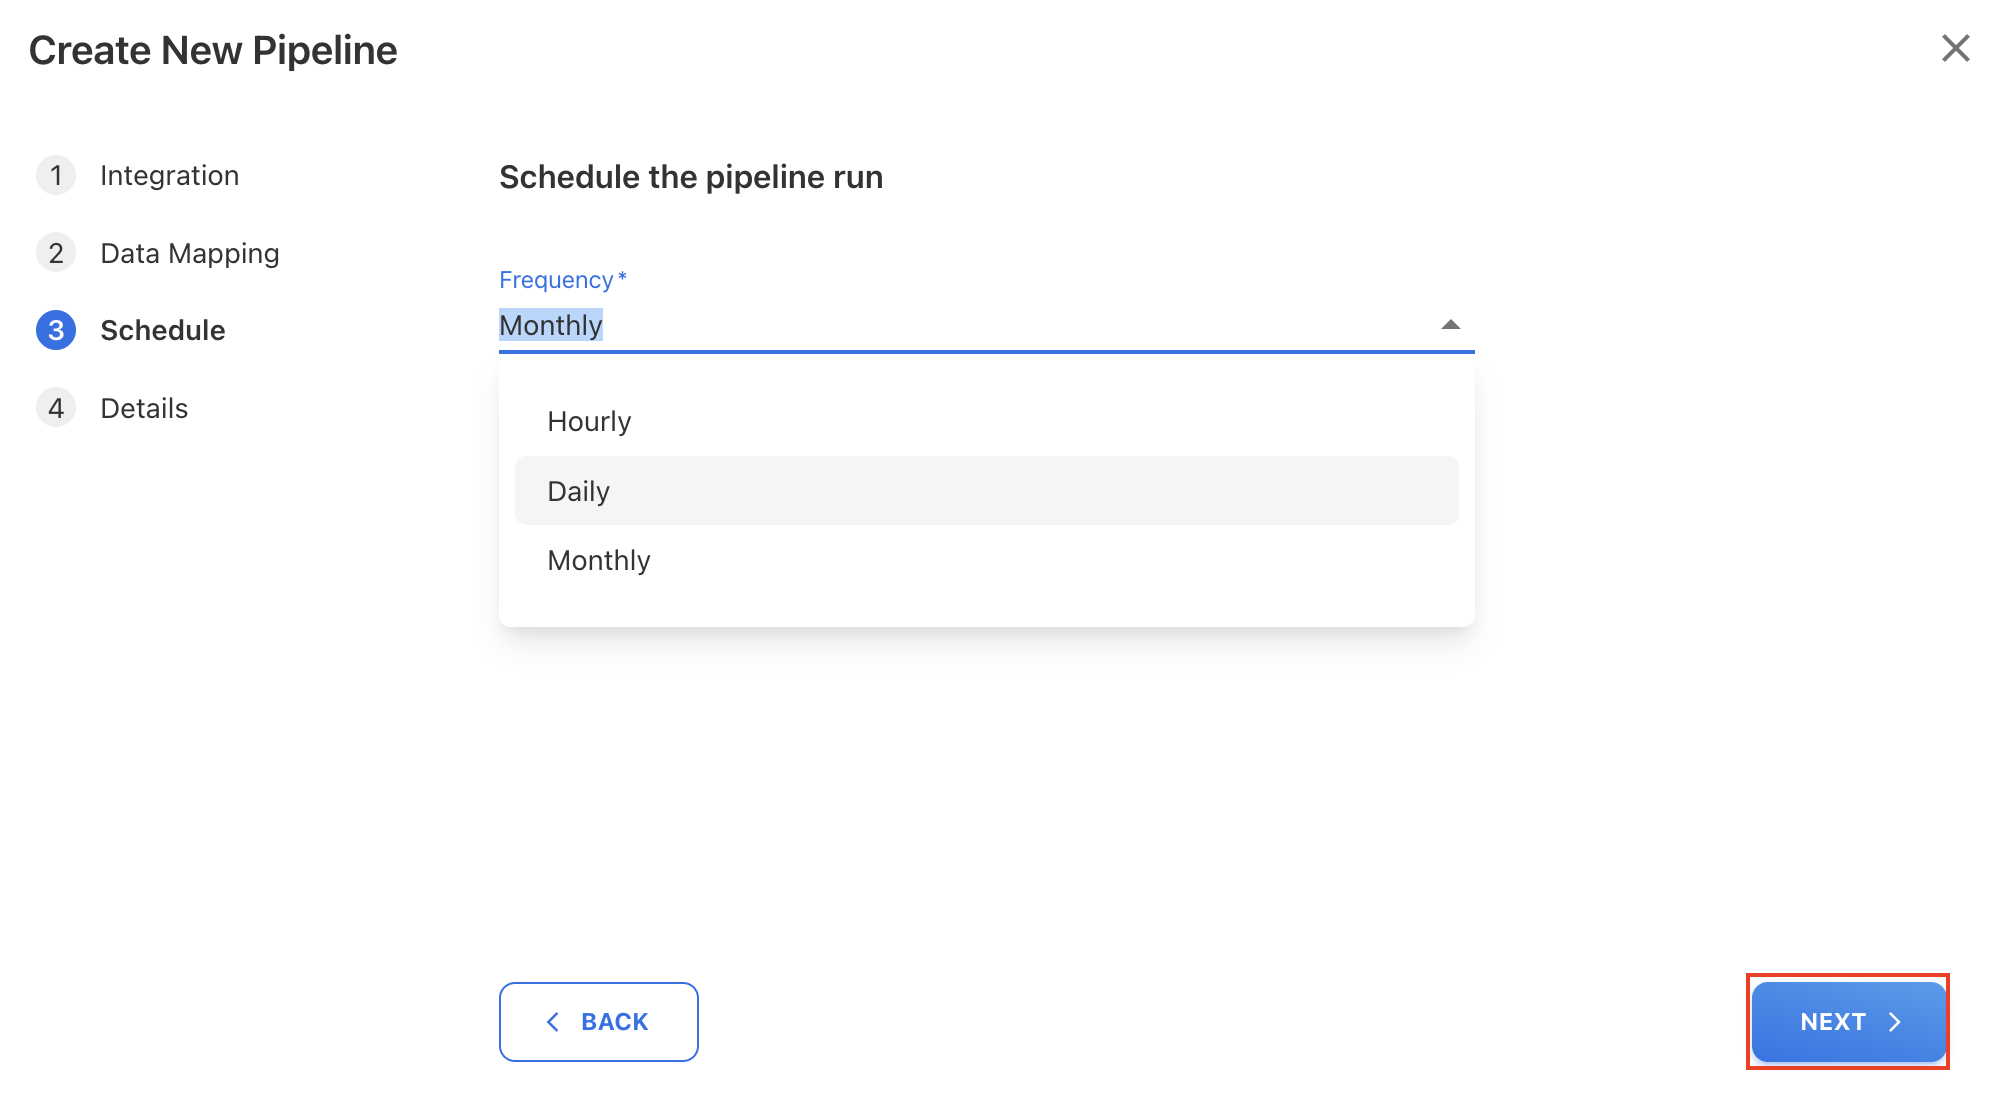
On Schedule tab, select Frequency for the pipeline to run from the dropdown list and then click NEXT:
-
Hourly: Select the hour(s) between 0 to 12 for the pipeline to start run in the field labelled. The run will occur at your defined intervals.
-
Daily: Occurs every day, starting at 12:00 AM.
-
Monthly: Specify the day of the month and select the month interval.
-
-
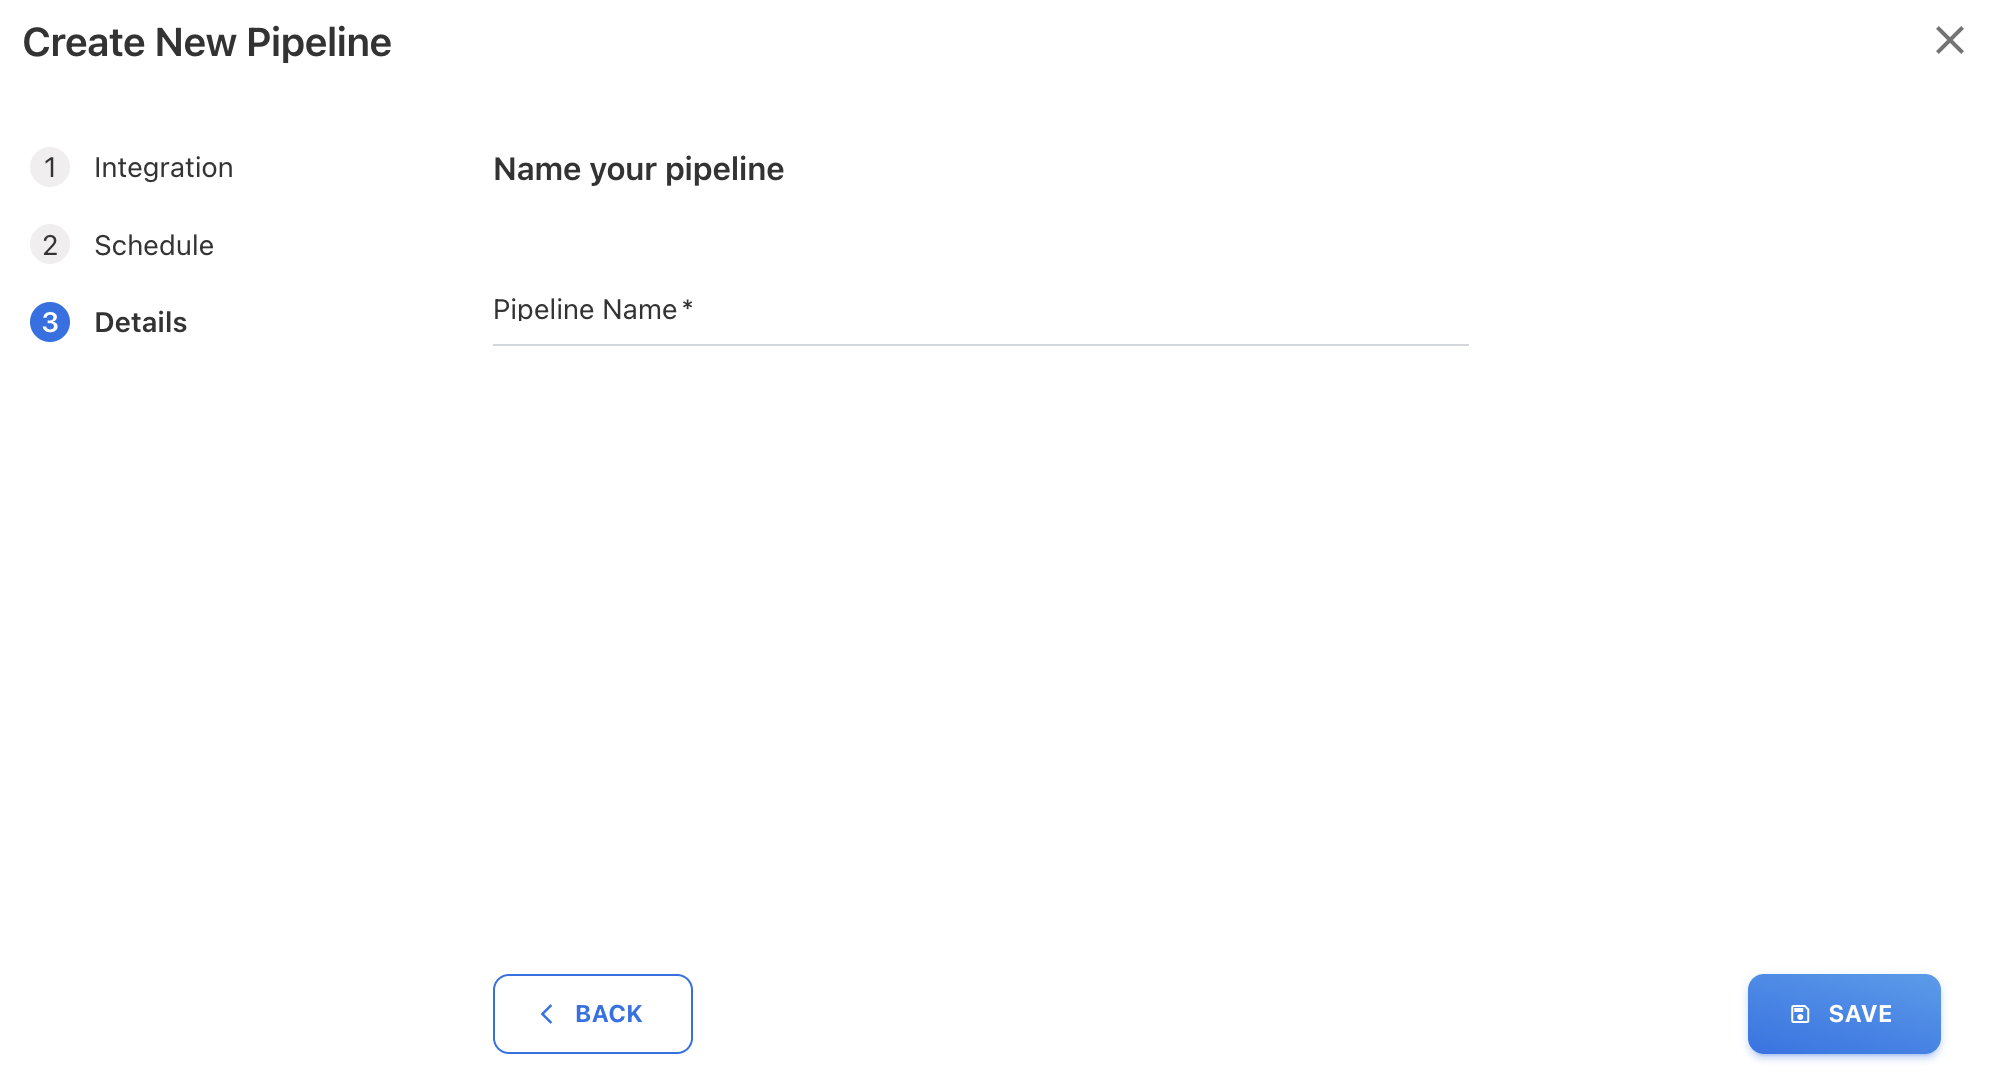
Enter the Pipeline Name and click SAVE.
The new pipeline is created in the application and remains deactivated by default. You must activate the pipeline to start scheduled or on-demand runs.
AWS S3
Prerequisites
Before creating an AWS Cloud Storage Pipeline, ensure you have:
-
A valid AWS S3 account with access to the required bucket.
-
An AWS connection configured in YäRKEN using:
-
Access key
-
Secret key
-
-
Access to the S3 bucket and folder path where usage files are stored.
-
AWS usage files exported to S3, such as:
-
AWS Cost and Usage Report (CUR)
-
-
A data mapping template to map fields from AWS usage files to YäRKEN fields.
-
File location details, including folder path and/or file naming patterns.
Procedure
To create,
-
Navigate to Admin > Pipelines > Pipelines.
-
On the Pipelines page, click + NEW PIPELINE.
-
On the Create New Pipeline dialog box, choose the storage type as AWS S3 and click NEXT.
-
Select an existing configured Connection or create a new. For more information on how to configure a connection prior to creating the pipeline, refer Creating a new Pipeline Connection | Create Cloud Storage Connection (manual only).
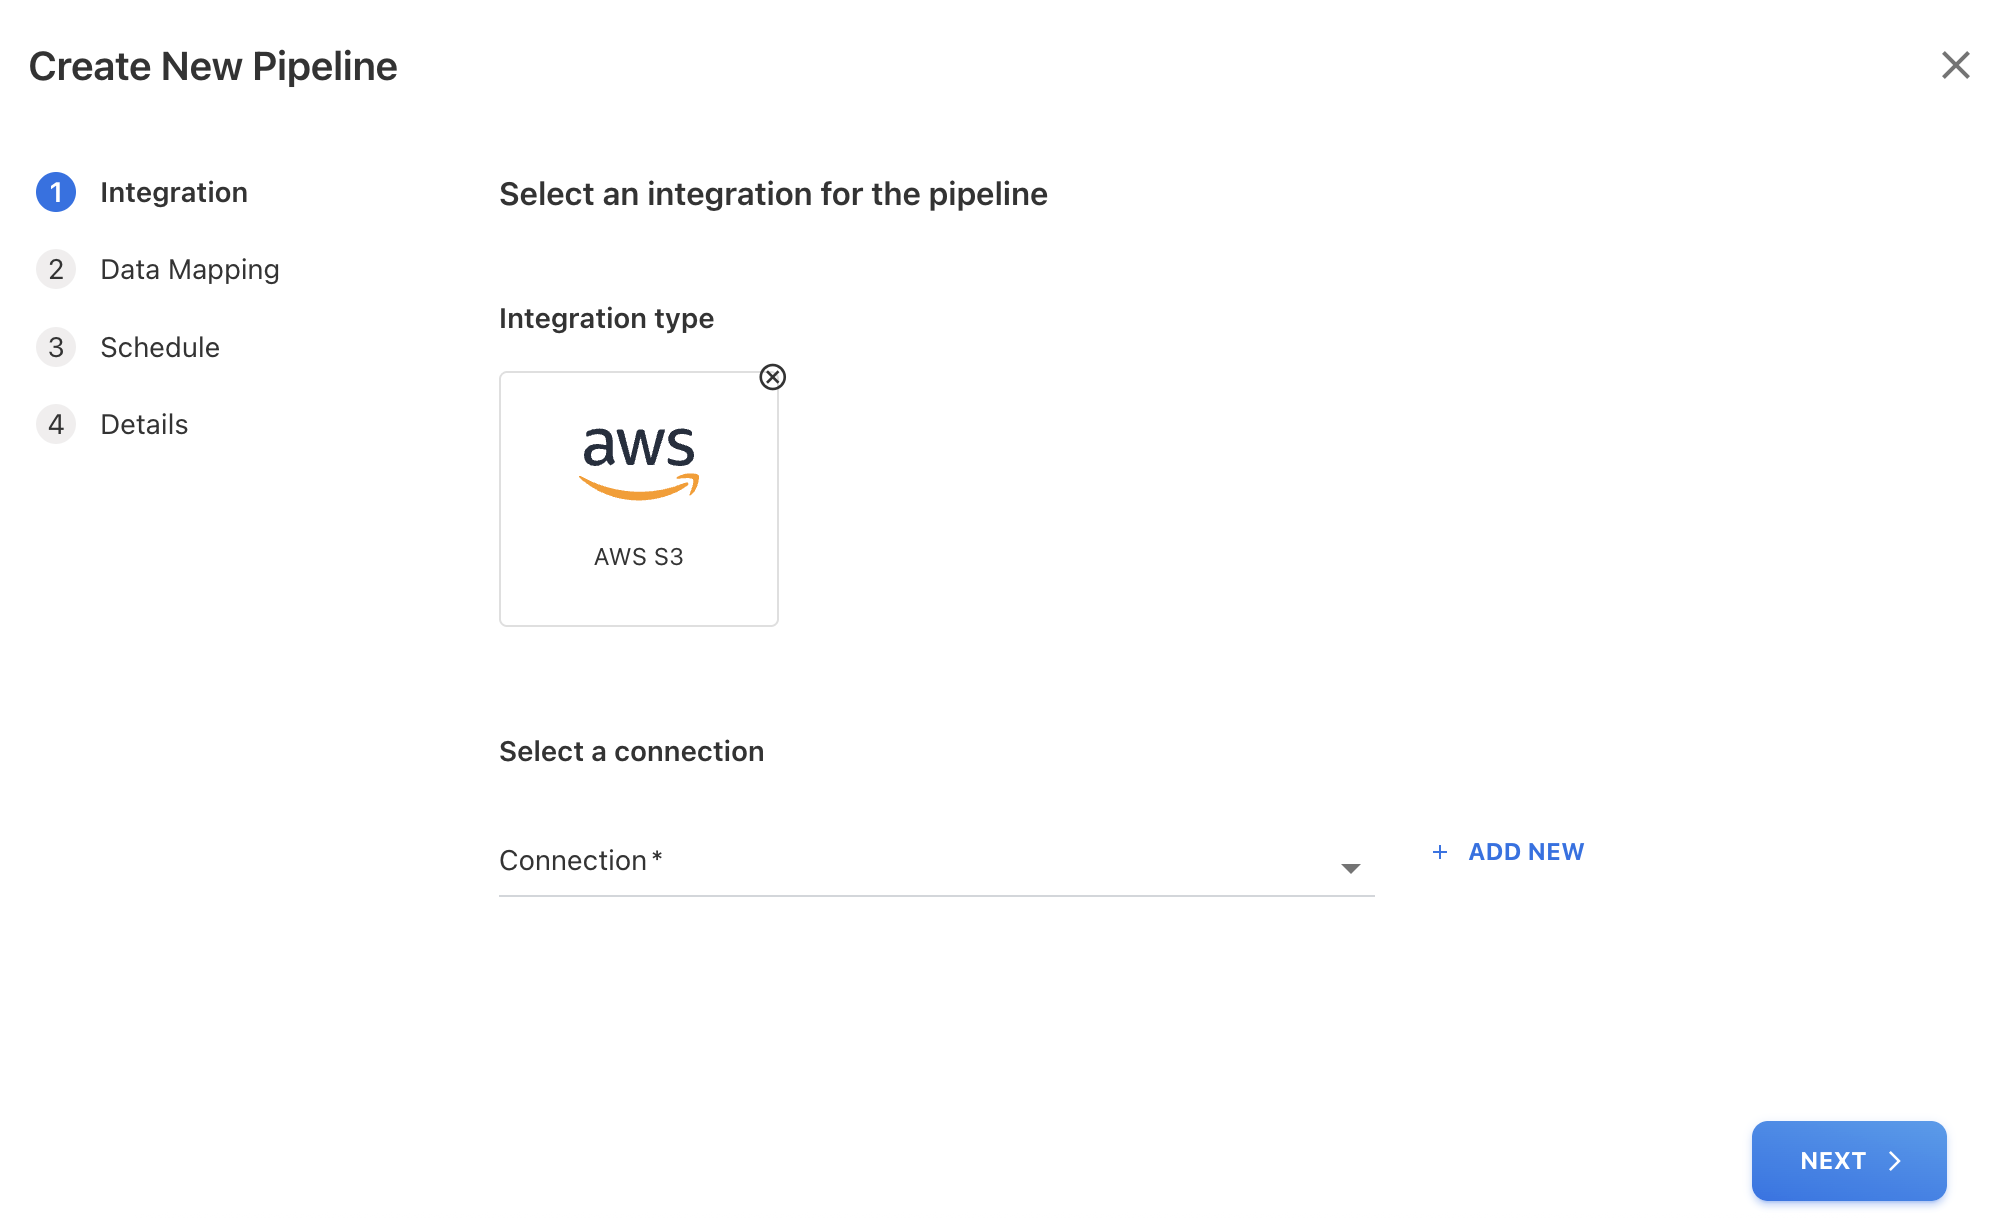
-
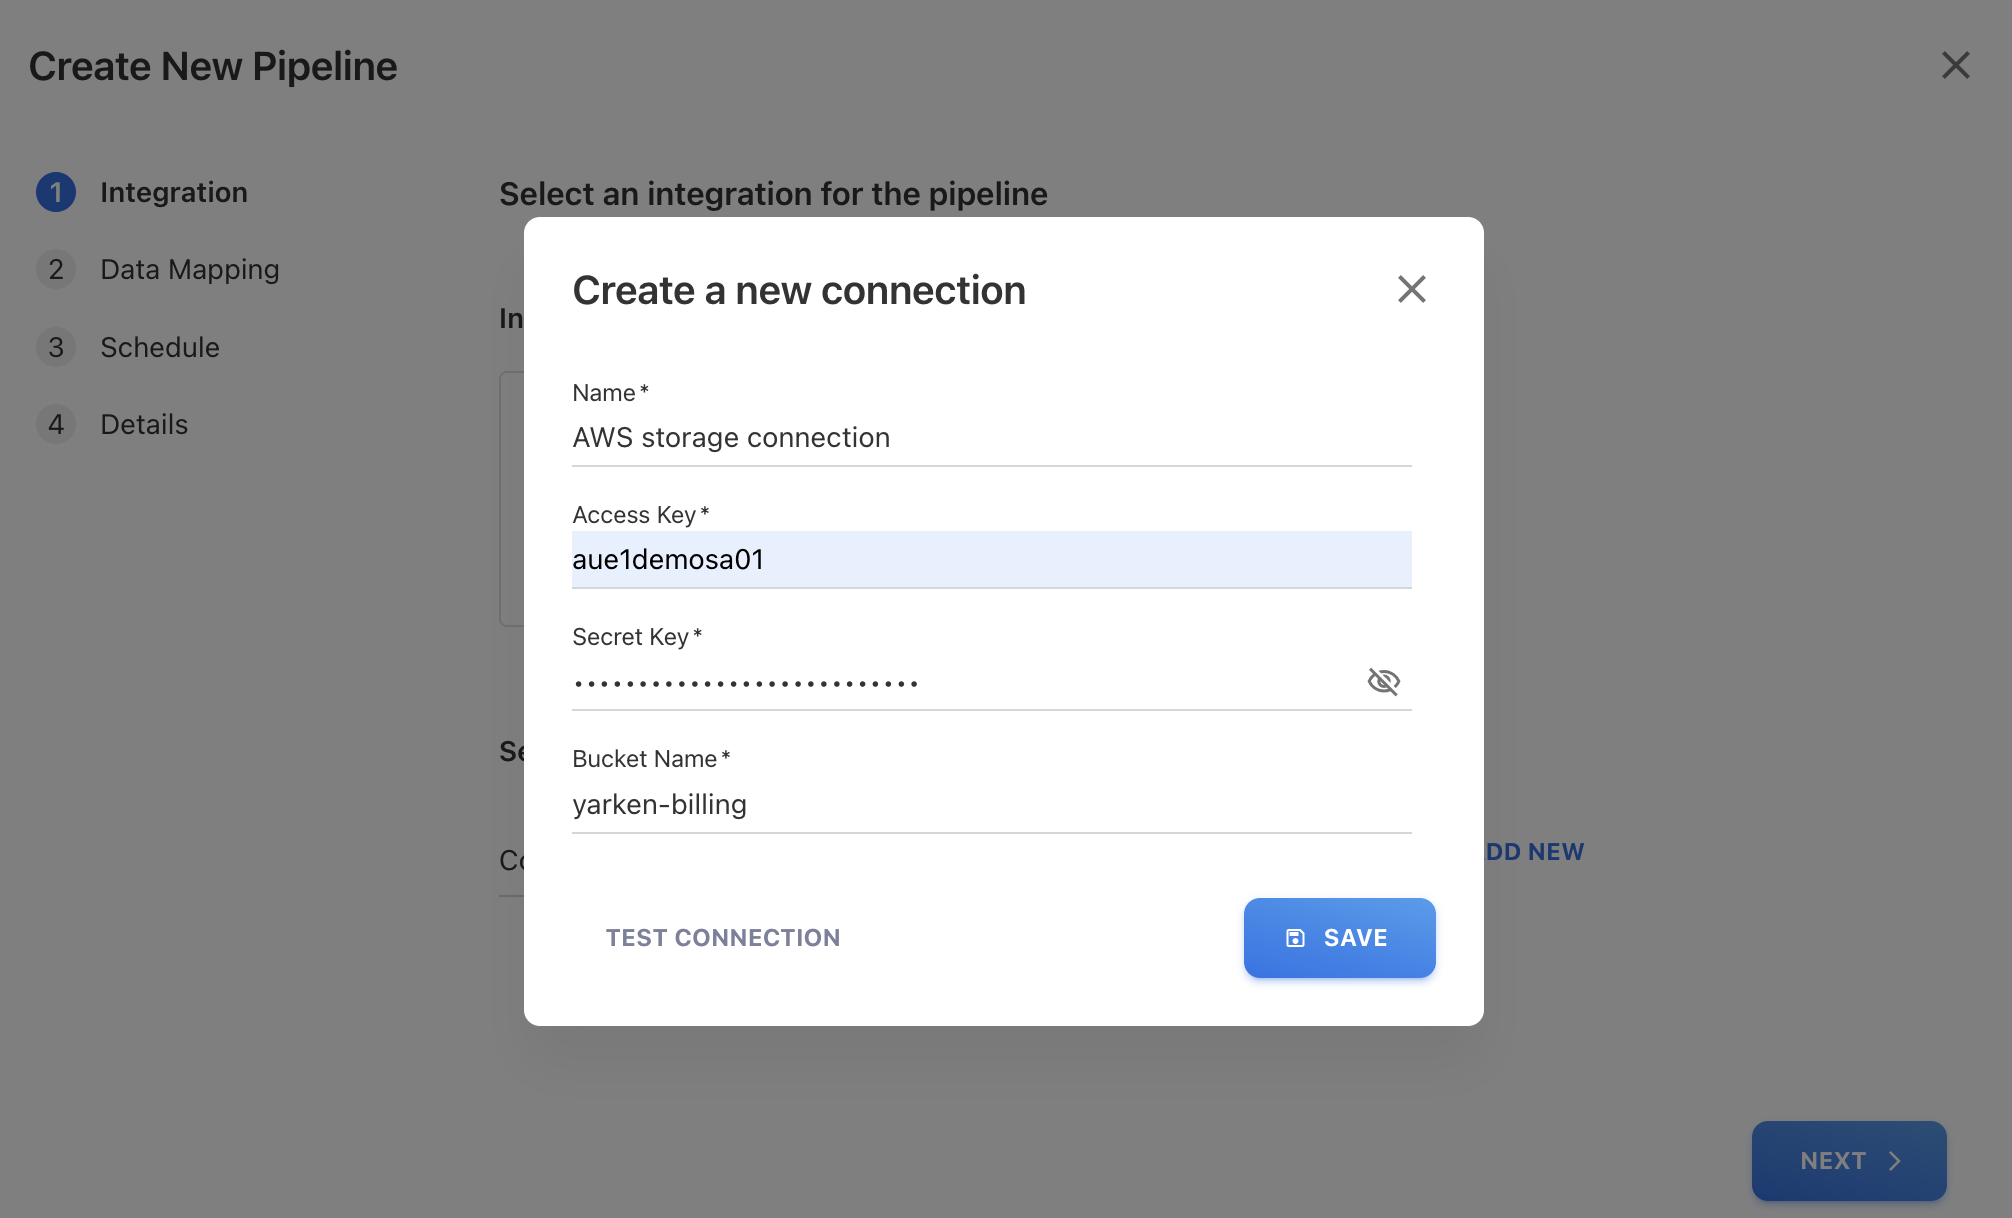
(Optional) To create a new connection, click + ADD NEW and enter the below details on Create a new connection dialog box:
-
Name: The name of the connection.
-
Access Key: The Azure Storage Account Access Key for accessing the storage account data.
-
Secret Key: The AWS Secret Key used along with the Access Key to access the S3 storage bucket.
-
Bucket Name: The name of the S3 bucket where the exported files are being stored, for example, yarken-billing.
-
Click SAVE.
-
-
-
Enter a Directory Name from which you want to retrieve files and select NEXT.

-
Select a Data Mapping Template from the dropdown list and click NEXT. For more information on Data Mapping Template, refer Data Mapping Templates.
-
On Schedule tab, select Frequency for the pipeline to run from the dropdown list and then click NEXT:
-
Hourly: Select the hour(s) between 0 to 12 for the pipeline to start run in the field labelled. The run will occur at your defined intervals.
-
Daily: Occurs every day, starting at 12:00 AM.
-
Monthly: Specify the day of the month and select the month interval.
-
-
Enter the Pipeline Name and click SAVE.
The new pipeline is created in the application and remains deactivated by default. You must activate the pipeline to start scheduled or on-demand runs.
Google Cloud Storage
Prerequisites
Before creating a Google Cloud Storage Pipeline, ensure you have:
-
A valid Google Cloud Storage (GCS) bucket.
-
A Google Cloud Storage connection configured in YäRKEN using:
-
Access key
-
Secret key
-
-
Access to the GCS bucket and folder path containing usage files.
-
GCP usage files exported to GCS, such as:
-
GCP Billing Export files
-
-
A data mapping template to map GCP file fields to YäRKEN fields.
-
File location details, including bucket path and file naming patterns.
Procedure
To create,
-
Navigate to Admin > Pipelines > Pipelines.
-
On the Pipelines page, click + NEW PIPELINE.
-
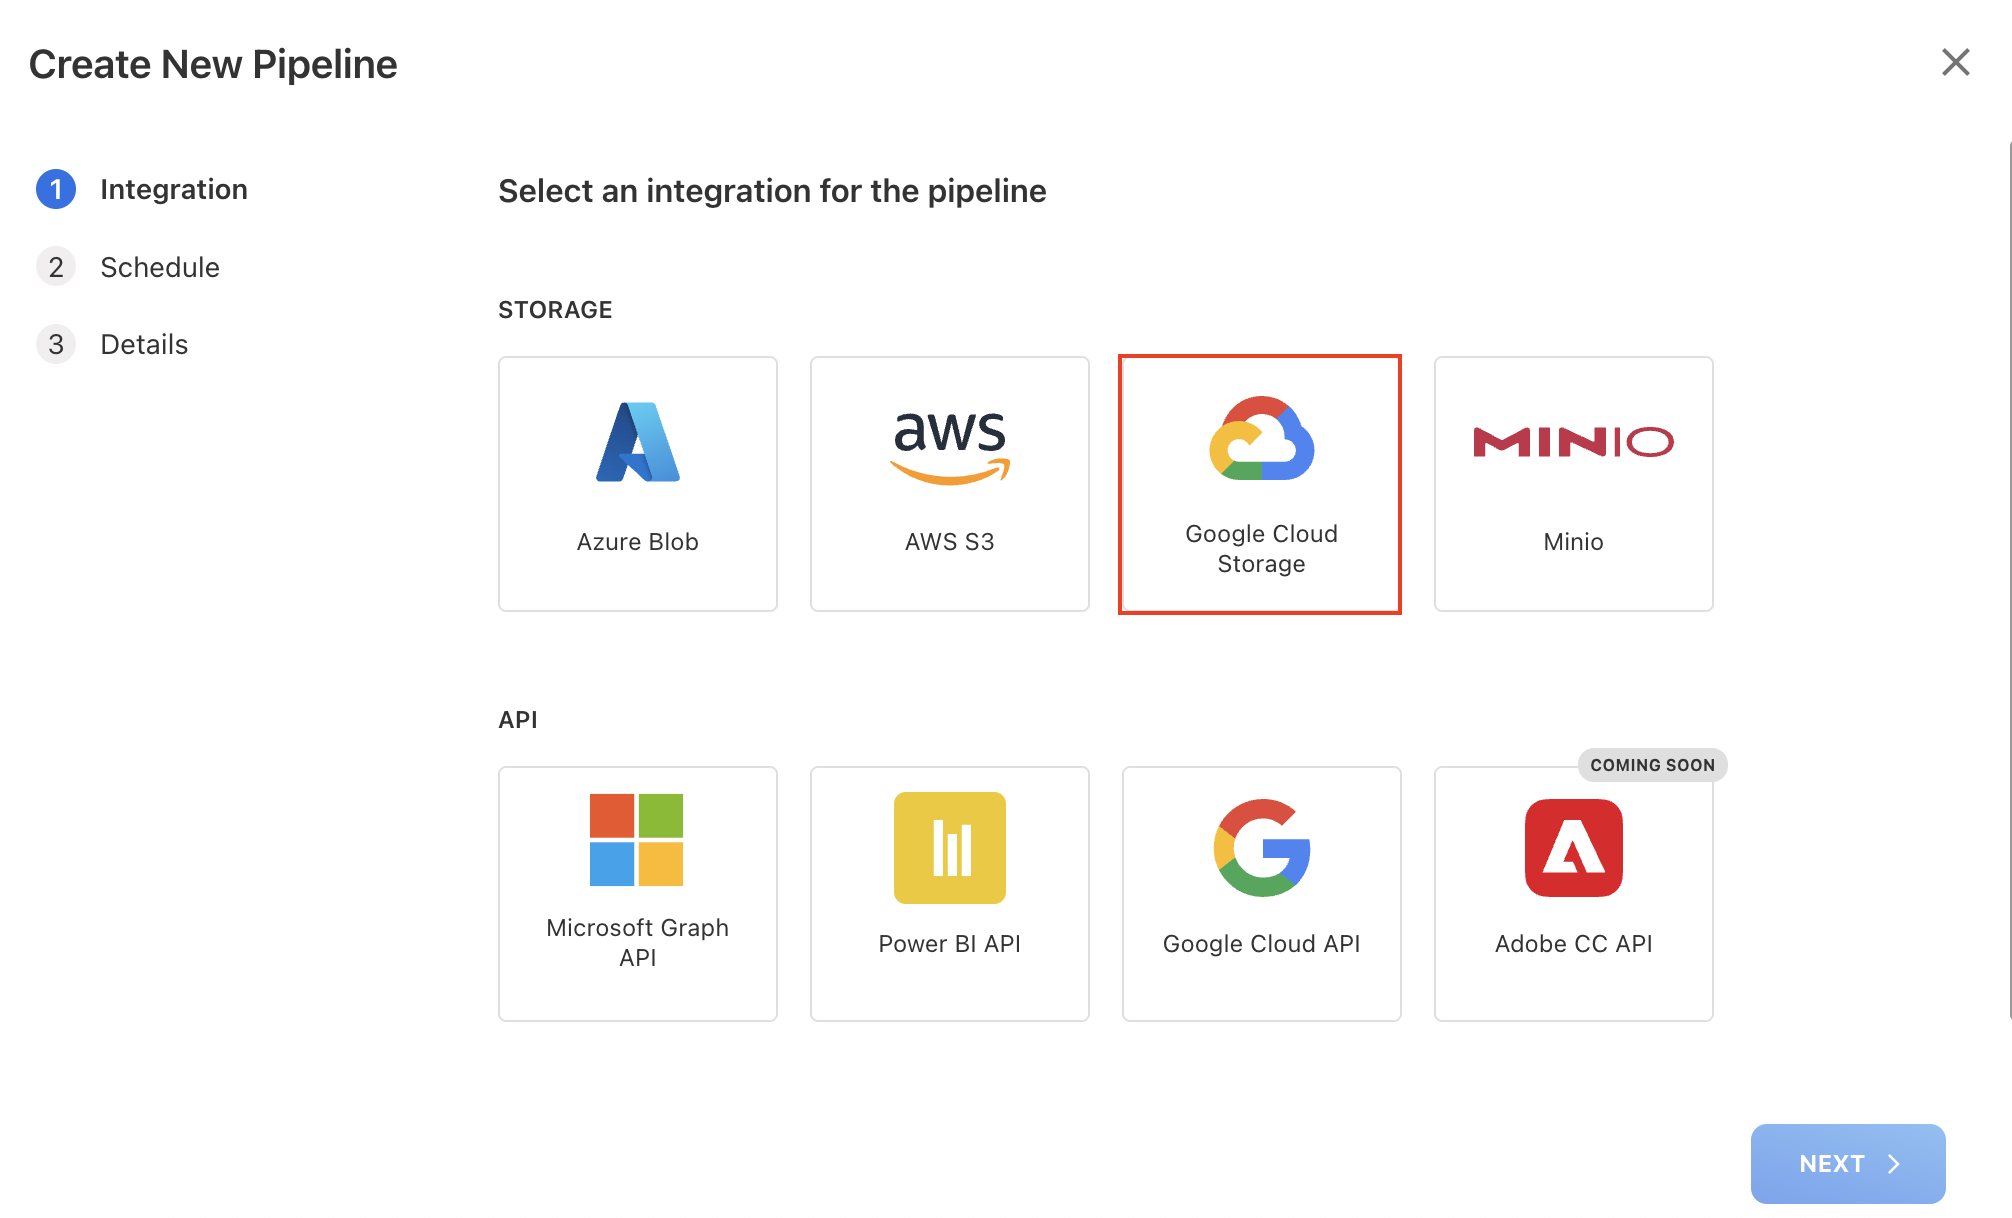
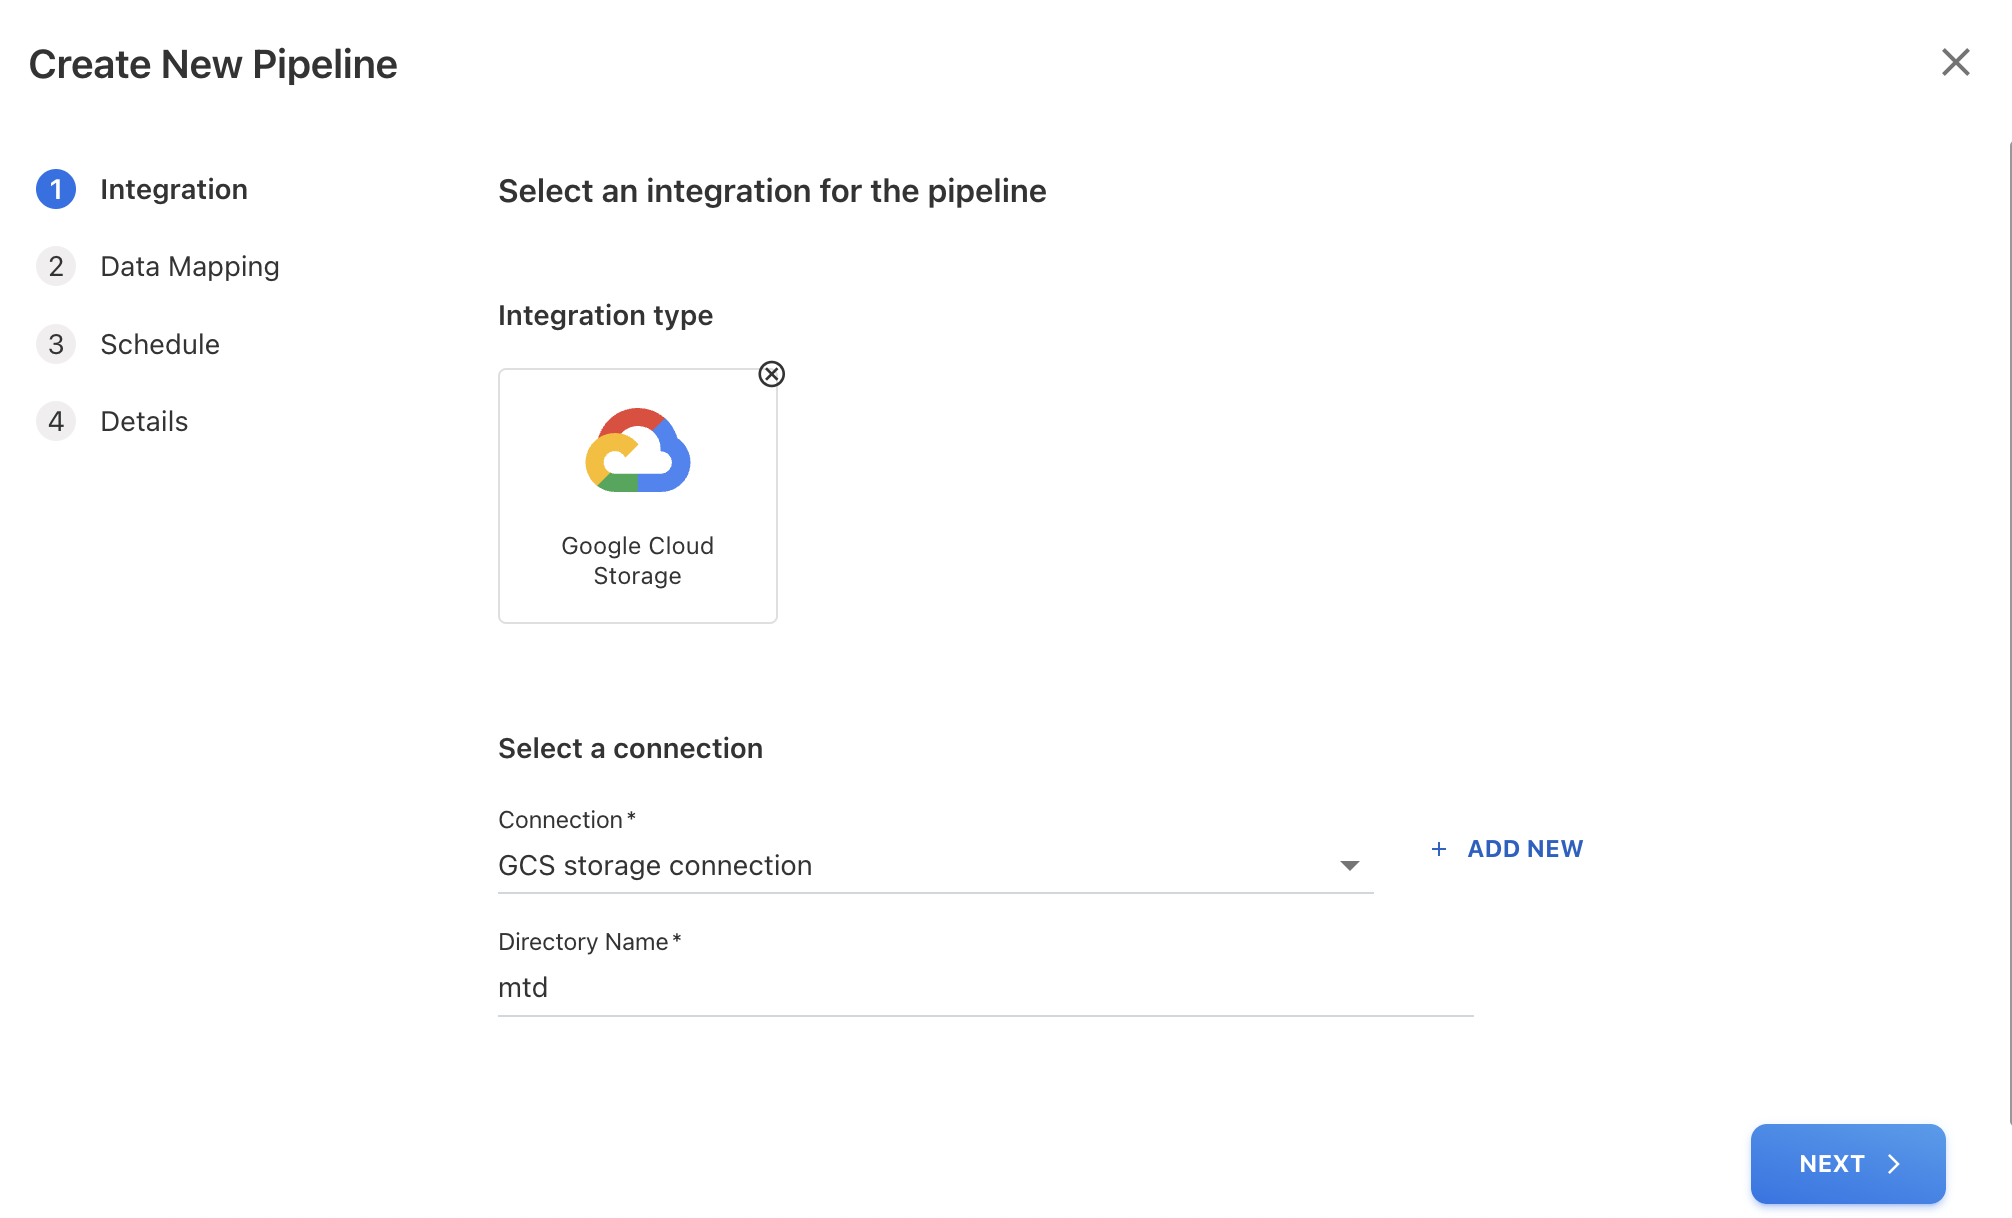
On the Create New Pipeline dialog box, choose the storage type as Google Cloud Storage and click NEXT.
-
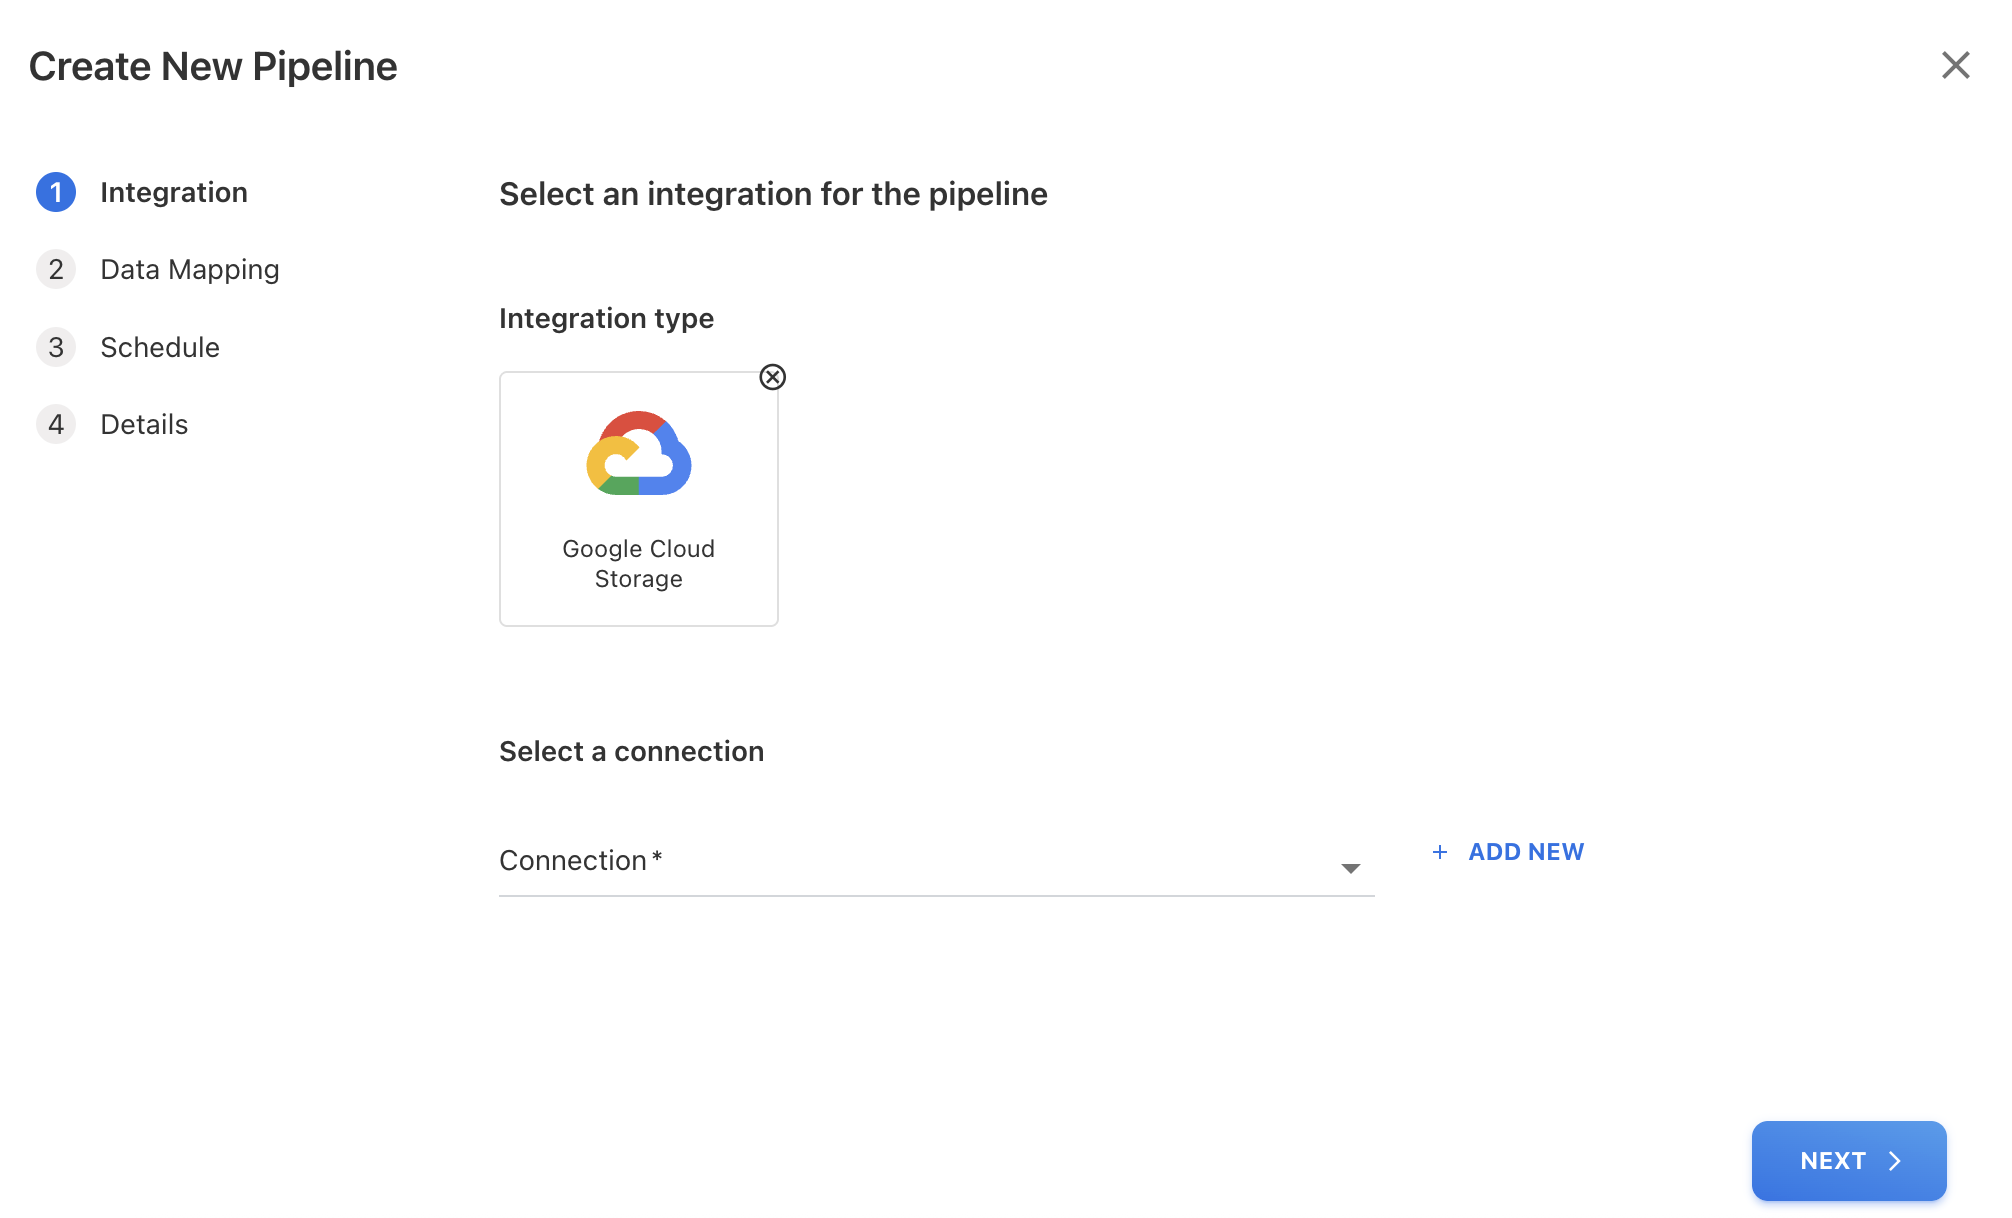
Select an existing configured Connection or create a new. For more information on how to configure a connection prior to creating the pipeline, refer Creating a new Pipeline Connection | Create Cloud Storage Connection (manual only).
-
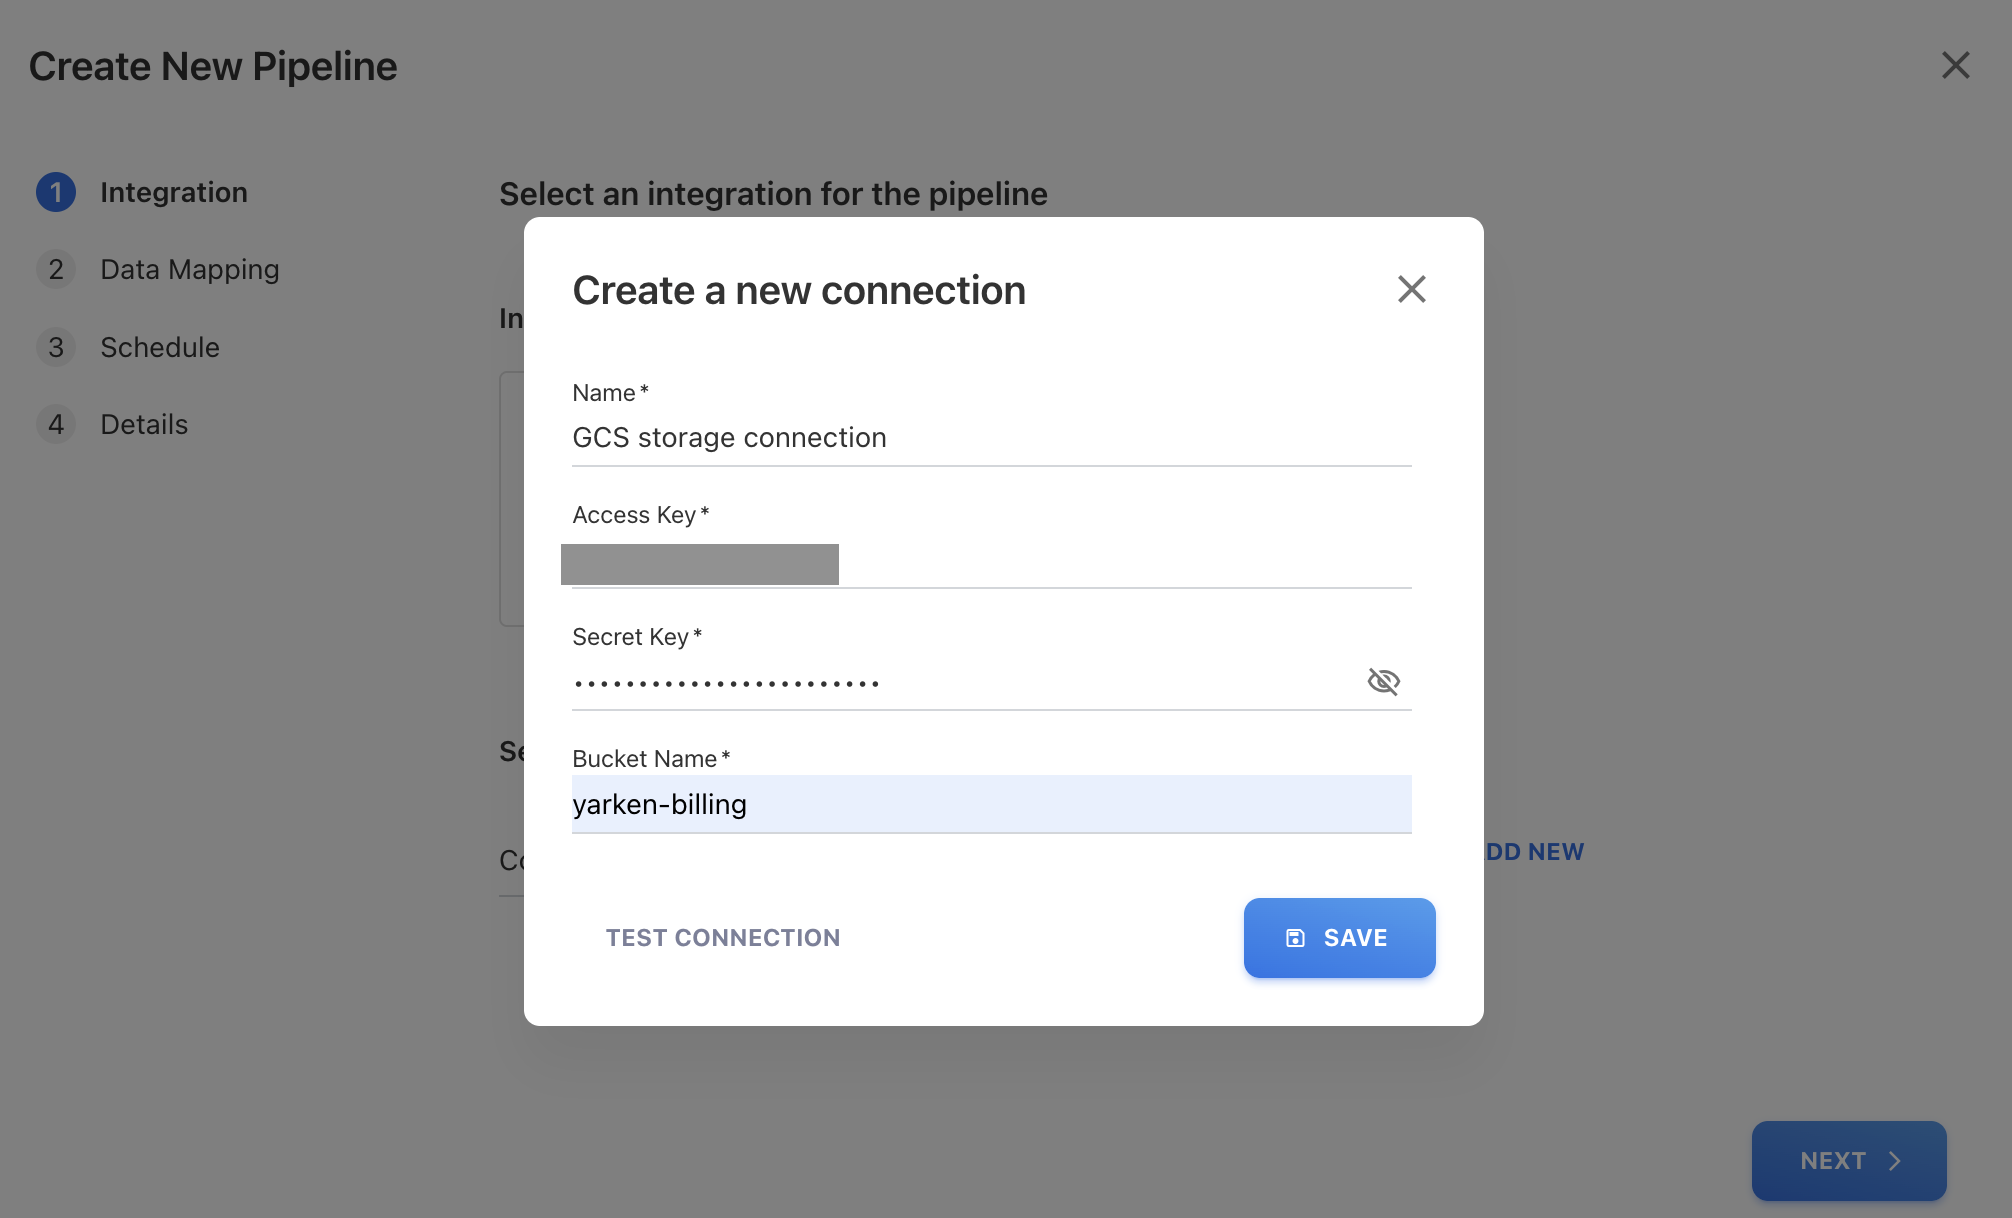
(Optional) To create a new connection, click + ADD NEW and enter the below details on Create a new connection dialog box:
-
Name: The name of the connection.
-
Access Key: The access key used to authenticate and authorize the access to the storage service.
-
Secret Key: A secret key associated with the access key used to authenticate and authorize secure access to the storage service.
-
Bucket Name: The name of the GCS bucket where the exported files (objects) are being stored, for example, yarken-billing.
-
Click SAVE.
-
-
-
Enter a Directory Name from which you want to retrieve files and select NEXT.
-
Select a Data Mapping Template from the dropdown list and click NEXT. For more information on Data Mapping Template, refer Data Mapping Templates.
-
On Schedule tab, select Frequency for the pipeline to run from the dropdown list and then click NEXT:
-
Hourly: Select the hour(s) between 0 to 12 for the pipeline to start run in the field labelled. The run will occur at your defined intervals.
-
Daily: Occurs every day, starting at 12:00 AM.
-
Monthly: Specify the day of the month and select the month interval.
-
-
Enter the Pipeline Name and click SAVE.
The new pipeline is created in the application and remains deactivated by default. You must activate the pipeline to start scheduled or on-demand runs.
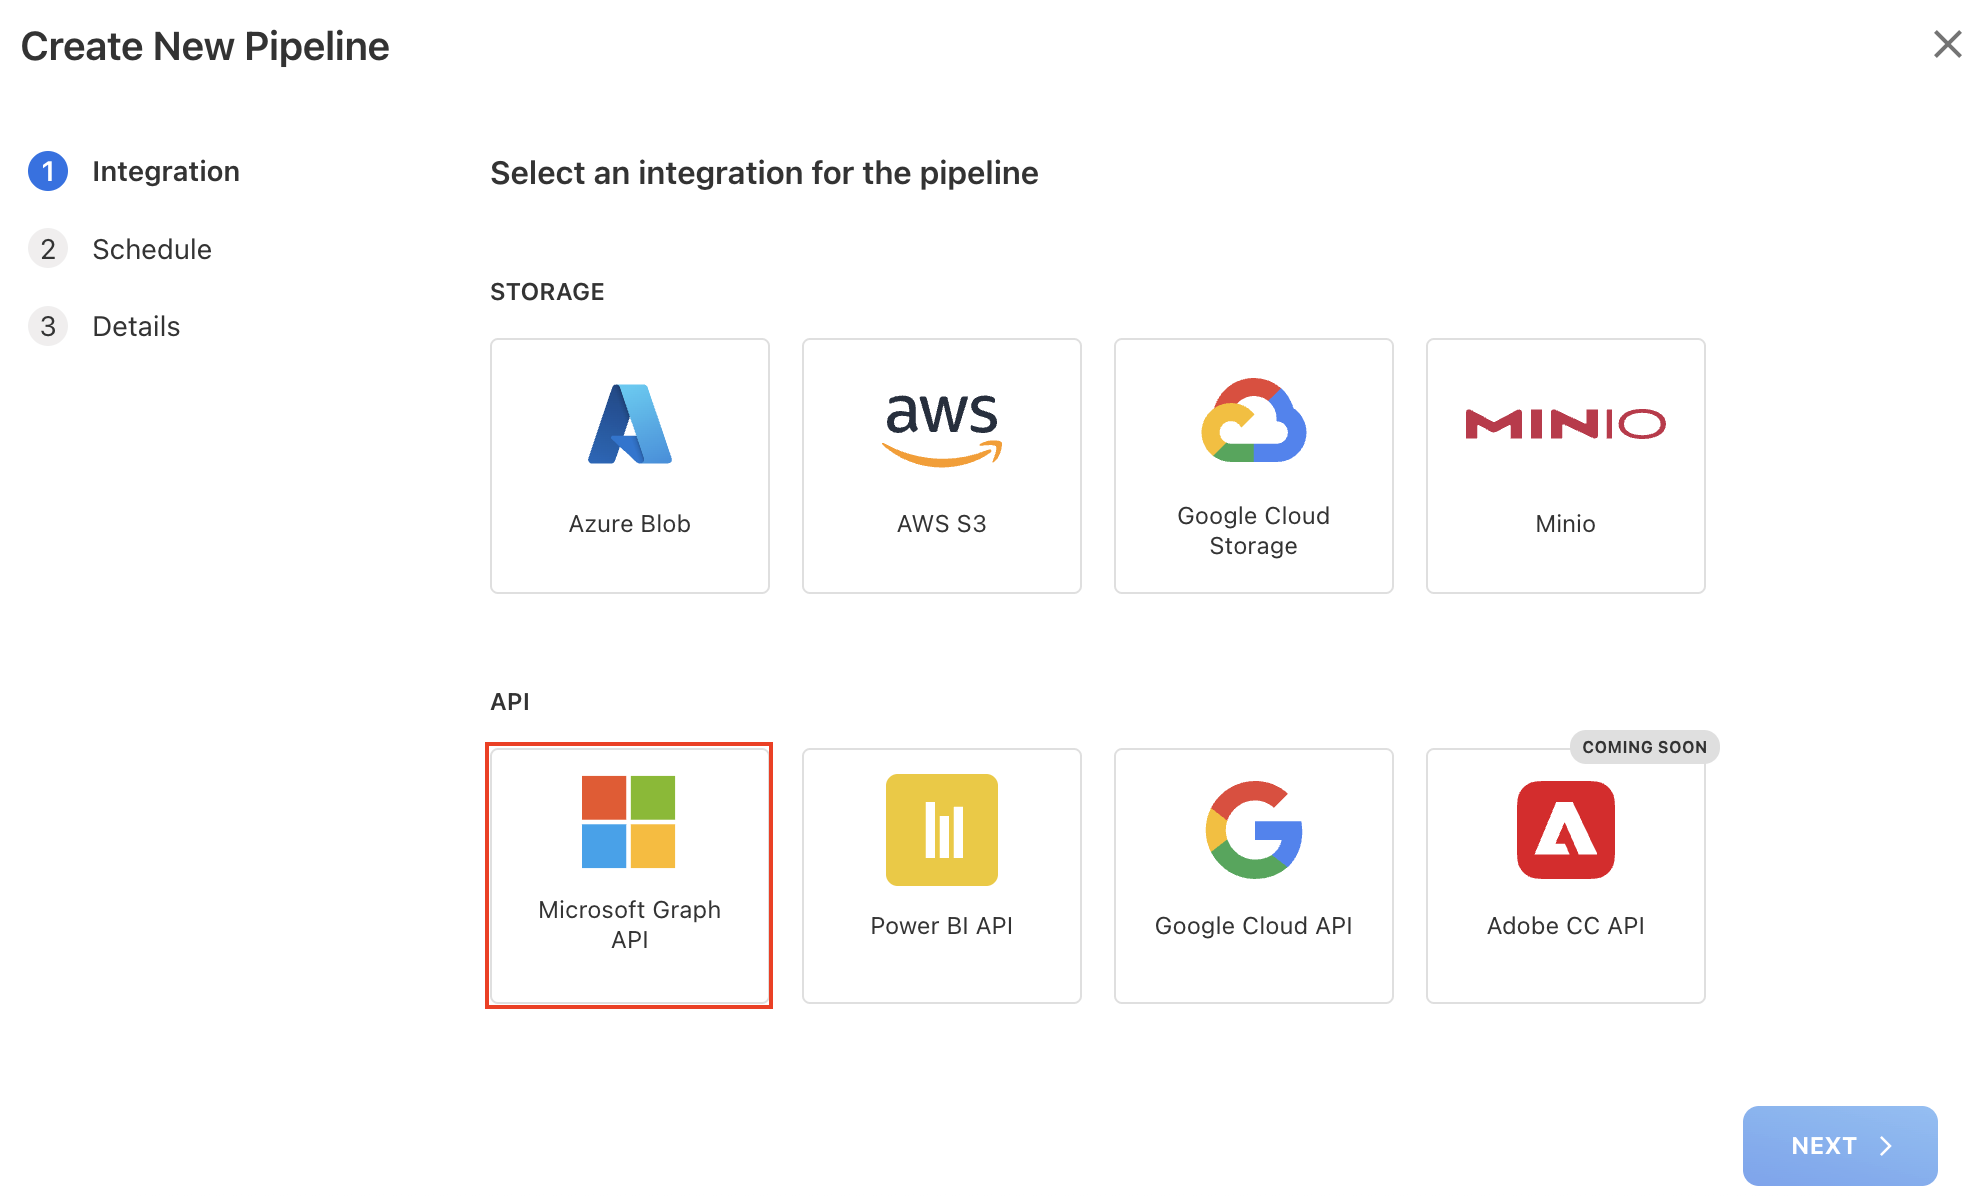
Create an API Pipeline manually
Note: Manual API pipeline creation is not recommended because pipelines are automatically created via the Consent URL. These steps should be used only when manual setup is required.
As part of the consent-link process, when a tenant accepts the consent links, the application automatically creates the API connections and their corresponding API pipelines. Use the below section to create an API Pipelines manually.
Microsoft Graph API
The Microsoft Graph API pipeline is used to collect:
-
License details
-
Product usage details
-
Entra ID activity details
-
Teams activity details
-
Defender enrolled device details
Prerequisite
-
A Microsoft Graph API connection must already be configured in the application.
Procedure
To configure,
-
Navigate to Admin > Pipelines > Pipelines.
-
On the Pipelines page, click + NEW PIPELINE.
-
On the Create New Pipeline dialog box, select Microsoft Graph API and click NEXT.
-
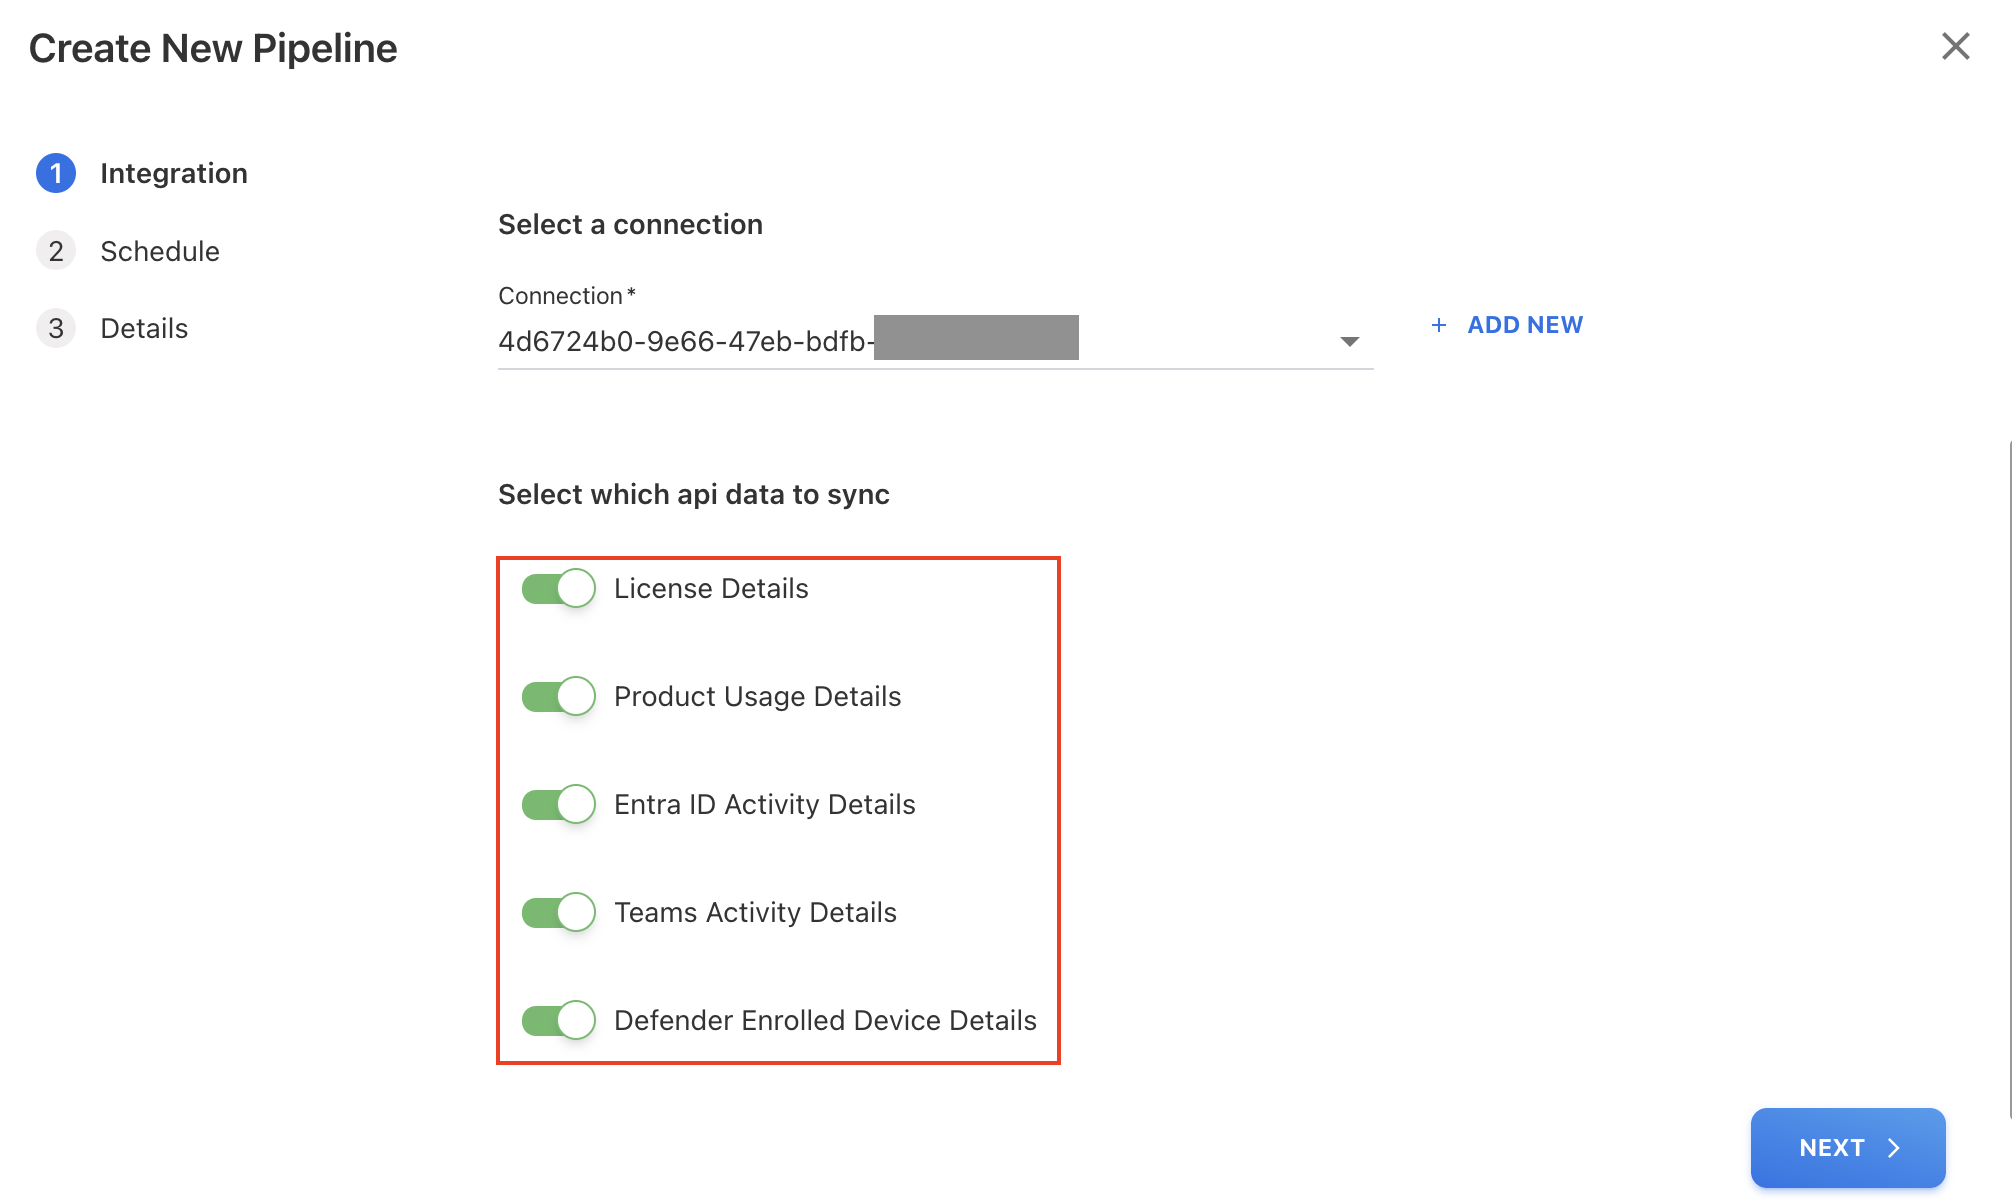
Under Select a connection, click the dropdown icon and select already configured API connection for Microsoft Graph API.

-
Select the API data to sync and click NEXT:
-
License Details
-
Product Usage Details
-
Entra ID Activity Details
-
Teams Activity Details
-
Defender Enrolled Details
-
-
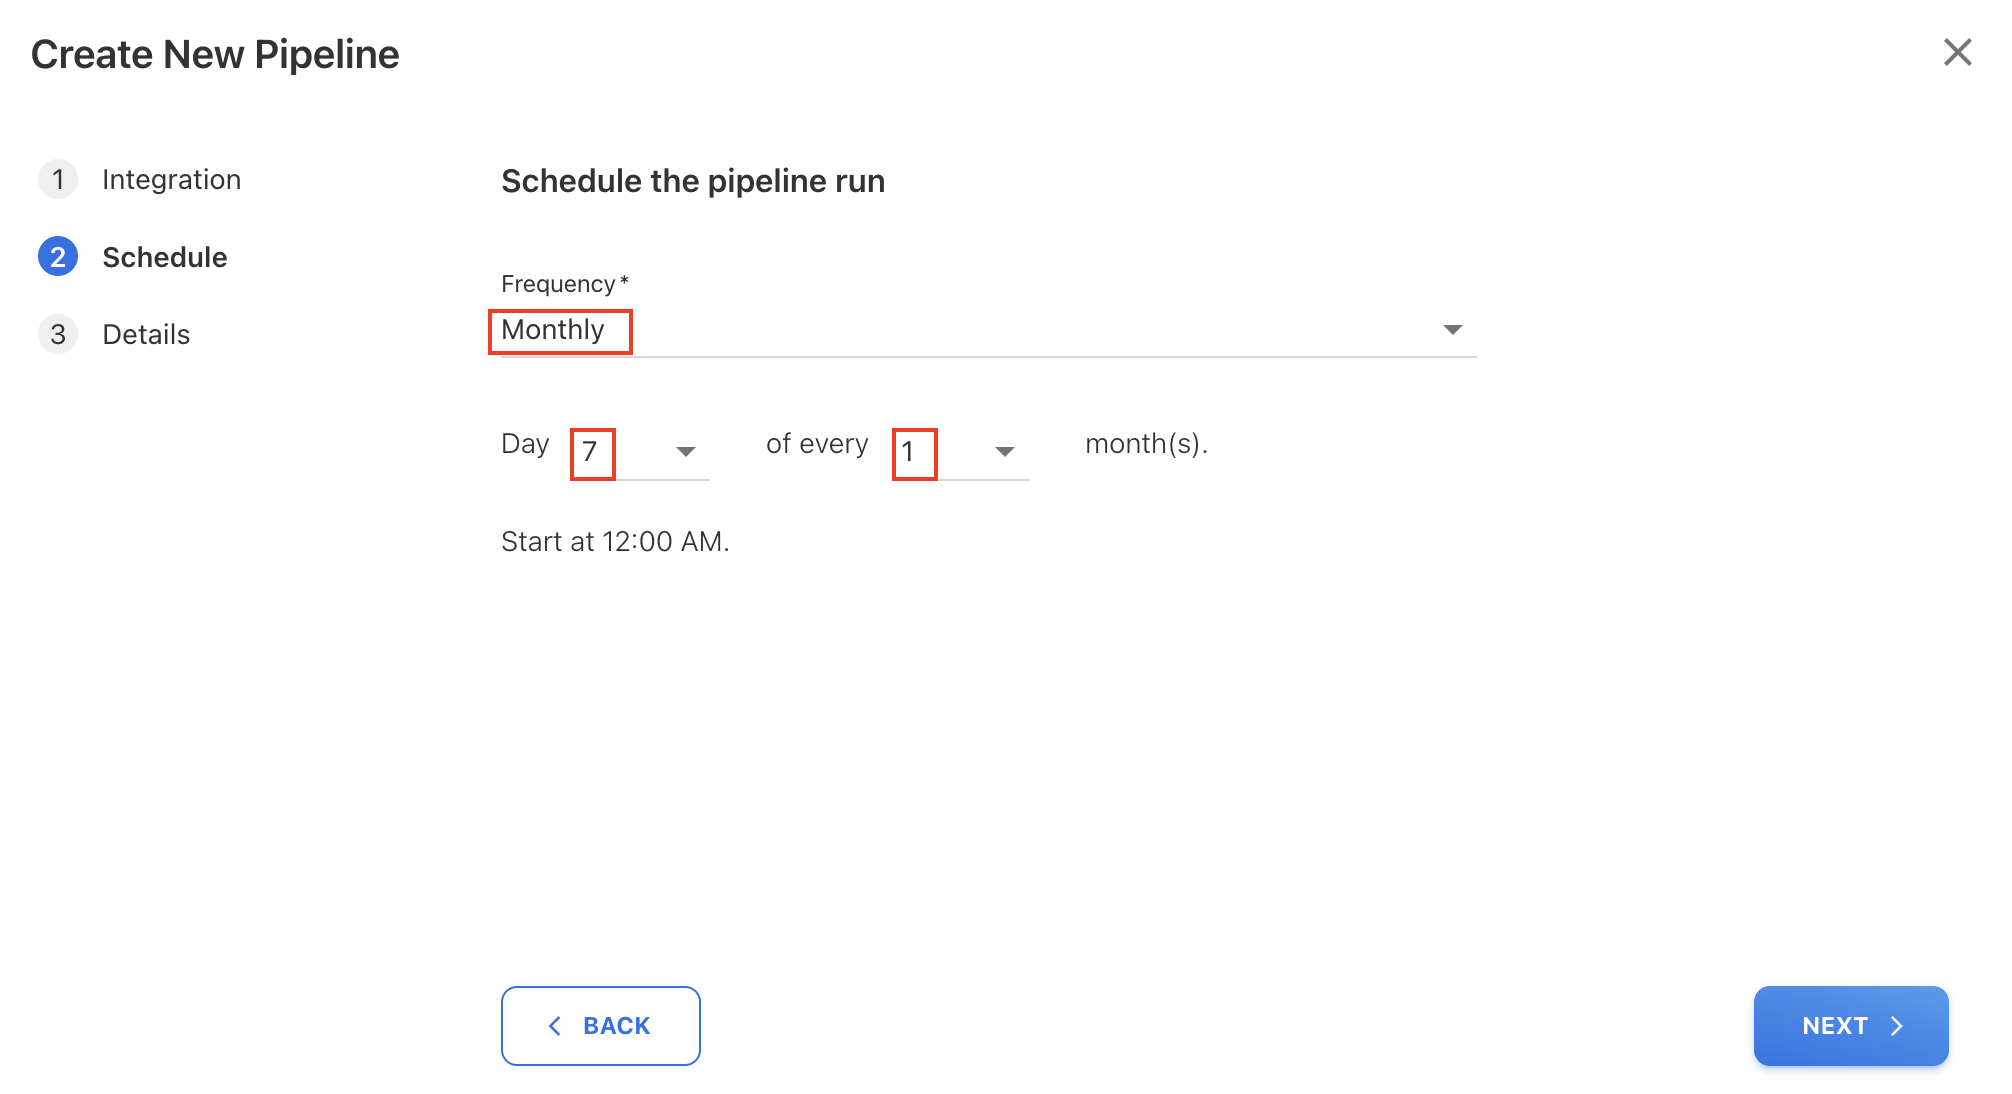
On the Schedule tab, choose Monthly frequency and select Day 7 of every 1 month (recommended).
-
Click NEXT.
-
On the Details tab, enter a Pipeline Name and click SAVE.
-
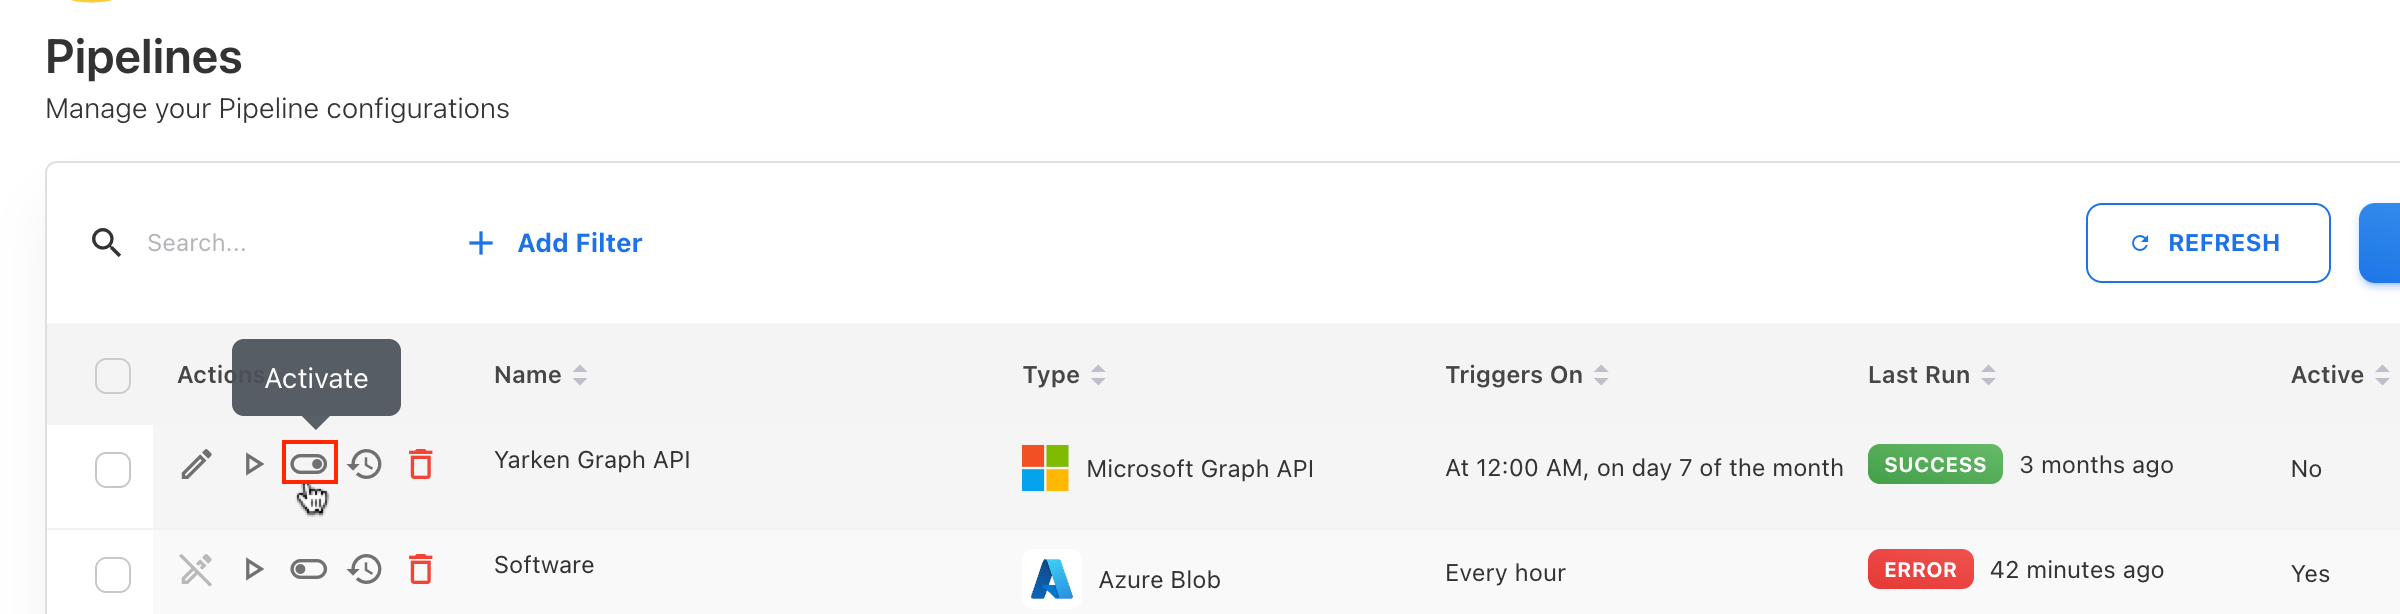
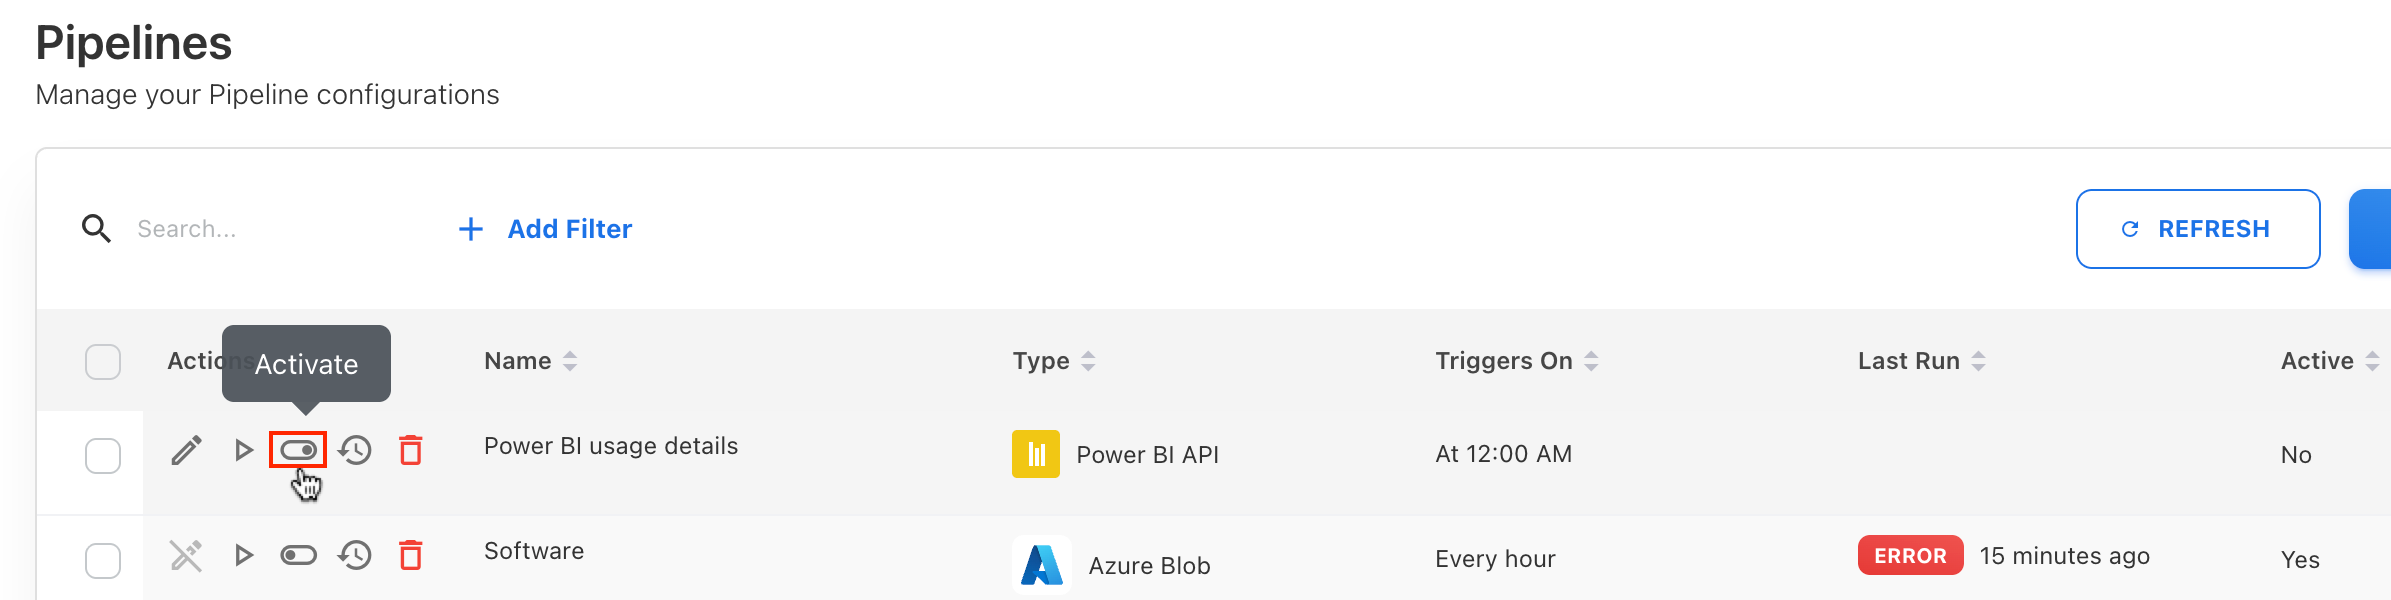
The new pipeline is created in a deactivated state. Activate it using the Activate toggle and click OK on confirmation popup.
-
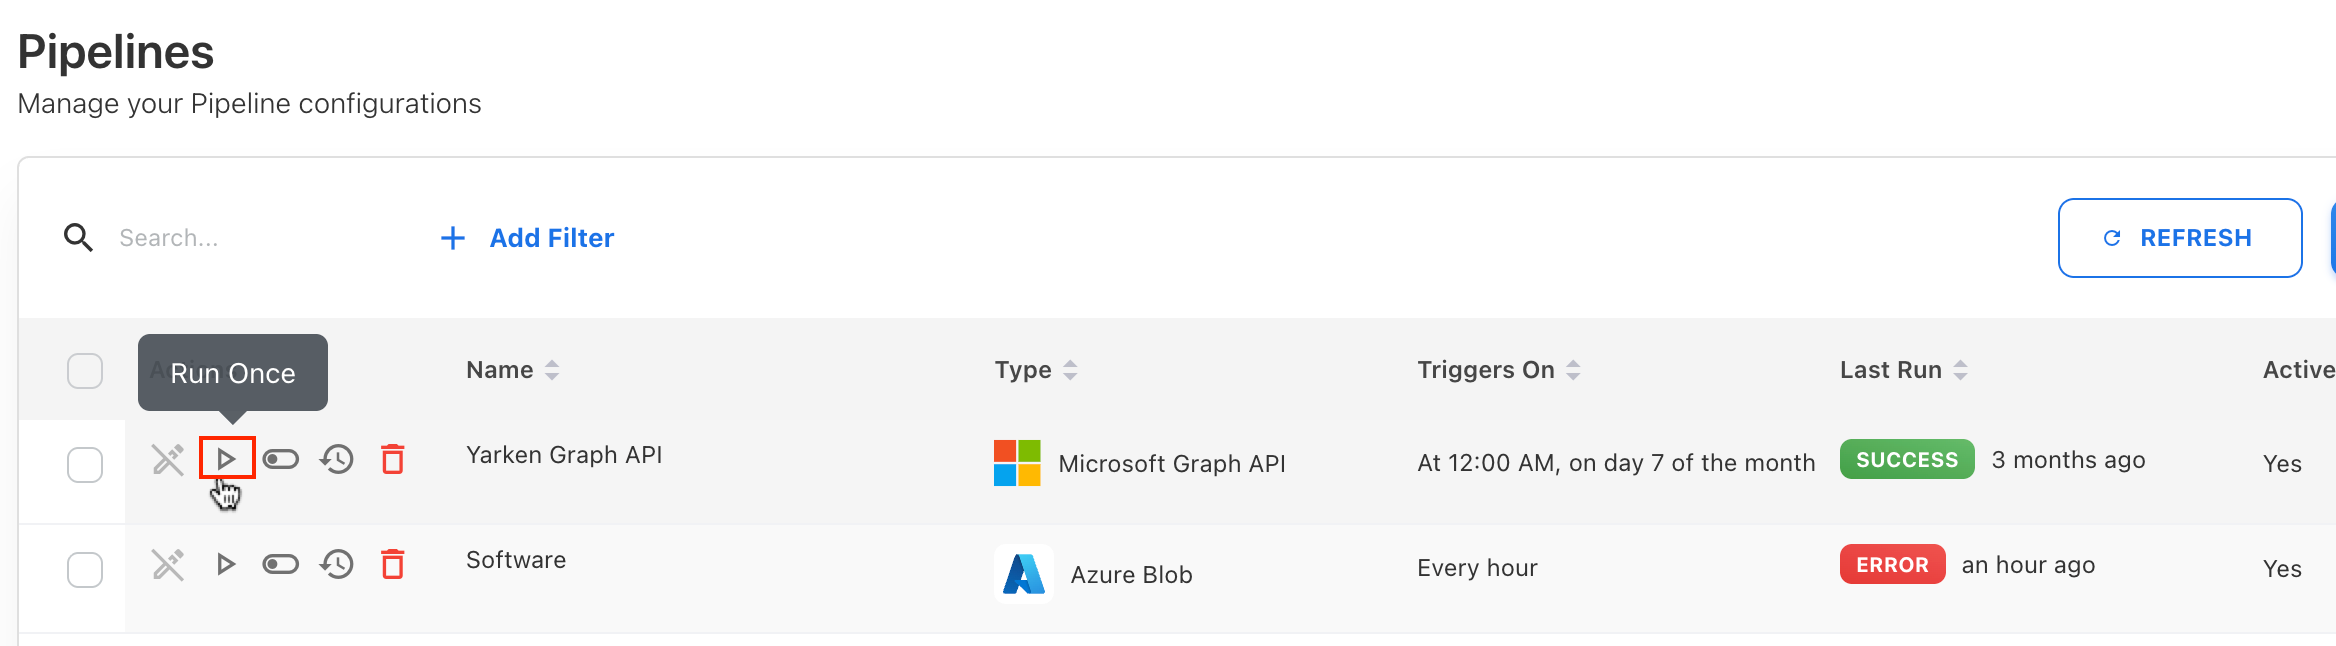
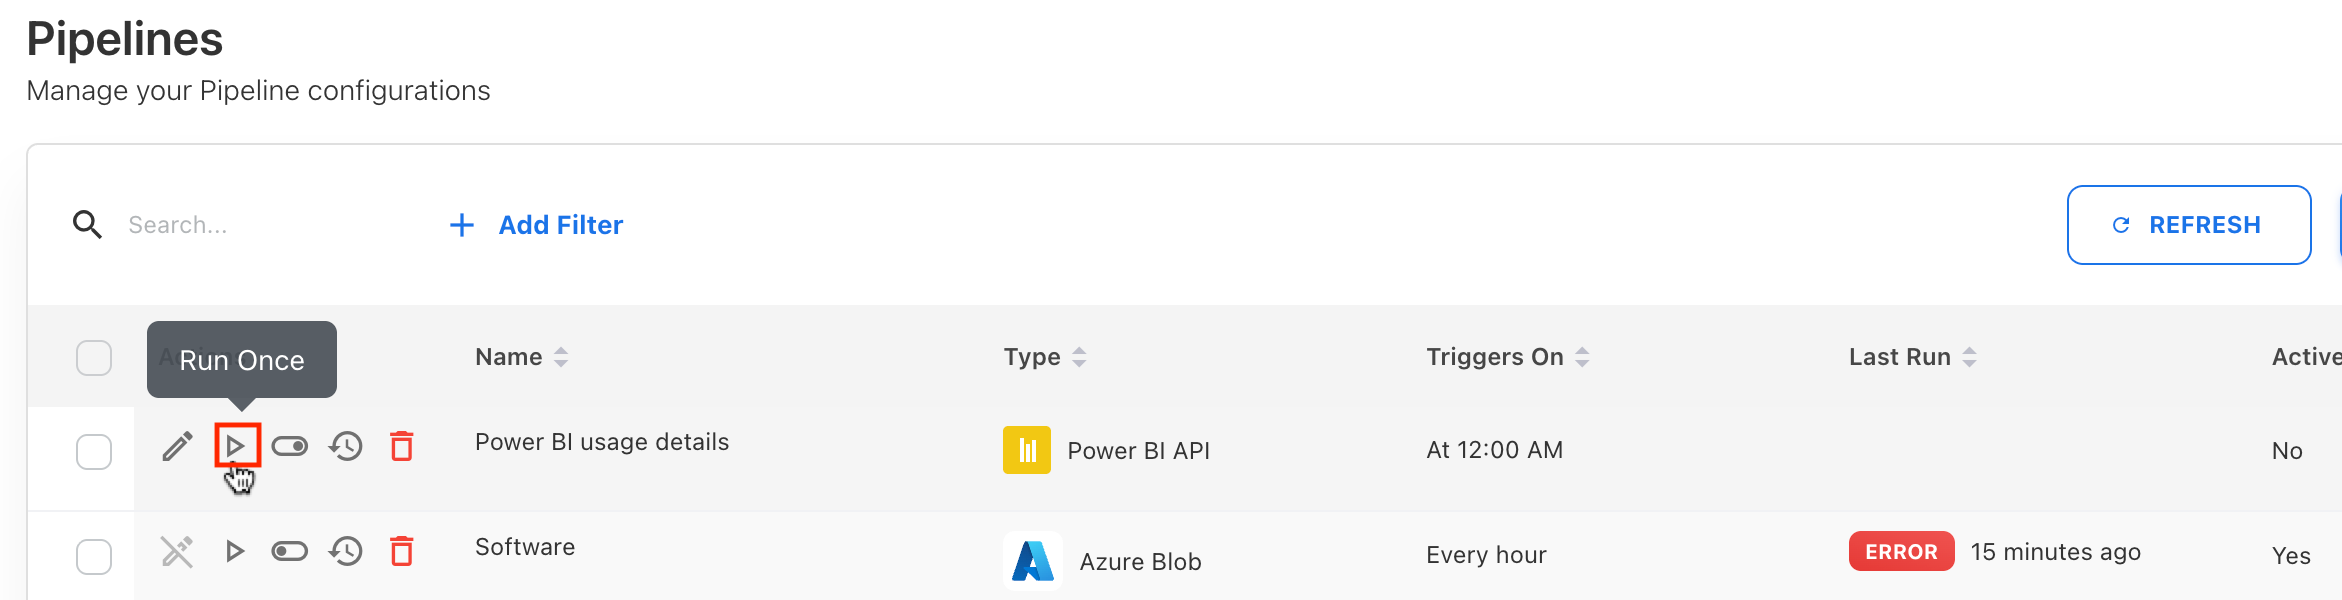
Once activated, the pipeline runs on the scheduled timeframe. You may also use Run Once to trigger an immediate execution.
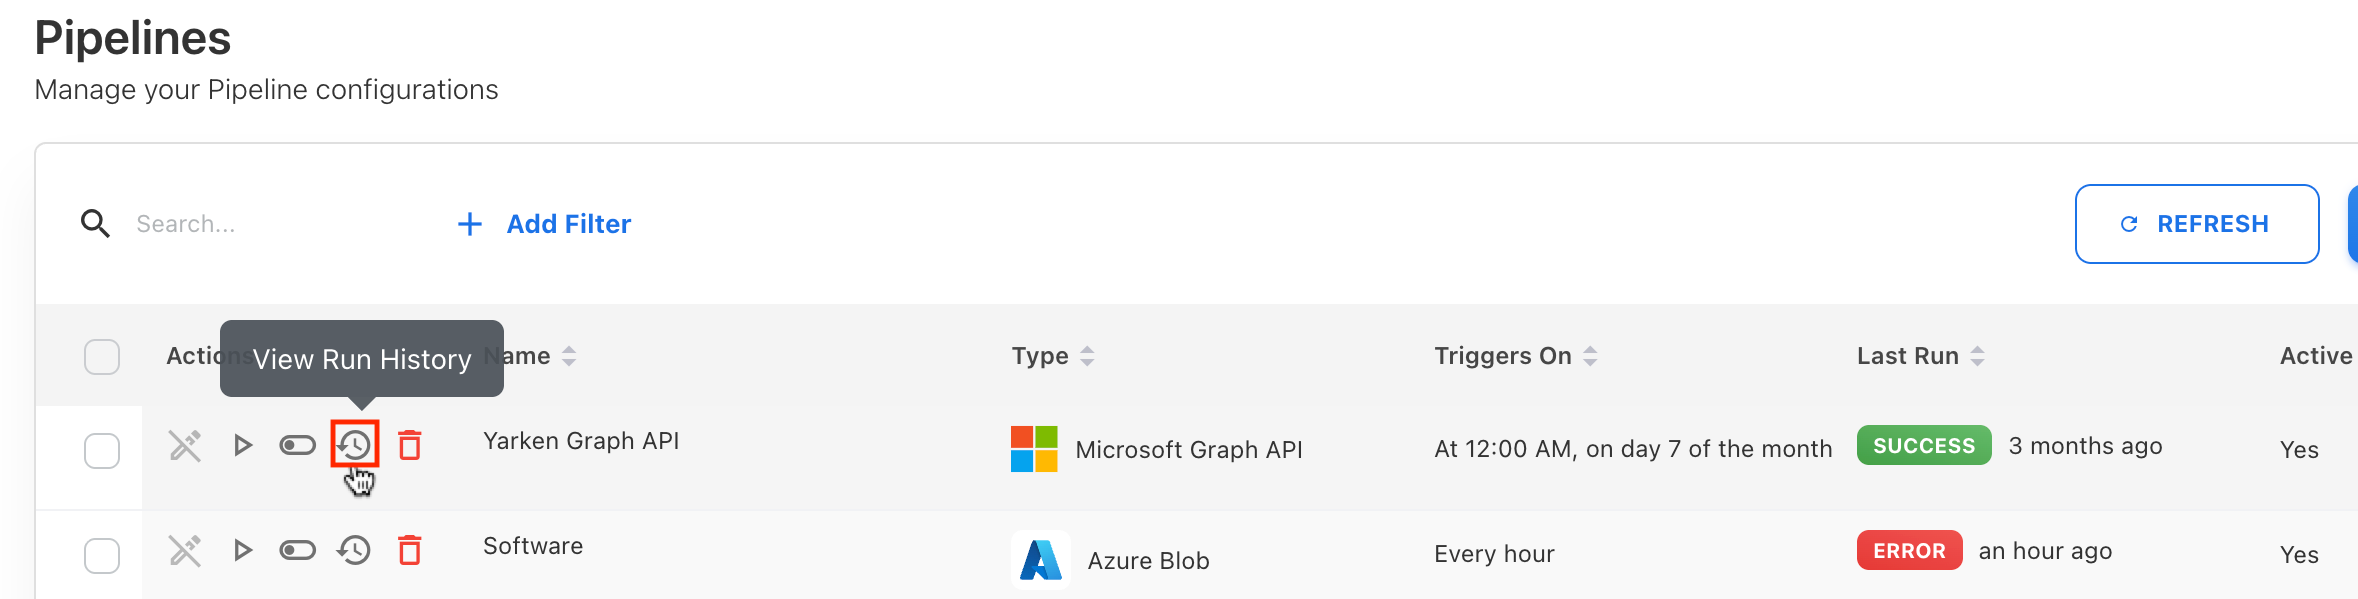
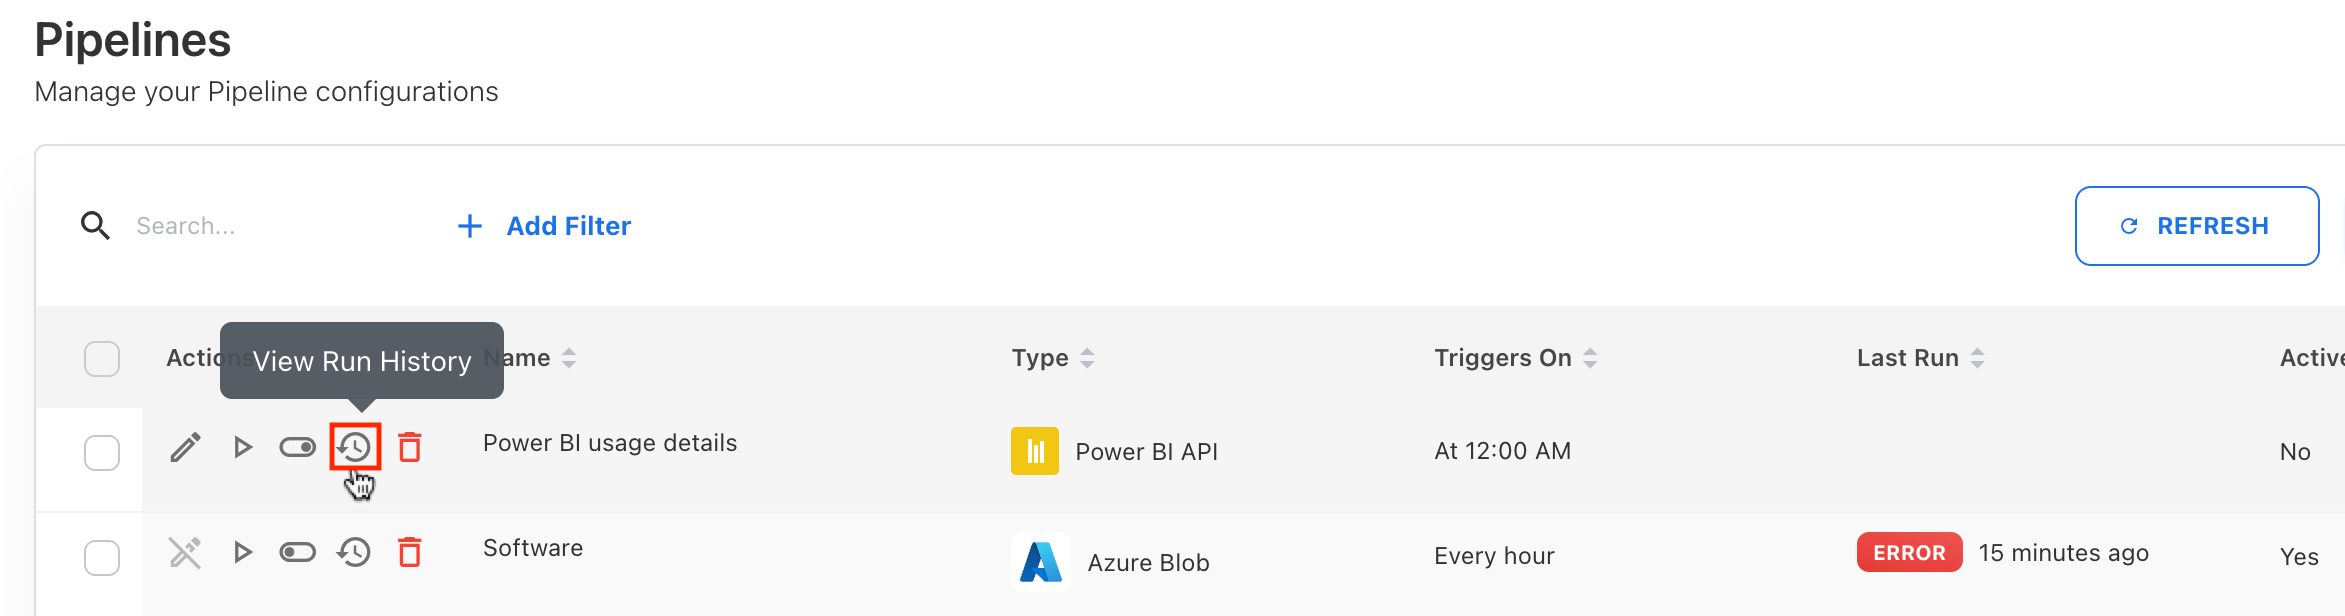
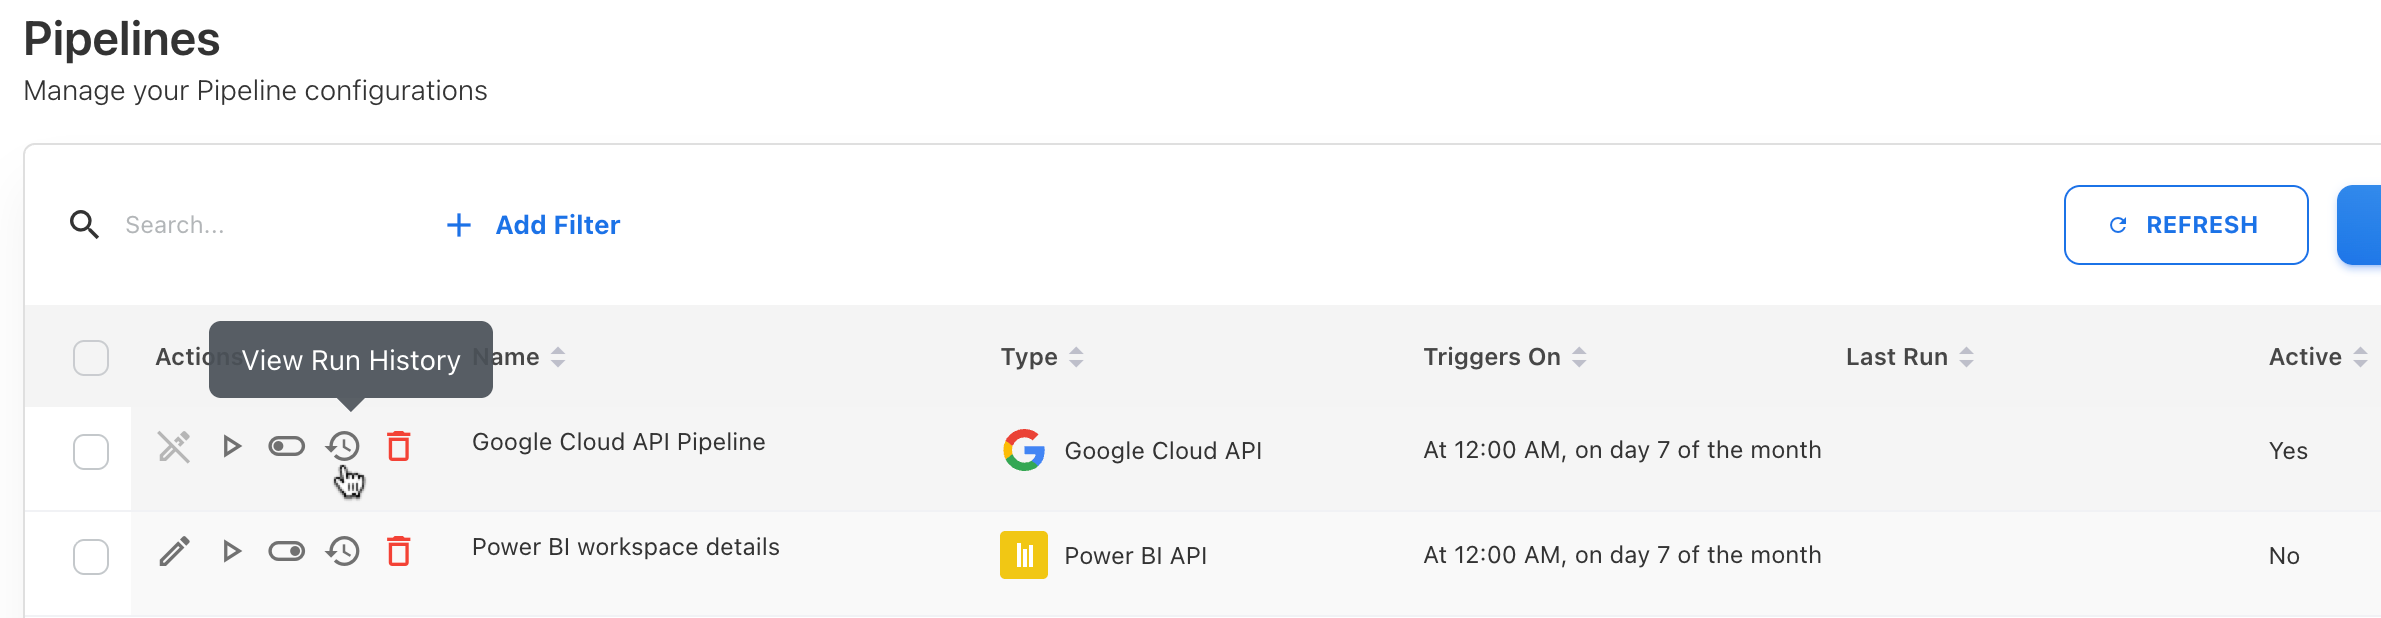
The YäRKEN application immediately starts fetching data. You can click View Run History icon to check the last running status.
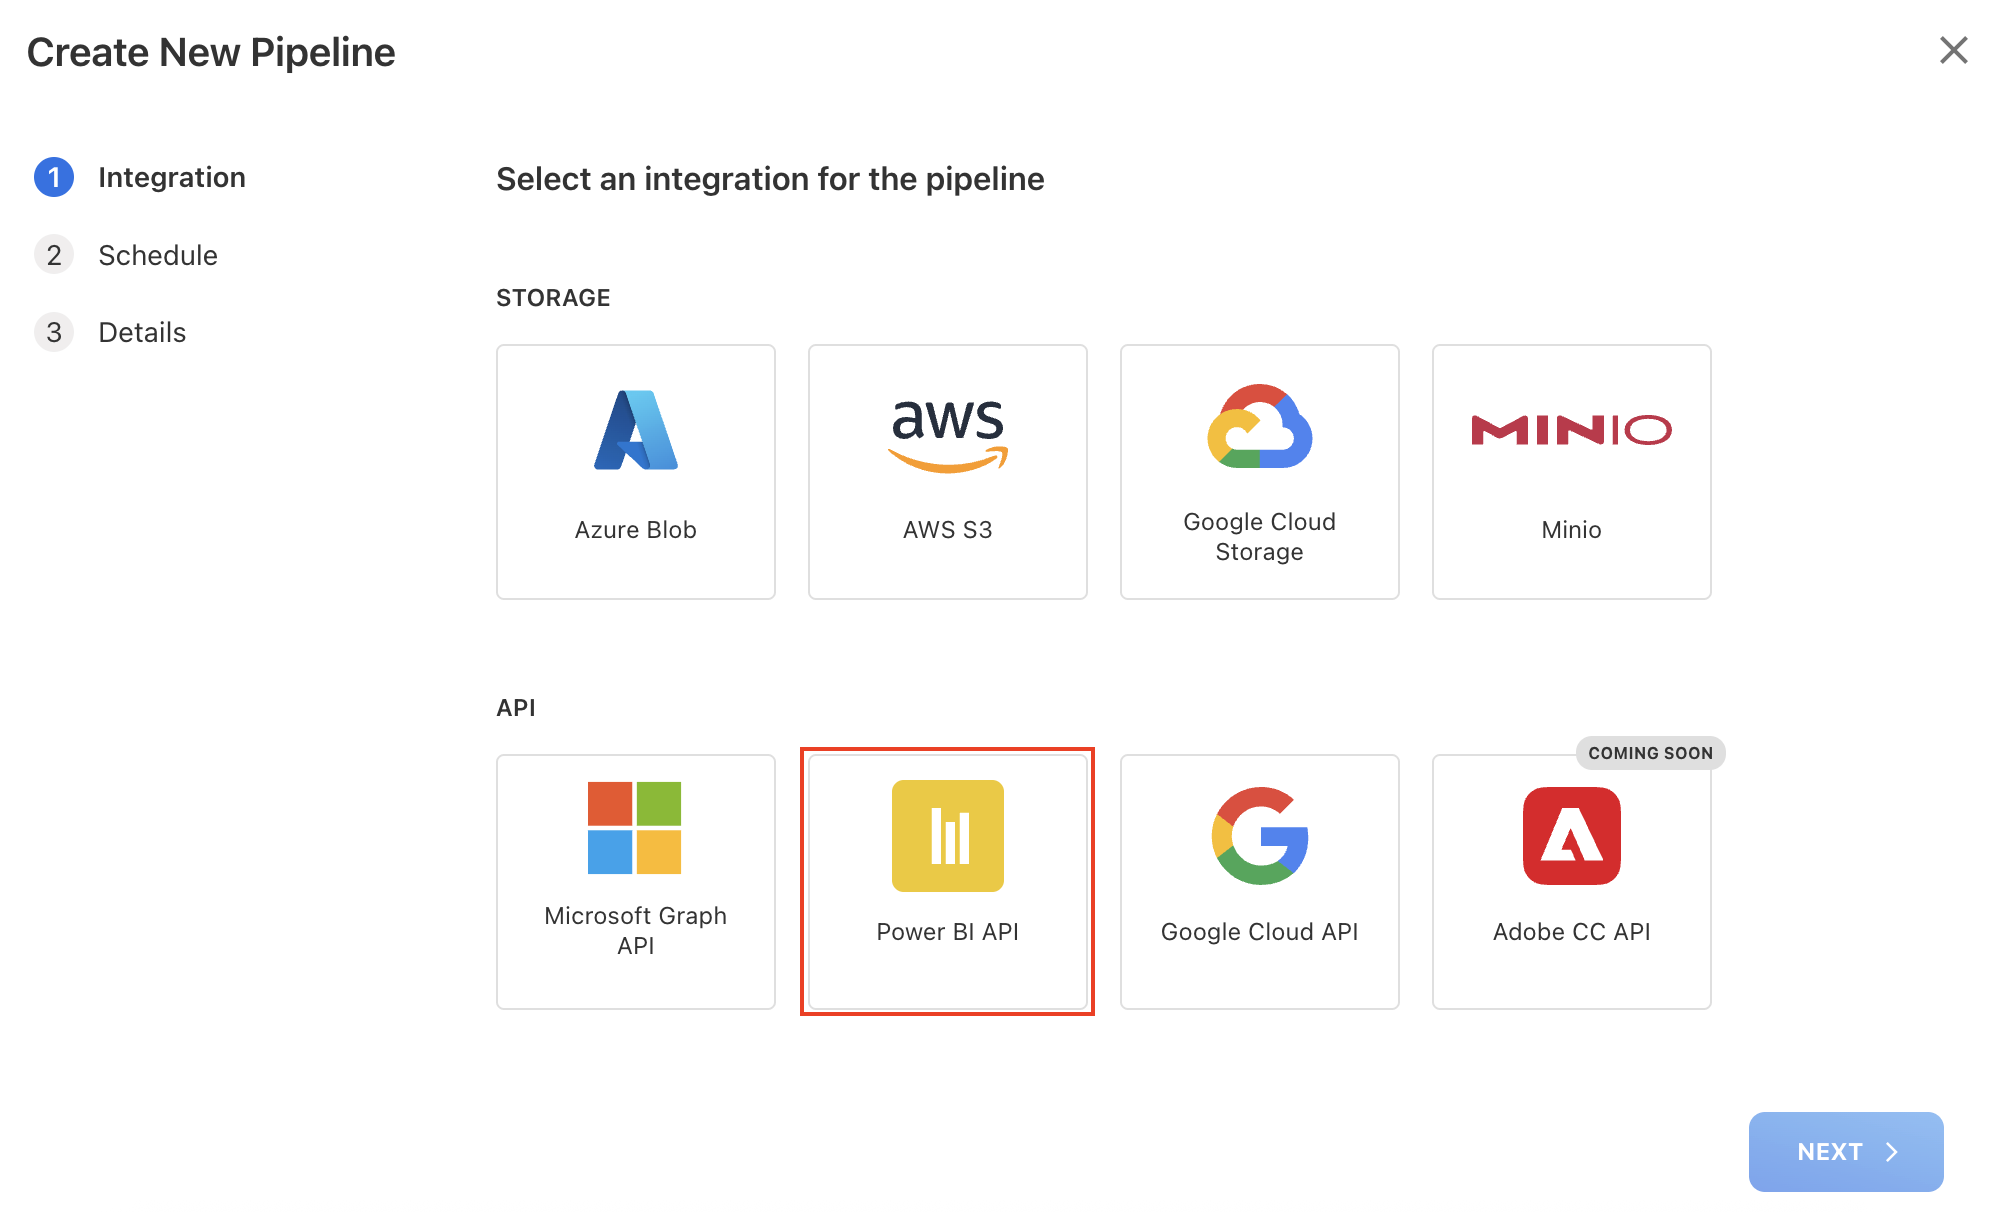
Power BI API
For Power BI, two separate pipelines must be created using the same Power BI connection:
-
One for daily usage details
-
One for monthly workspace details.
Prerequisite
-
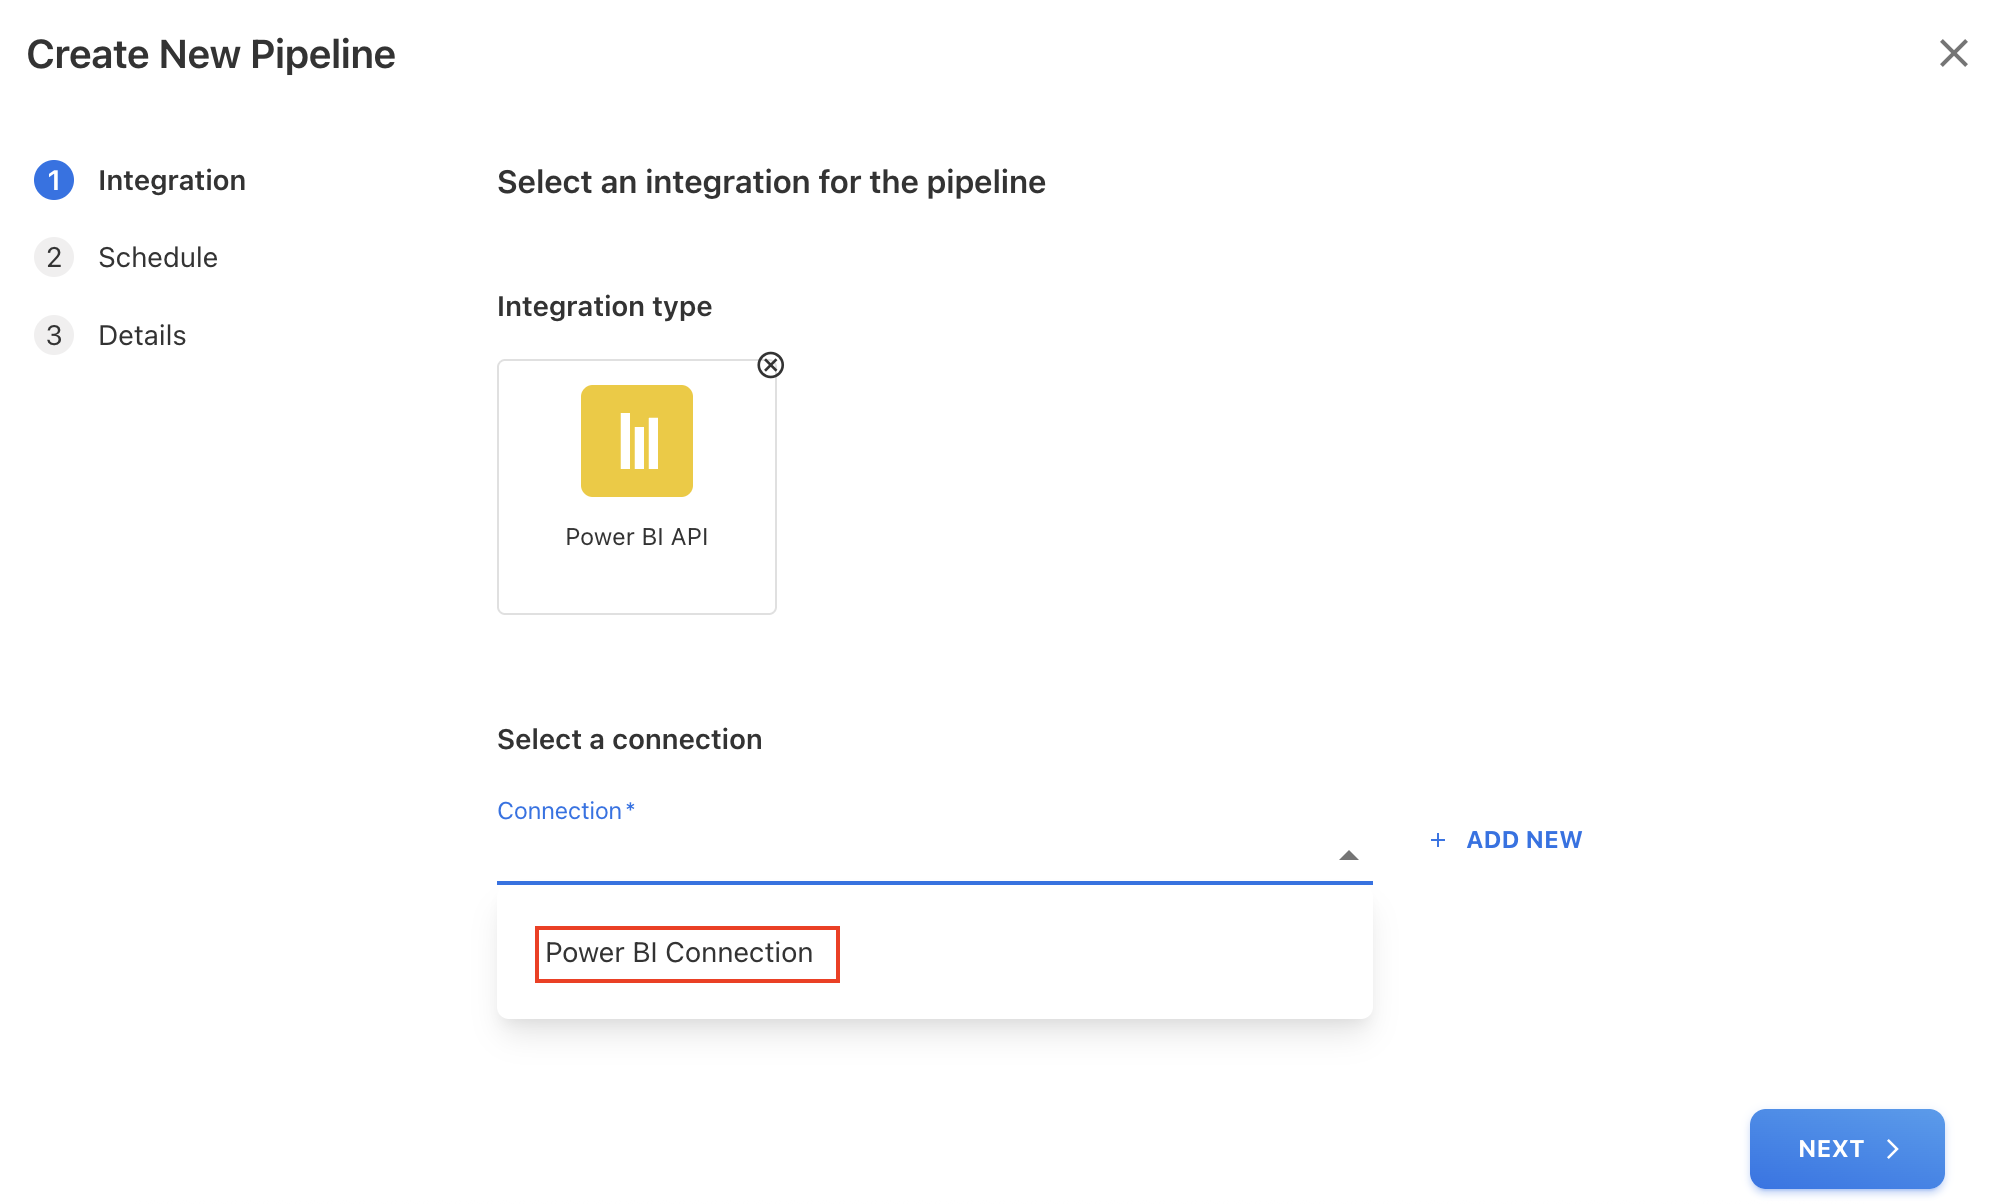
A Power BI API connection must already be configured.
Procedure
Pipeline 1: Power BI Usage Details (Daily)
To configure,
-
Navigate to Admin > Pipelines > Pipelines.
-
On the Pipelines page, click + NEW PIPELINE.
-
On the Create New Pipeline dialog box, select Power BI API and click NEXT.
-
Under Select a connection, click the dropdown icon and select already configured API connection for Power BI API.
-
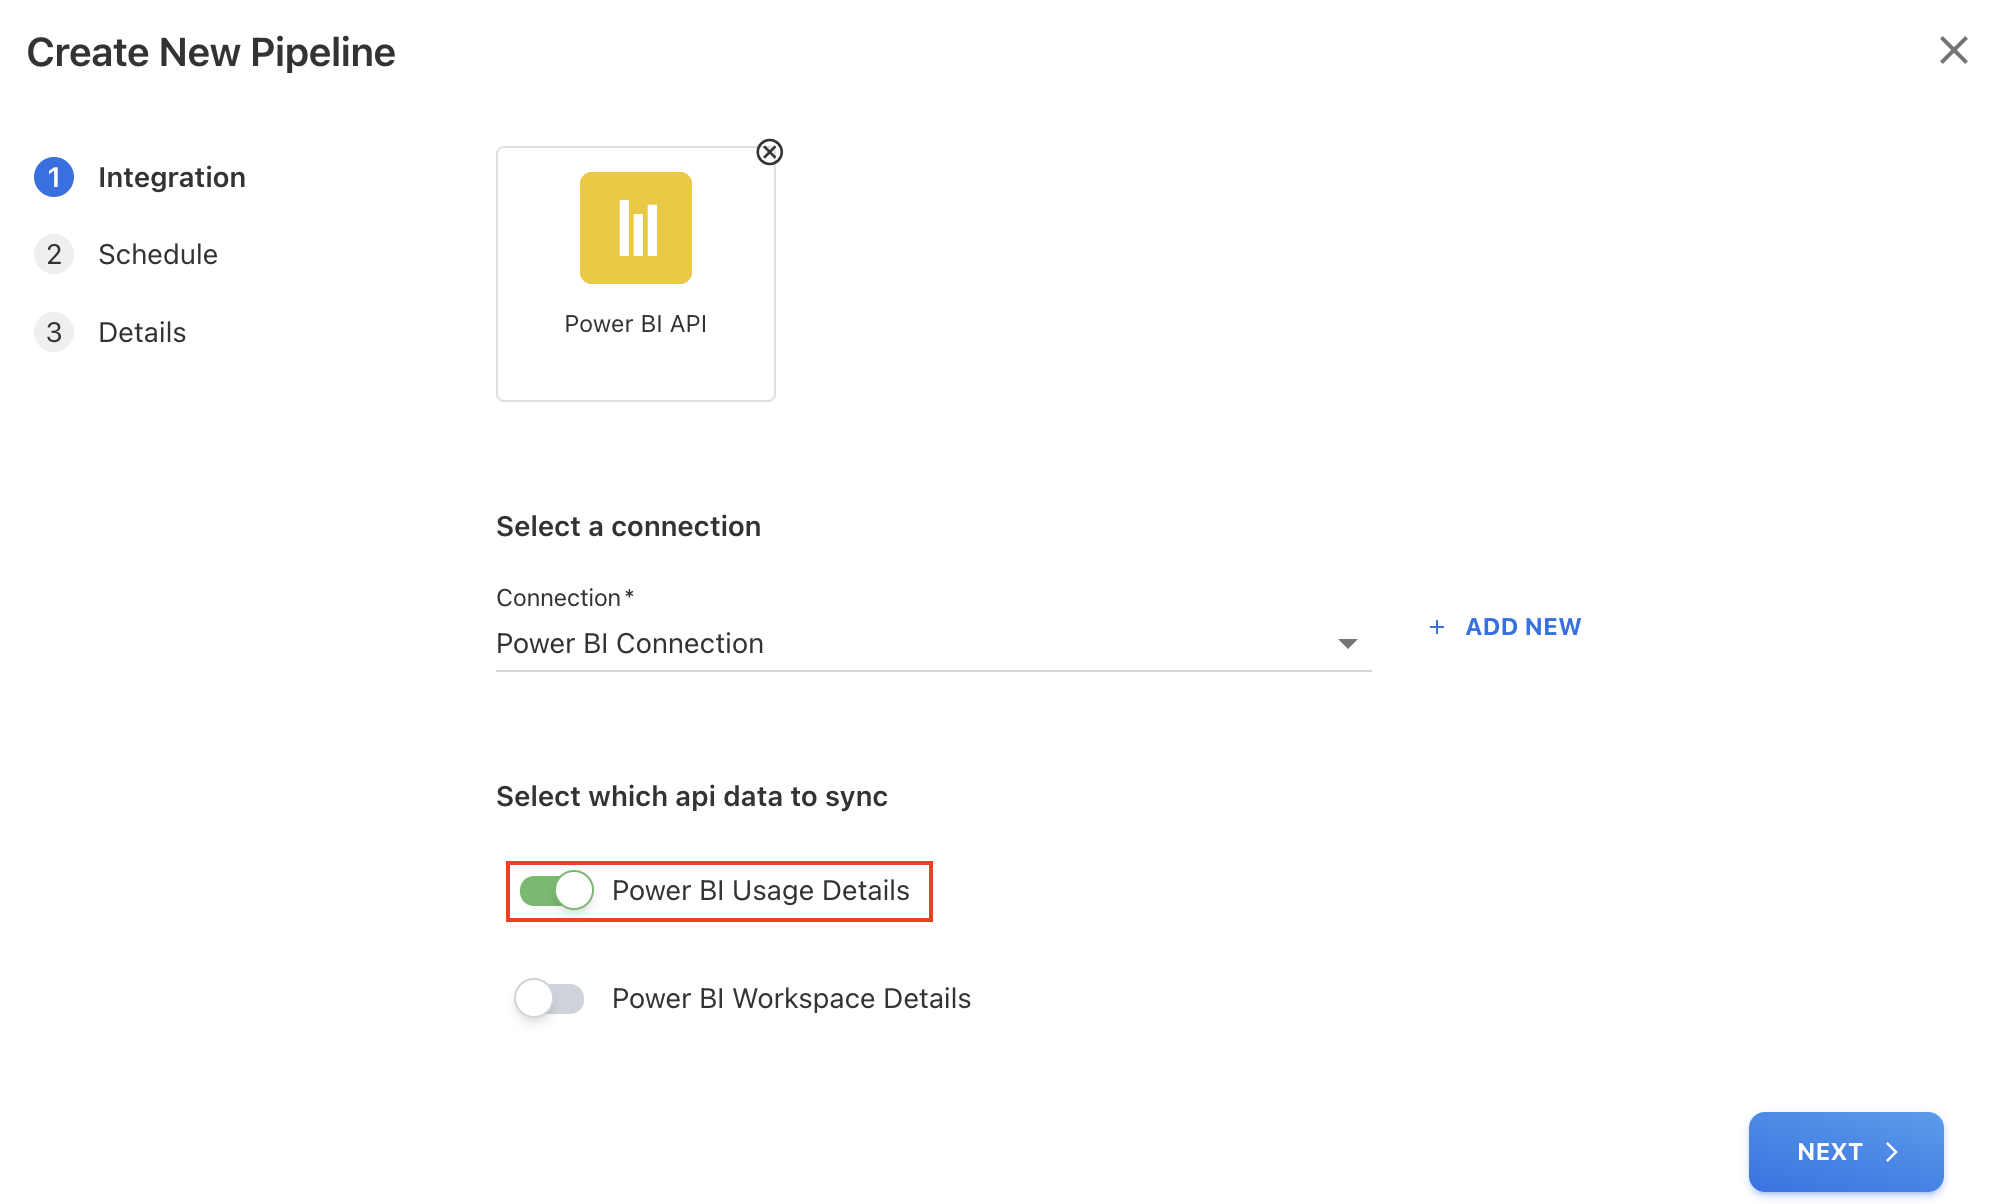
Select Power BI Usage Details to sync and click NEXT.
-
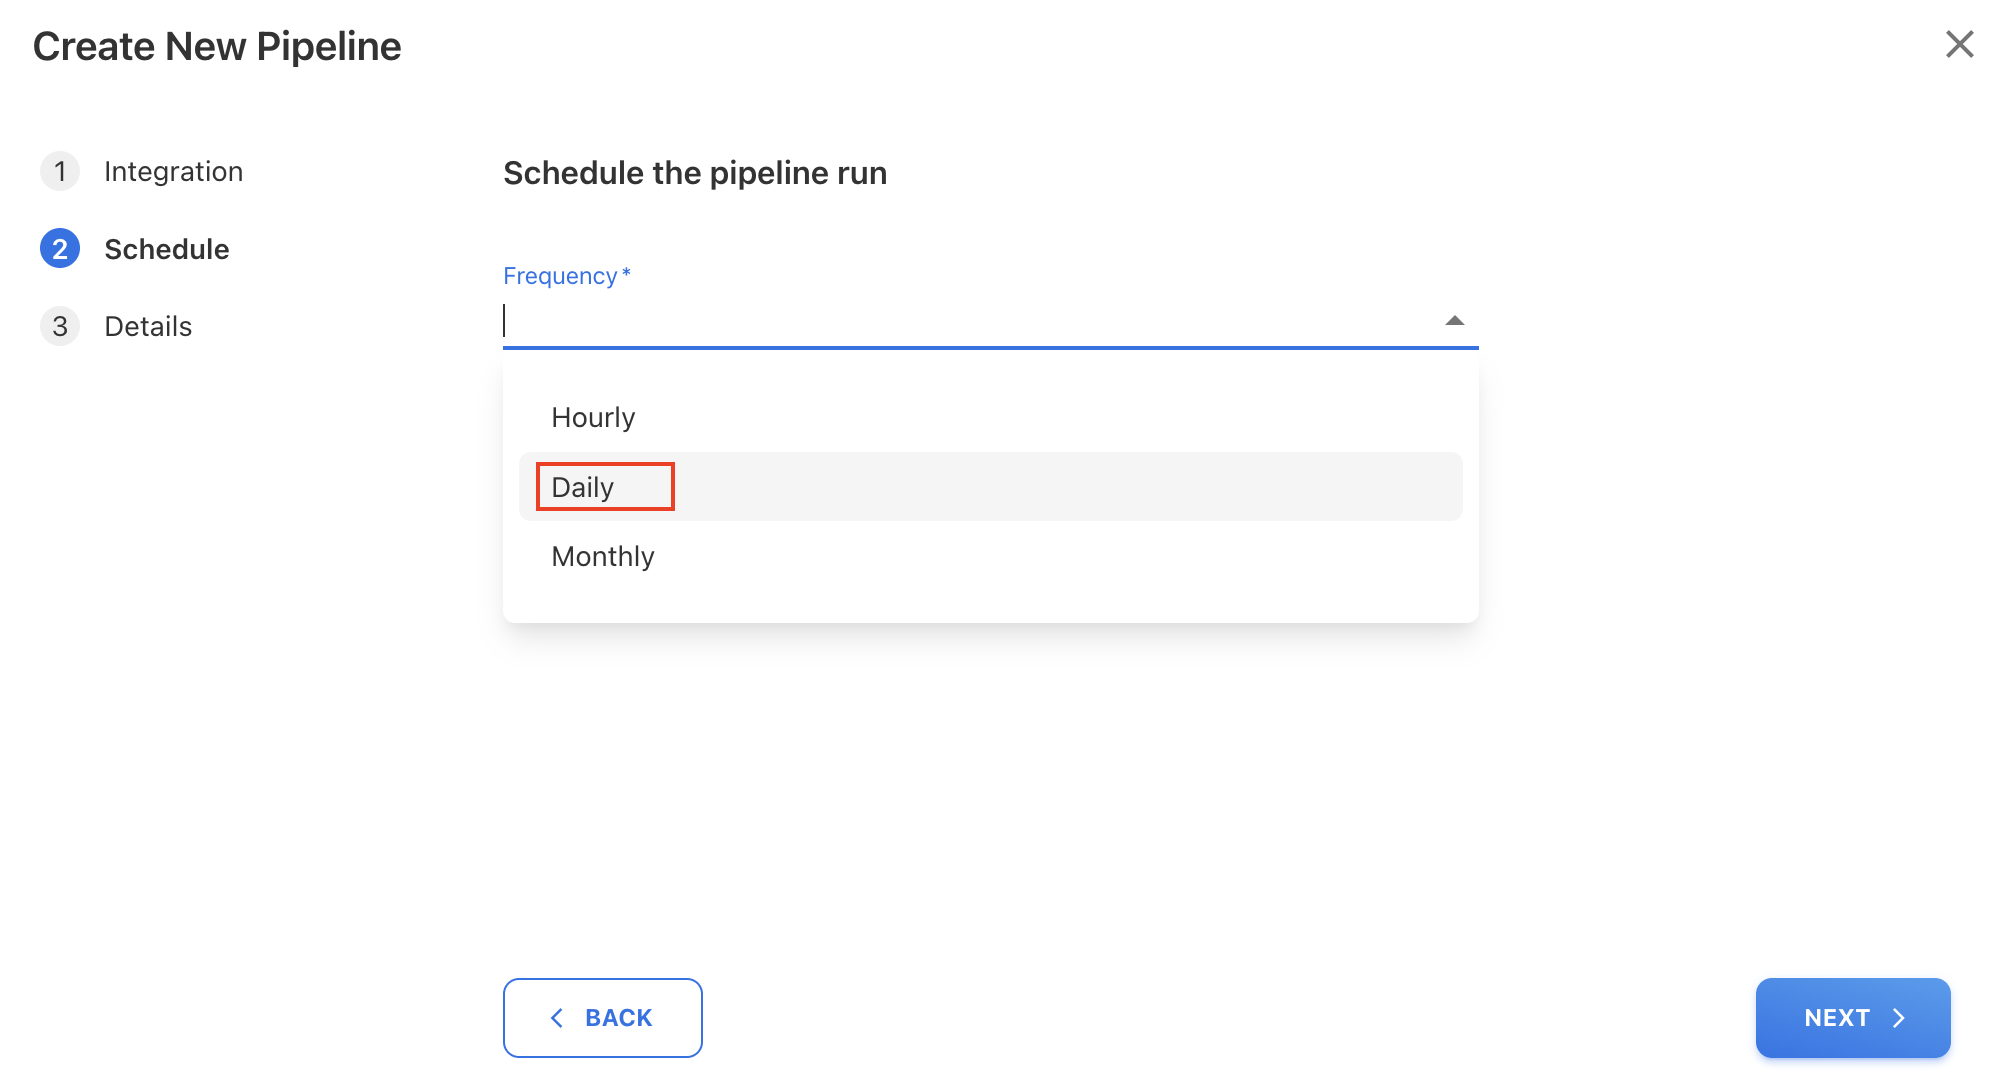
On the Schedule tab, select Daily frequency.
-
Click NEXT.
-
On the Details tab, enter a Pipeline Name and click SAVE.
-
The new pipeline is created in a deactivated state. Activate it using the Activate toggle and click OK on confirmation popup.
-
Once activated, the pipeline runs on the scheduled timeframe. You may also use Run Once to trigger an immediate execution.
The YäRKEN application immediately starts fetching data. You can click View Run History icon to check the last running status.
Pipeline 2: Power BI Workspace Details (Monthly)
Procedure
To configure,
-
Navigate to Admin > Pipelines > Pipelines.
-
On the Pipelines page, click + NEW PIPELINE.
-
On the Create New Pipeline dialog box, select Power BI API and click NEXT.
-
Under Select a connection, click the dropdown icon and select already configured API connection for Power BI API.
-
Select Power BI Workspace Details to sync and click NEXT.
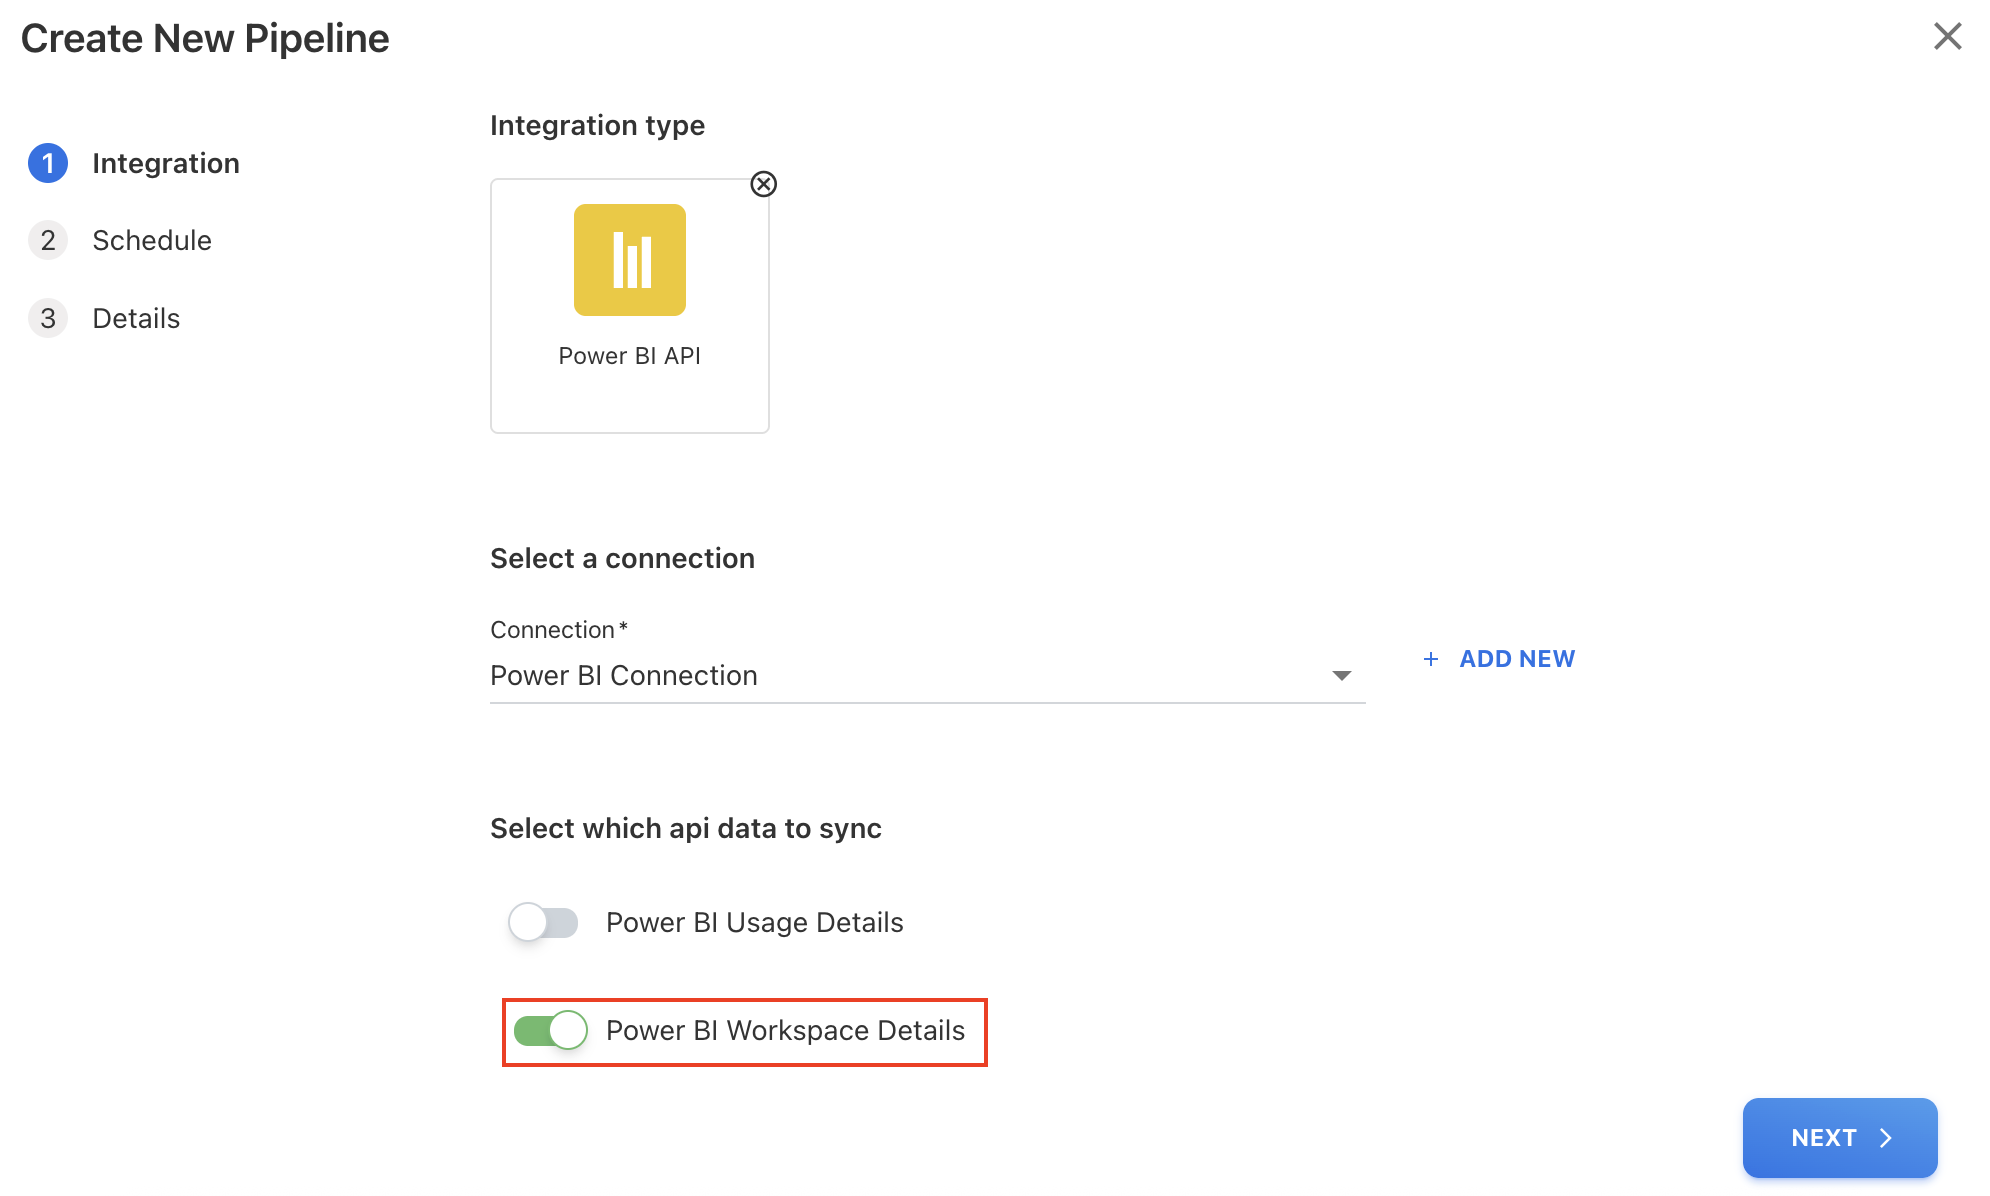
-
On the Schedule tab, select Monthly frequency and choose Day 7 of every 1 month.
-
Click NEXT.
-
On the Details tab, enter a Pipeline Name and click SAVE.
-
The new pipeline is created in a deactivated state. Activate it using the Activate toggle and click OK on confirmation popup.
-
Once activated, the pipeline runs on the scheduled timeframe. You may also use Run Once to trigger an immediate execution.
The YäRKEN application immediately starts fetching data. You can click View Run History icon to check the last running status.
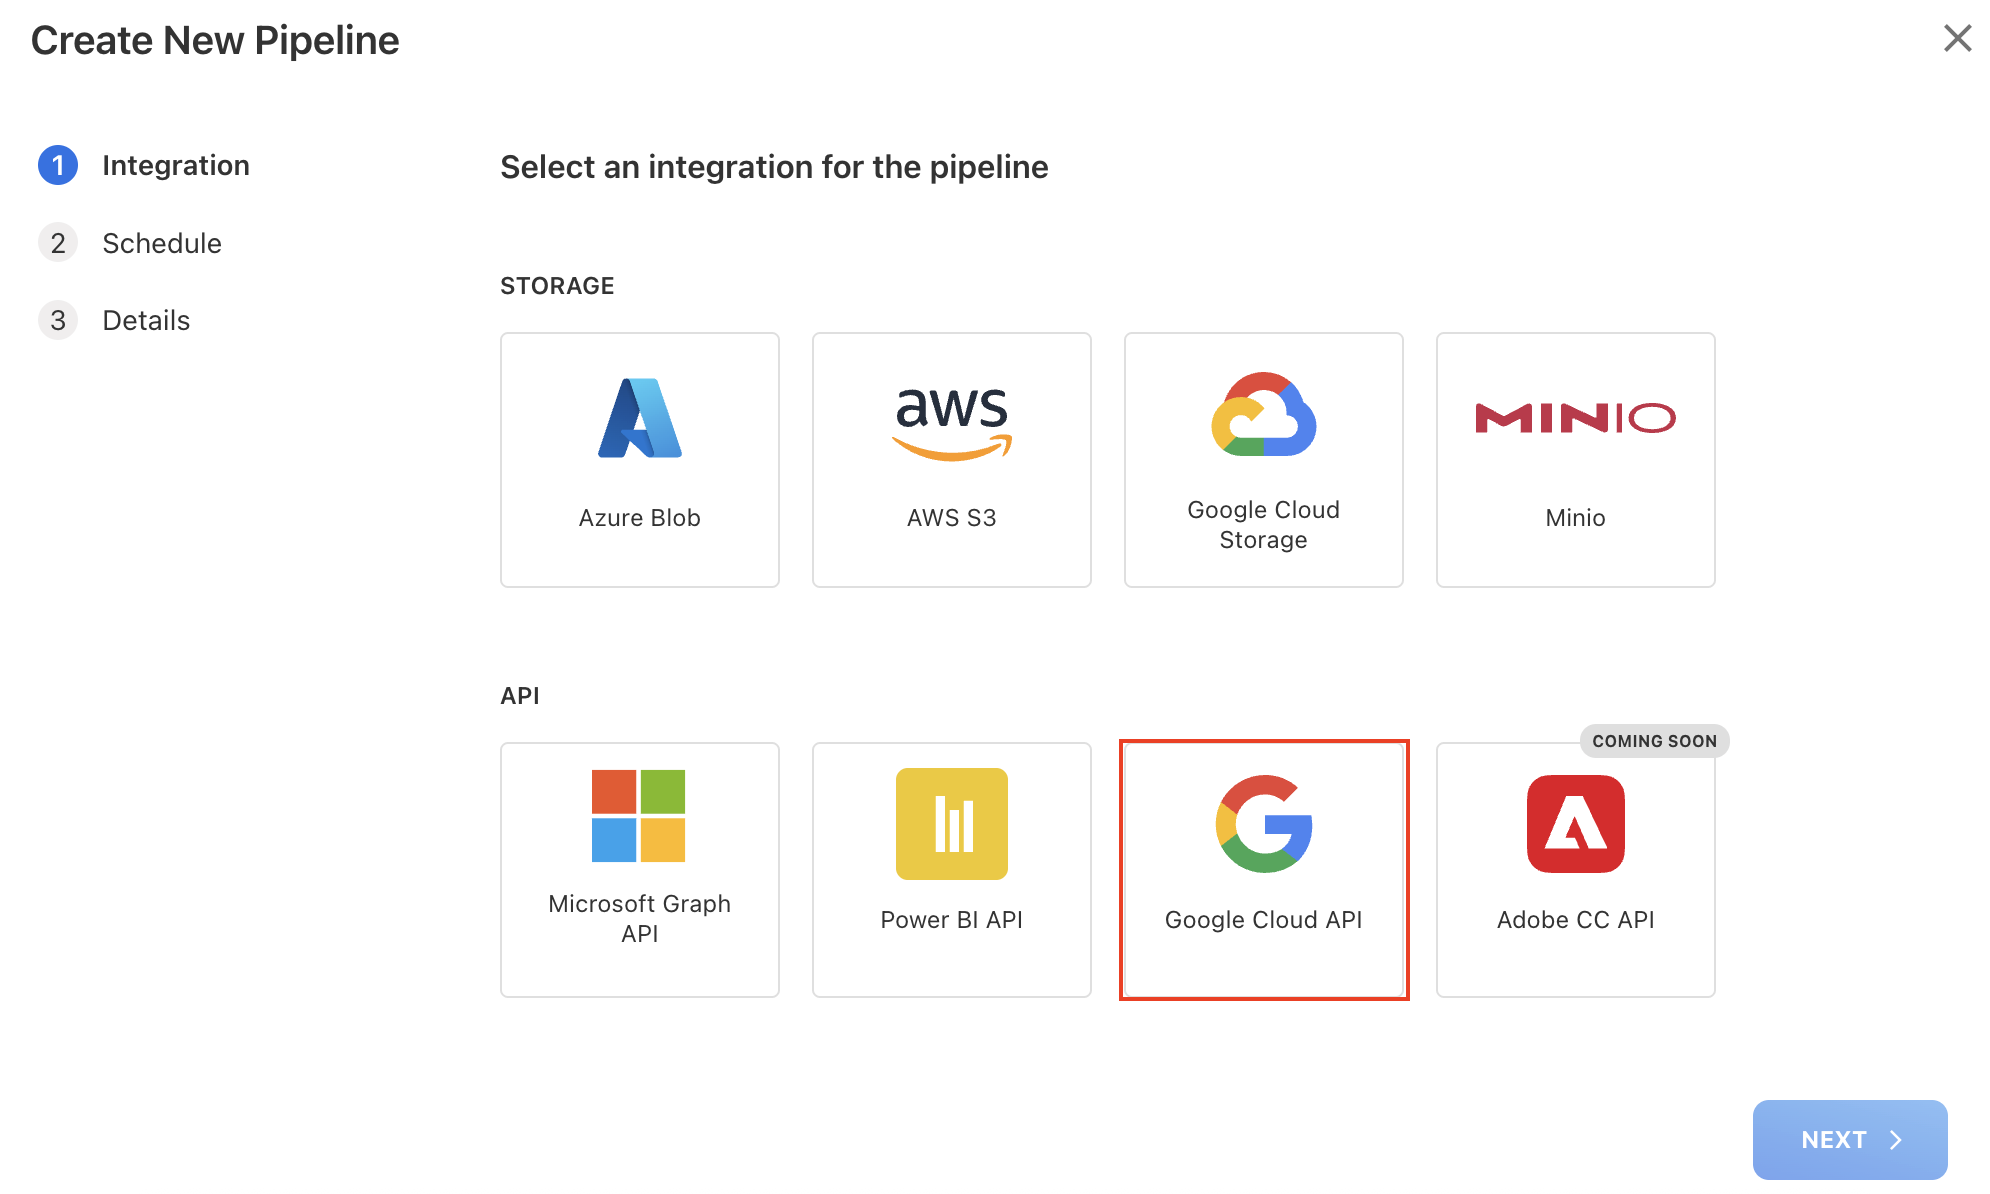
Google Cloud API
The Google Cloud API pipeline is used to collect:
-
Sign-in details
-
Product usage details
Prerequisite
-
A Google API connection must be configured before creating the pipeline.
Procedure
To configure,
-
Navigate to Admin > Pipelines > Pipelines.
-
On the Pipelines page, click + NEW PIPELINE.
-
On the Create New Pipeline dialog box, select Google Cloud API and click NEXT.
-
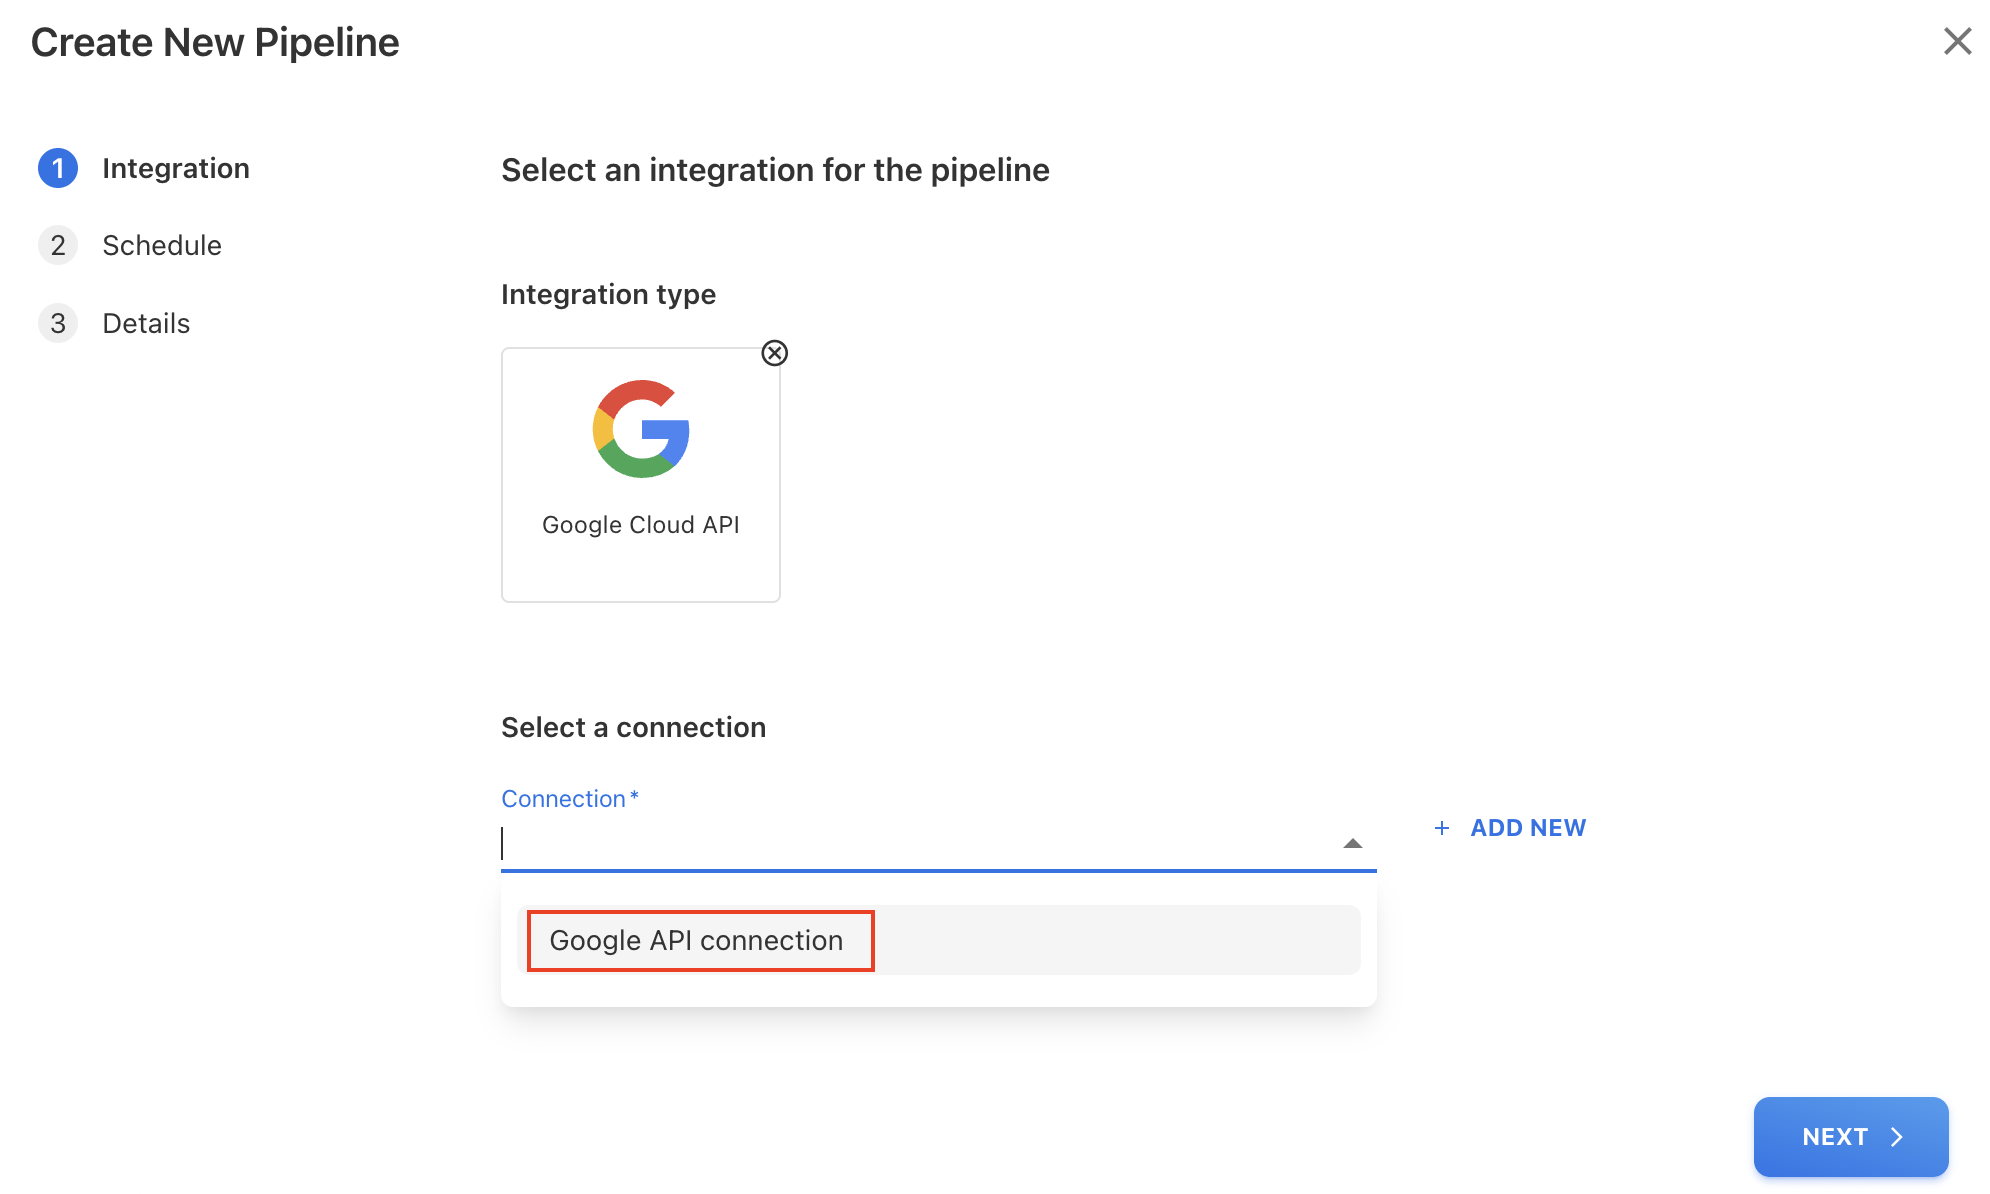
Under Select a connection, click the dropdown icon and select already configured API connection for Google Cloud API.
-
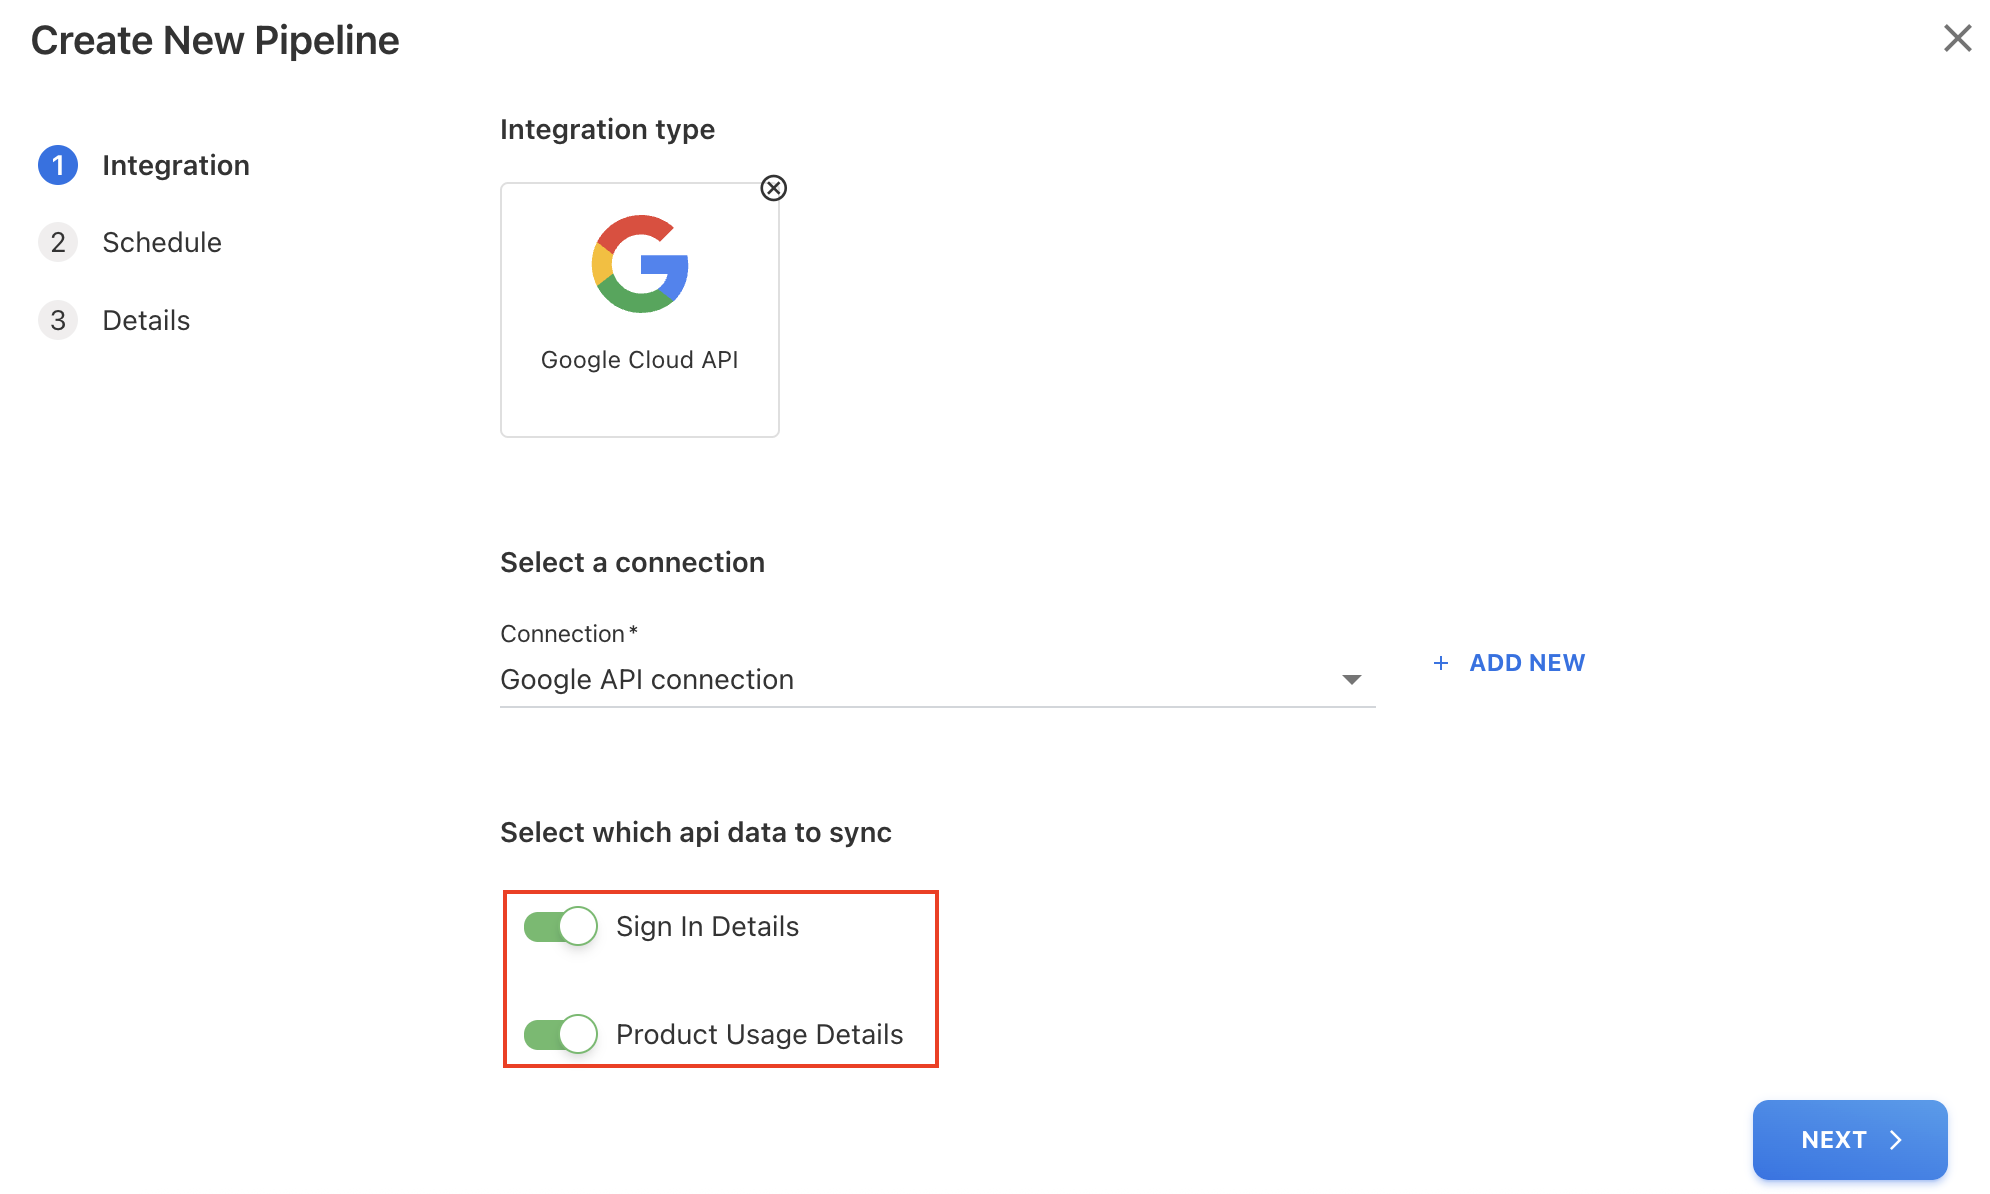
Select the API data to sync and click NEXT:
-
Sign In Details
-
Product Usage Details
-
-
On the Schedule tab, select Monthly frequency and choose Day 7 of every 1 month (recommended).
-
Click NEXT.
-
On the Details tab, enter a Pipeline Name and click SAVE.
-
The new pipeline is created in a deactivated state. Activate it using the Activate toggle and click OK on confirmation popup.
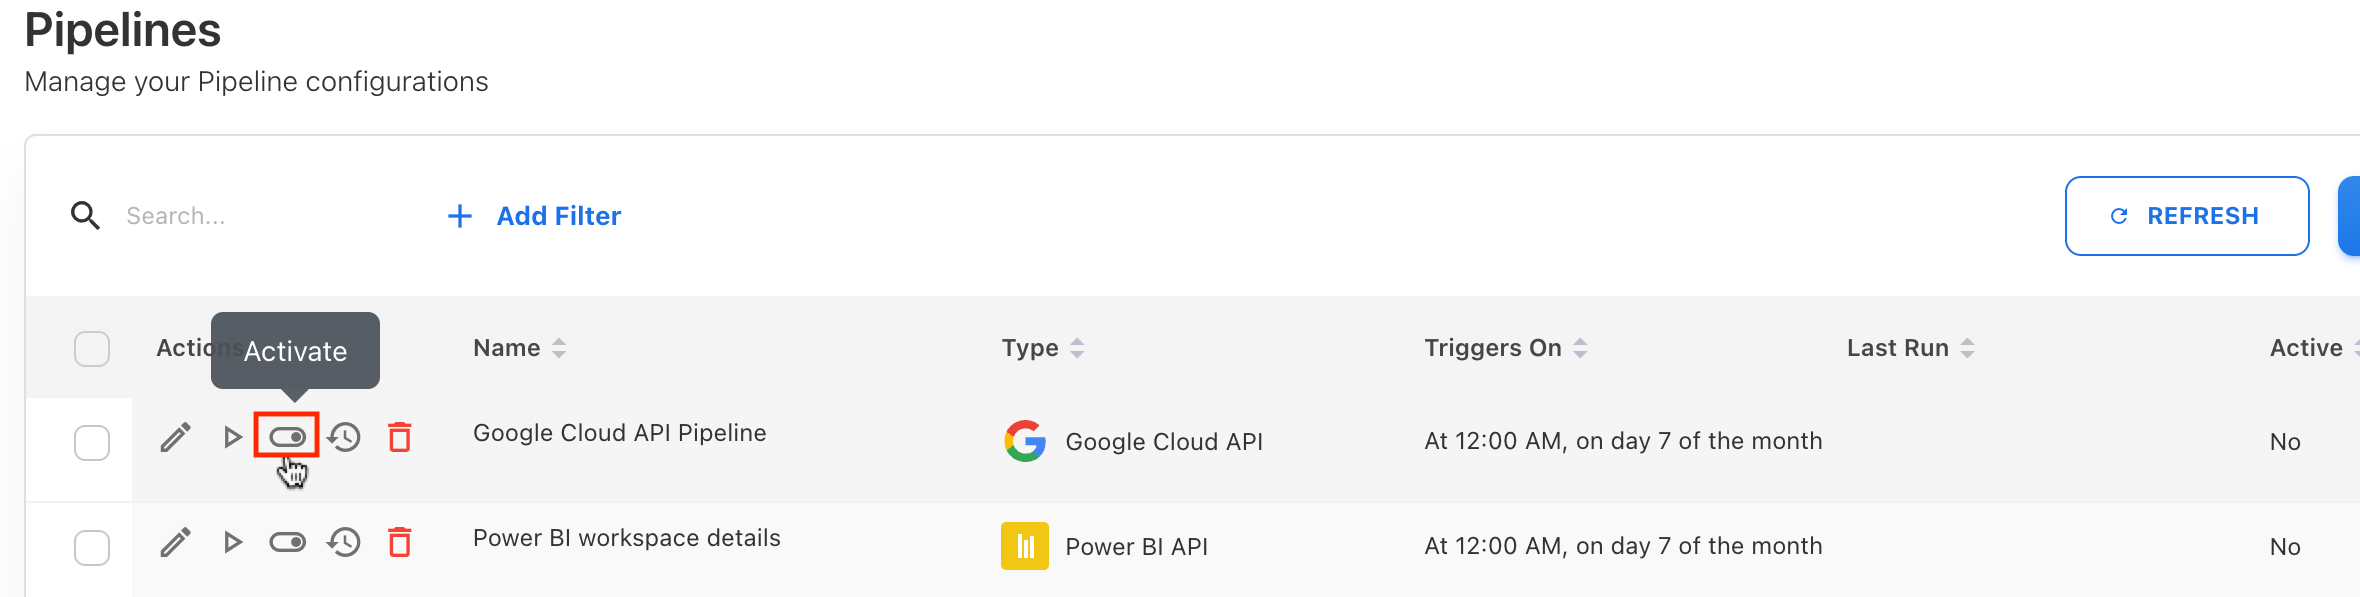
-
Once activated, the pipeline runs on the scheduled timeframe. You may also use Run Once to trigger an immediate execution.
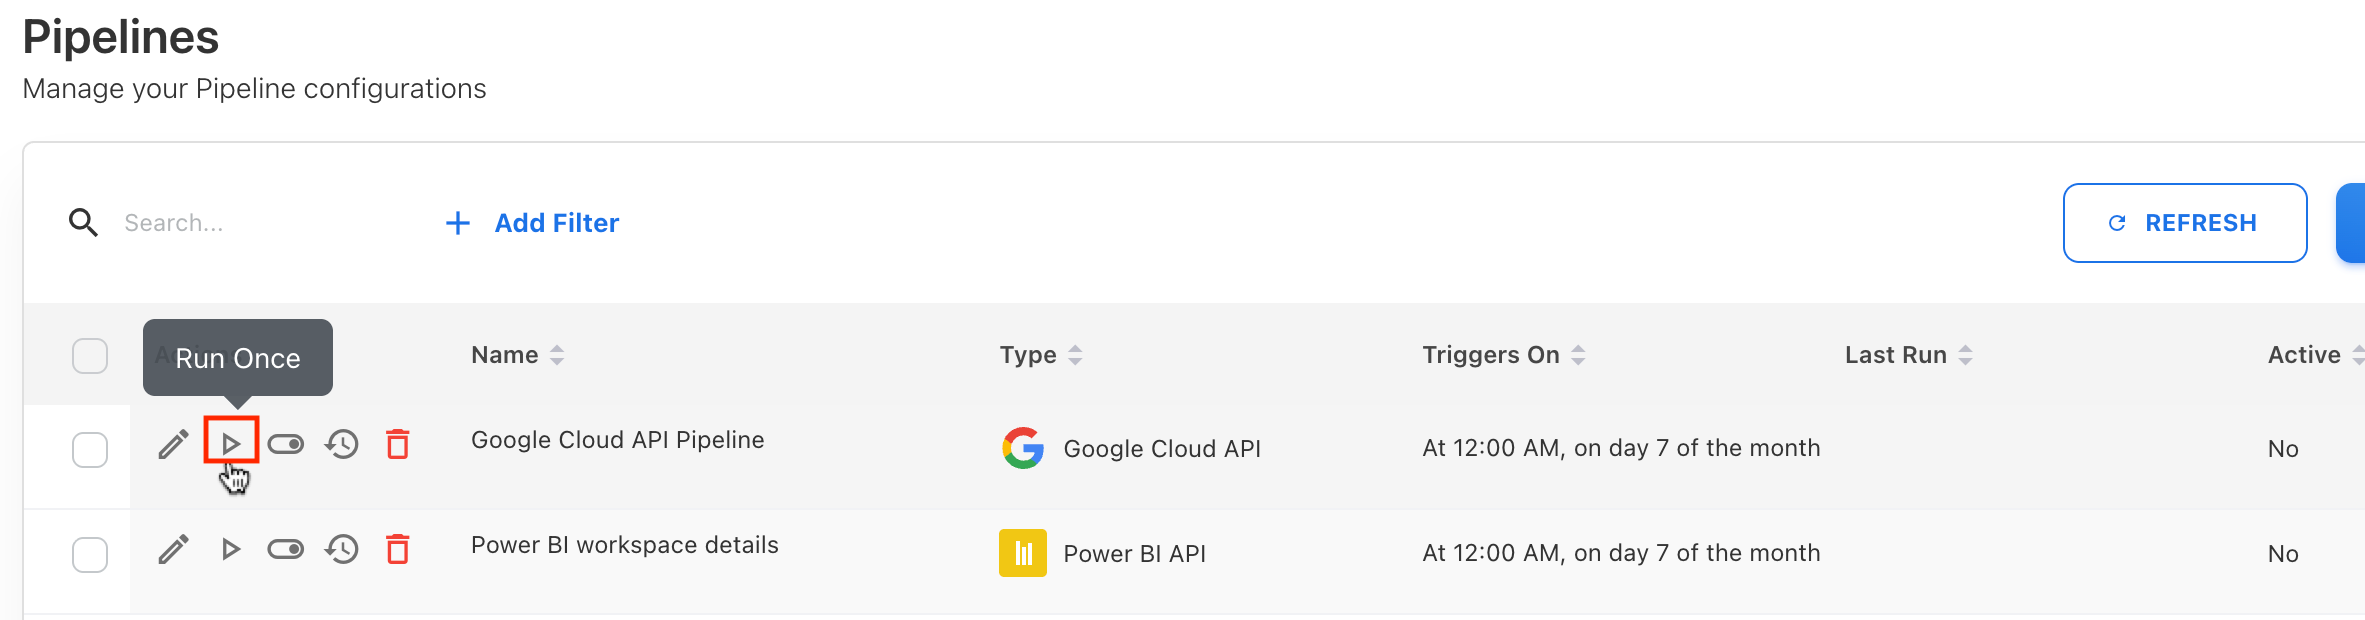
The YäRKEN application immediately starts fetching data. You can click View Run History icon to check the last running status.
Related content
Creating a new Pipeline Connection | Create API Connection using Consent URL
Creating a new Pipeline Connection | Create API Connection manually
Creating a new Pipeline Connection | Create Cloud Storage Connection (manual only)