
The Cloud Usage Data screen allows you to upload and manage your monthly cloud consumption data. This screen displays monthly cloud usage data for the selected year and month. The cloud usage upload feature lets you to manually add your monthly cloud usage data by uploading cloud files provided by your cloud service providers.
Supported Cloud Platforms
The Cloud Usage Upload feature supports uploading usage data in CSV format for the following cloud providers:
-
Azure
-
AWS_v2
-
AWS_legacy
-
FOCUS
Note: Providers are configurable. Administrators can add new provider through Settings > Provider. Any newly added provider is automatically treated as FOCUS format with FOCUS-standard service categories.
Key Benefits
The cloud consumption data is used to generate detailed reports and dashboards that offer insights into your cloud spend, cloud services, cloud resources, usage patterns, and potential cost-saving opportunities.
Mandatory fields
To successfully upload cloud usage data, each CSV file must include specific mandatory fields for each cloud provider. These fields ensure that the system can correctly process and allocate your usage data. Below are the mandatory fields for each supported provider:
How to Upload
-
Prepare Your File
-
Ensure the file is in the CSV or XLSX format for the upload.
-
Verify that the file includes all the mandatory fields.
-
-
Navigate to the Consumption Data screen
-
Go to Admin > Yarken Designer.
-
Under the upload section expand Consumption and select Cloud.
-
-
Select your cloud provider file type
-
Click ellipsis (…) menu icon and select Add Usage Data option.
-
Select the desired file type.
-
-
Upload and map the fields
-
Drag or drop your file into the upload popup, or click browse.
-
Map the fields and click NEXT.
-
-
Choose the date format for cloud spend
-
Select the Date Format that matches your file's date columns.
-
Click FINISH.
-
Note: Account, Cost Center, and Vendor fields are no longer available on the manual upload screen. These fields must be populated using Upload Rules. Cloud spend cannot be published unless Account, Cost Center, and Vendor are assigned via Upload Rules.
For more information on configuring Upload Rules for cloud consumption data, refer to Use Upload Rules.
Upload Errors and Troubleshooting
If the upload fails, you will see an error message with specific details on the Data Upload Error popup. Below are some common upload errors and how to address them:
-
Invalid data values - Check negative costs, or decimal separator.
-
Incorrect date format - This error occurs when the date format in the file does not match with the date format defined during mapping. To resolve this:
-
Verify the date format in your file.
-
Re-upload the file and select the different date format similar to your file’s date format
-
Make sure that all the date columns should be uniform date format.
-
View Uploaded Data
After successful upload, navigate to the Cloud Usage Data screen and refer the donut chart of any month. The monthly tiles indicates the total cloud spend value and donut chart shows the proportional breakdown of cloud spend by individual provider.
View Uploaded Files
You can view the uploaded files from the (…) menu icon on the monthly tiles. All the uploaded files for a month are available under the UPLOADED FILES tab. From this tab, you can download, reload, automate, or delete the uploaded files. You can also view the total loaded records, the mapping field, and errors encountered during upload.
Upload Rules for Cloud Consumption Data
For cloud consumption uploads (Azure, AWS, FOCUS), the Account, Cost Center, and Vendor fields must be populated using Upload Rules. These fields are no longer available for selection during the manual upload process.
Cloud spend cannot be published unless Account, Cost Center, and Vendor are assigned via Upload Rules
Key points:
-
Cloud spend cannot be published unless Account, Cost Center, and Vendor are assigned via Upload Rules.
-
Define Upload Rules for the cloud consumption source table to automatically populate these fields during file upload.
-
If you have already uploaded cloud data without these rules, you may delete the existing file, define the Upload Rules, and reload the file to apply the rules.
-
For any cloud data intended for AI financial tracking, the AI Service field should be considered a standard mapping requirement and must be populated using upload rules. Mapping spend to the AI Service field allows for automatic population of AI attributes in the Cloud asset type during the publish process.
For step-by-step instructions on creating Upload Rules, refer to Manage Upload Rules.
Manage Cloud Spend
The Manage Cloud Spend allows you to view the total cloud spend distribution across Providers, Account, Cost Center, Vendor, Cloud Asset, and Cloud Team. You can publish your cloud spend to the Cost Transparency model and Forecasting feature.
What is Cloud Spend Publish?
Cloud spend publishing is the process of transferring monthly cloud spend data to Cost Transparency model for analysis and reporting. It also pushes the spend data to the forecasting feature, which compares the actual and forecasted spend for a given month.
Publishing the cloud spend provides the visibility into cloud costs and their distribution across providers, accounts, cost centers, vendors, and cloud assets.
How to publish the cloud spend?
Before publishing, make sure a cloud asset is associated with the cloud spend. This ensures that spend entries are linked to the corresponding cloud assets for reporting and analysis.
Use Upload Rules to create cloud assets before loading the cloud spend. For more information, see Create cloud asset using Upload Rule
The published icon on the month tile makes it easy to recognize the month for which spend is published.
Upload rules
-
If you want to create the cloud asset for already uploaded cloud data, you may delete the existing file, define the upload rules especially for the cloud asset and reload that file. This will create the cloud asset according to the upload rules.
-
AI Service fields must be populated using Upload Rules. Mapping spend to the AI Service field allows for automatic population of AI attributes in the Cloud asset type during the publish process.
Note: For cloud spend publishing, populate Account, Cost Center, and Vendor via Upload Rules. Cloud spend cannot be published unless these fields are set. Likewise, publishing is blocked if the cloud asset is not associated with a cloud resource.
Choose the distribution levels
When publishing cloud spend, you can choose how far the spend is distributed for each available Spend model.
The Cloud Summary displays the cloud asset count, total spend, available Spend models, and distribution levels.
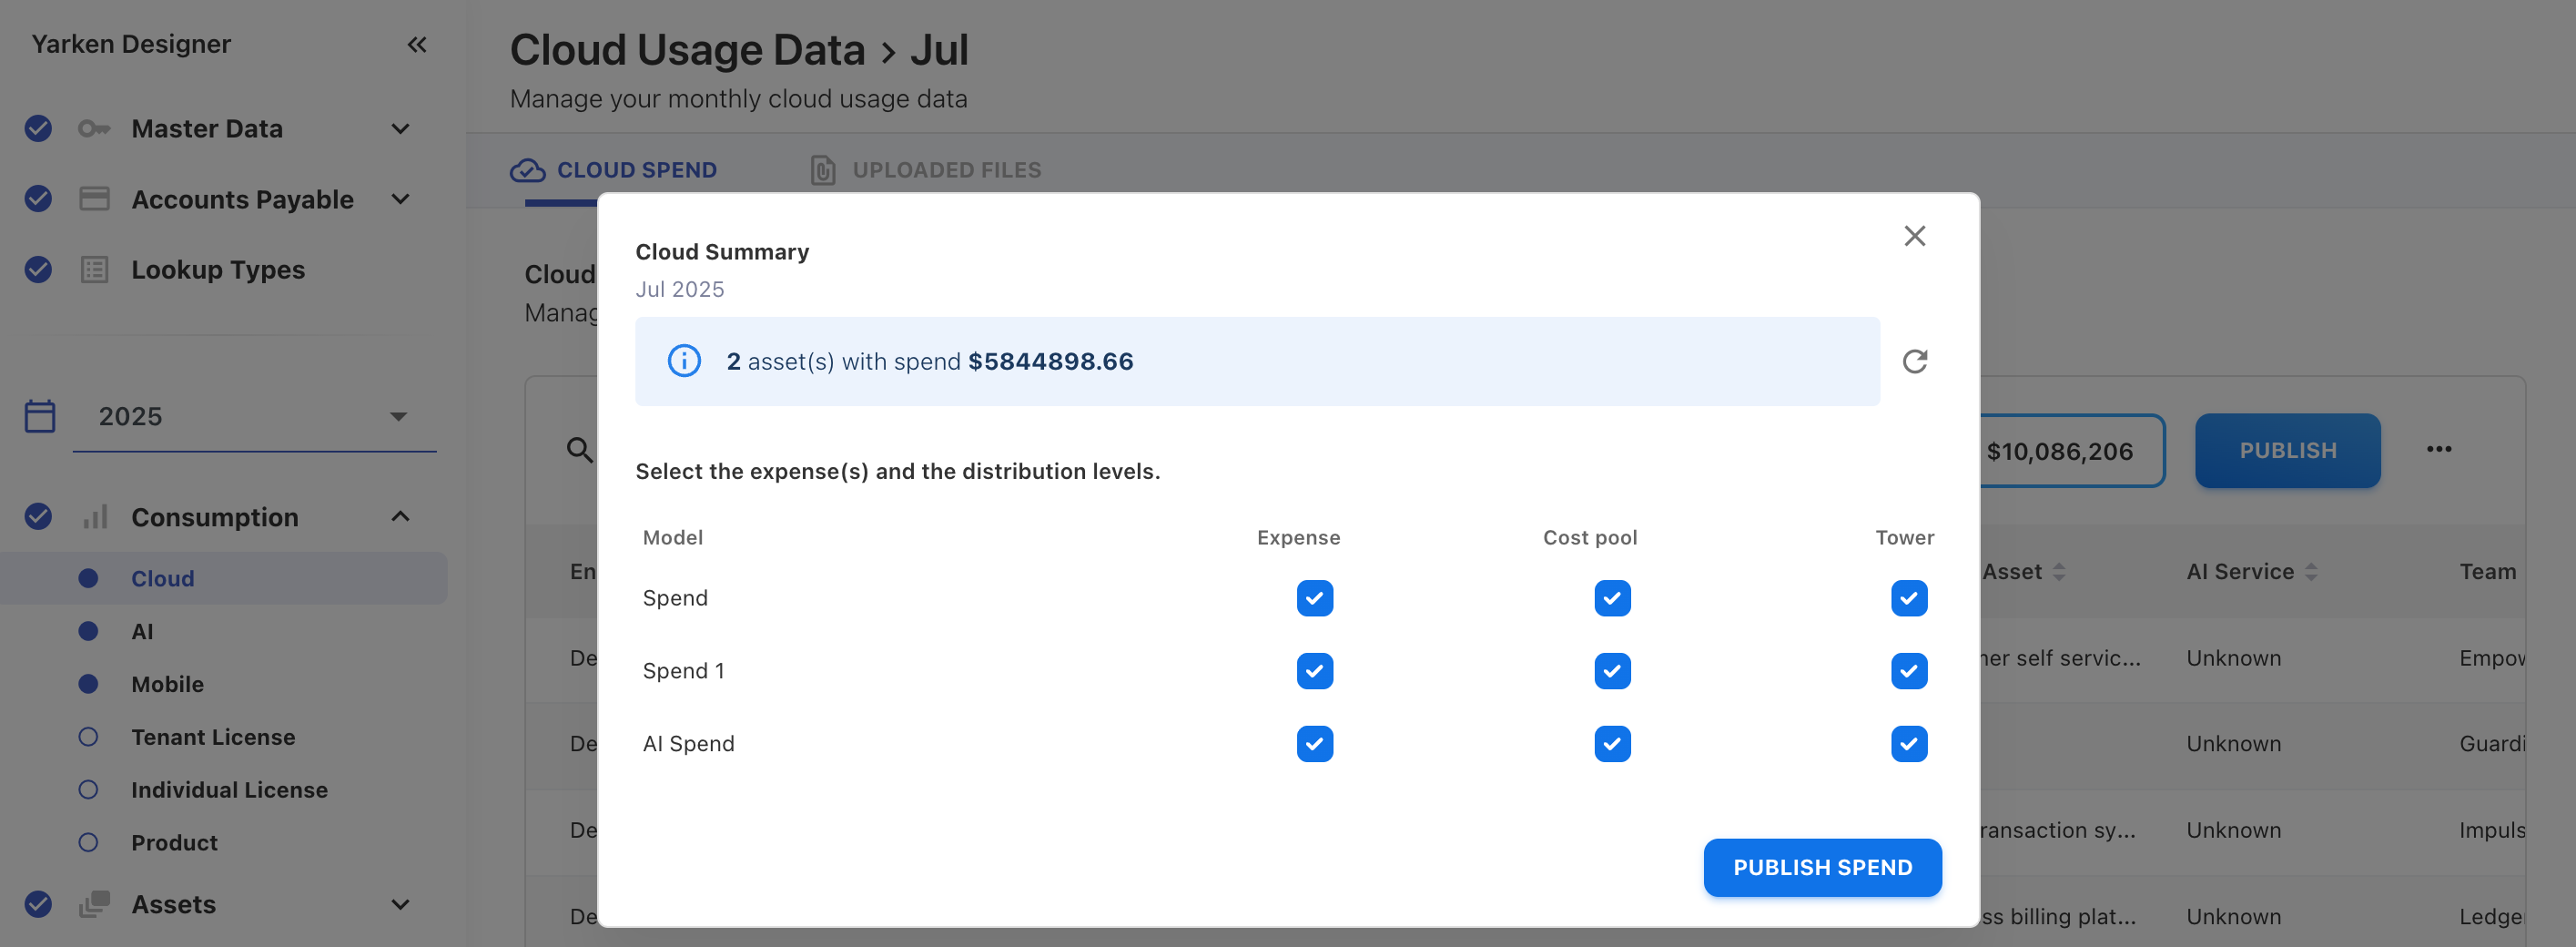
For each required Spend model, select one or more of the following levels:
|
Distribution level |
Description |
|---|---|
|
Expense |
Publishes cloud spend to the Expense level. |
|
Cost Pool |
Publishes cloud spend through the Cost Pool level. |
|
Tower |
Publishes cloud spend through the Tower level. |
You can select different distribution levels for each Spend model.
Publish cloud spend
To publish,
-
On the cloud usage data page, click (…) on the month for which you want to publish the spend.
-
Select Manage Cloud Spend.
-
On the upper-right corner, click PUBLISH button. A Cloud Summary popup appears.
-
Confirm the details and select PUBLISH SPEND button.
Yarken publishes the cloud spend to the selected Spend models using the selected distribution levels.
After publishing, go to Designer > Assets > Cloud to review the cloud assets created for the corresponding month.
Note: You cannot add or delete cloud usage data once it is published. If you want to modify the cloud usage data, you must unpublish the spend first.
Note: If chargeback has been created for a month, that month is locked across all models. Cloud Consumption cannot be published or unpublished for a locked chargeback month.
How to unpublish the cloud spend?
To unpublish,
-
Navigate to the cloud spend published month and click (…).
-
Select Manage Cloud Spend.
-
On the upper-right corner, click UNPUBLISH button.
The cloud spend is unpublished from the cost transperancy and forecast.
Note: Unpublishing affects all cloud dashboards and reports that rely on the cloud spend data.
Delete Usage Data
You can delete uploaded files if any correction is needed. When deleting the data, you can choose to delete the source file as well.
To delete,
-
On the month that you want to delete the cloud usage data, click ellipsis (…) menu icon, and select View Uploaded Files option. An UPLOADED FILES tab opens.
-
Click delete icon on file row for which you want to delete the data.
-
Confirm the deletion.
Yarken unpublishes the cloud spend from the applicable models.
Note: Deleting a cloud usage file will remove all associated data loaded in that month from the application, and this action is irreversible.