
Introduction
This document is one of the many how-to guides that explain how to use or work on a specific feature within the YäRKEN application.
This document describes how to load and manage spend in the YäRKEN application.
Table of Contents
Spend Data
Spend data refers to the detailed financial information about an organization’s IT-related expesnes. In YäRKEN, the primary sources of spend data includes the spend from General Ledger (GL) and Cloud Service Providers. You can use the spend section in the YäRKEN Designer to load your monthly spend files.
Load a Spend
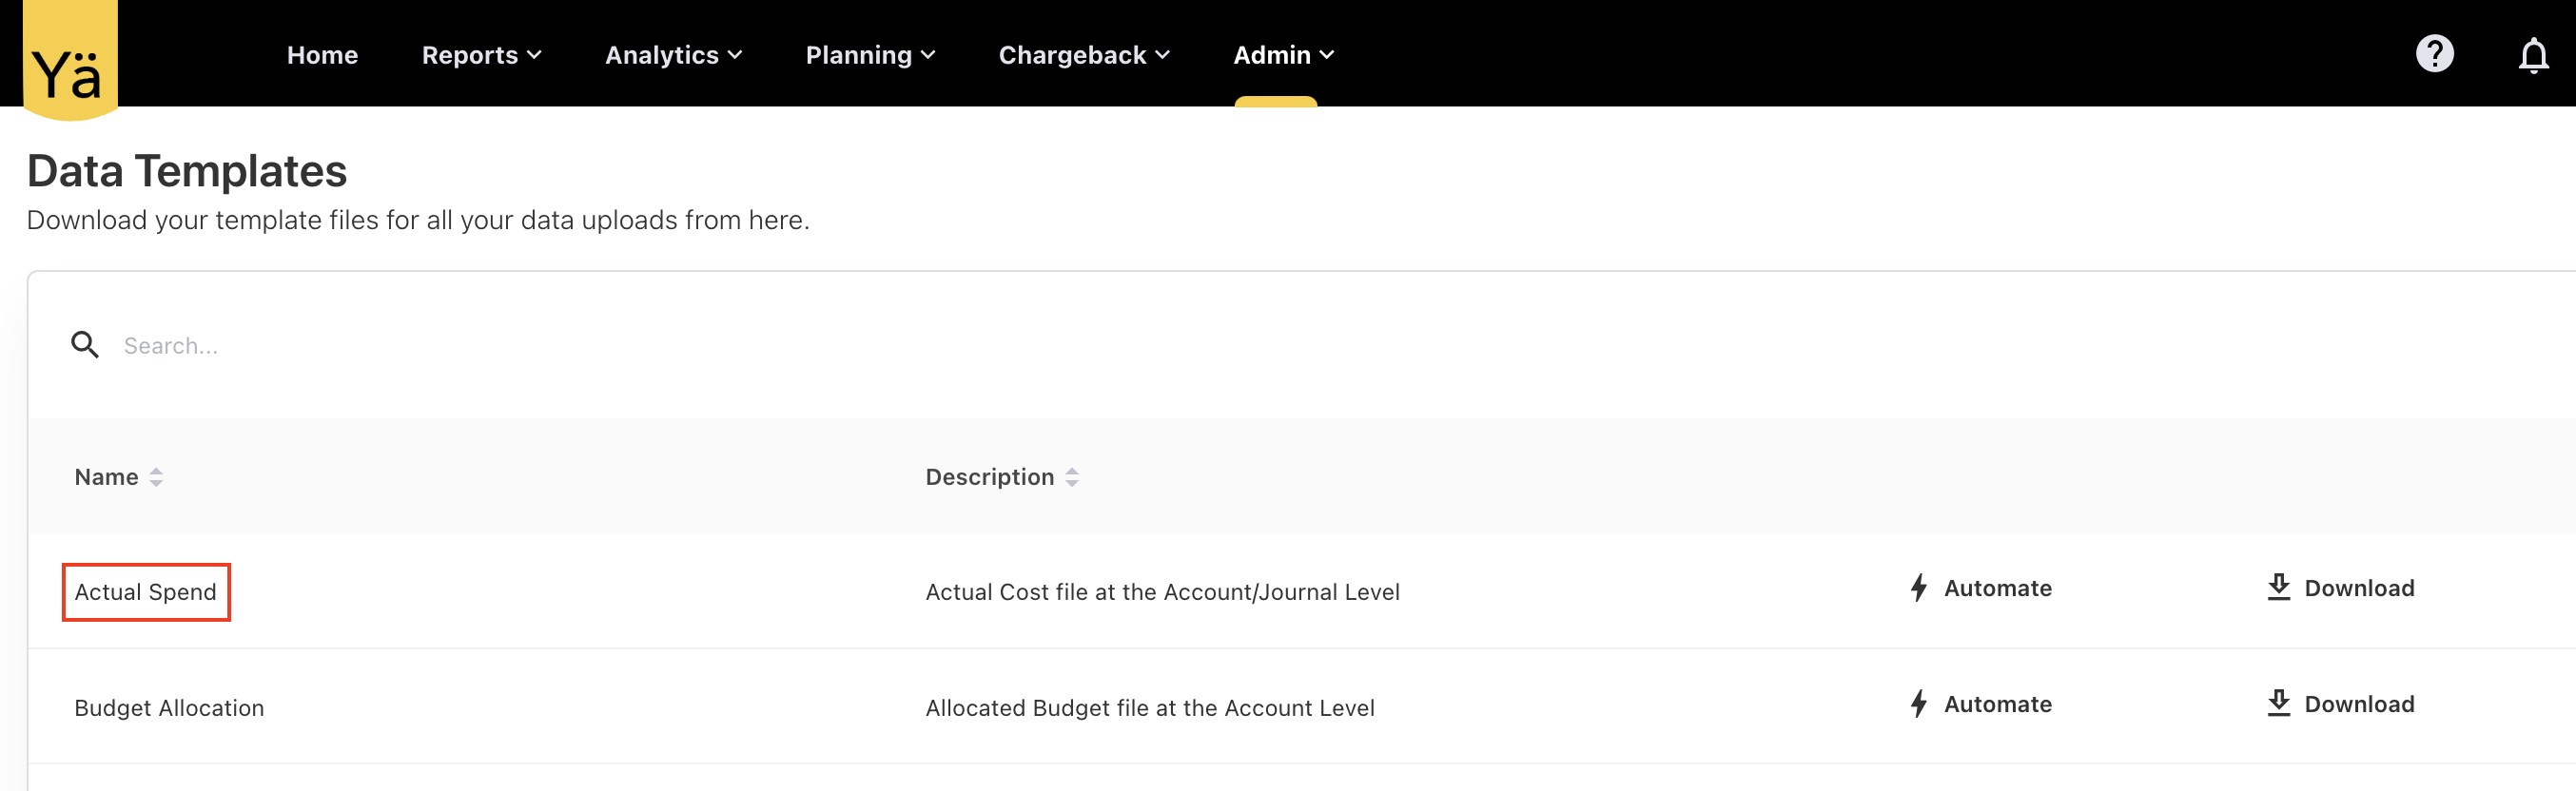
After loading the Master Data in the application, you can load your spend data for the spend allocation and mapping. You can either use the data from your spend source and map the fields, or use a data template file named Acutal Spend located under the Admin > Data Templates.
Before you begin, review data templates to verify you have enough data fields. Spend must be uploaded in Excel or CSV file and should only contain one month's data at a time.
Uploading a Spend Files
The uploading of spend file using the Actual Spend data template file can ease the uploading process. You can download this template file from the Admin > Data Templates and fill the data for the mandatory fields.
Before you load the spend, ensure that Master Data for Accounts, Cost Centres, and Vendors have been loaded in the application. Once you upload the spend, you can start allocating the spend to Cost Pools, Towers, Solutions, and Business Units.
This section describes the steps on how to load the spend files for the first time.
Prerequisites
To upload the spend files, you should fill out the following mandatory fields in the template file:
-
Expense Type
-
Account Code
-
Cost Center Code
-
Transaction Date
-
Amount
-
Vendor Code
-
Journal ID
Procedure
-
From the menubar, select Admin > YäRKEN Designer.
-
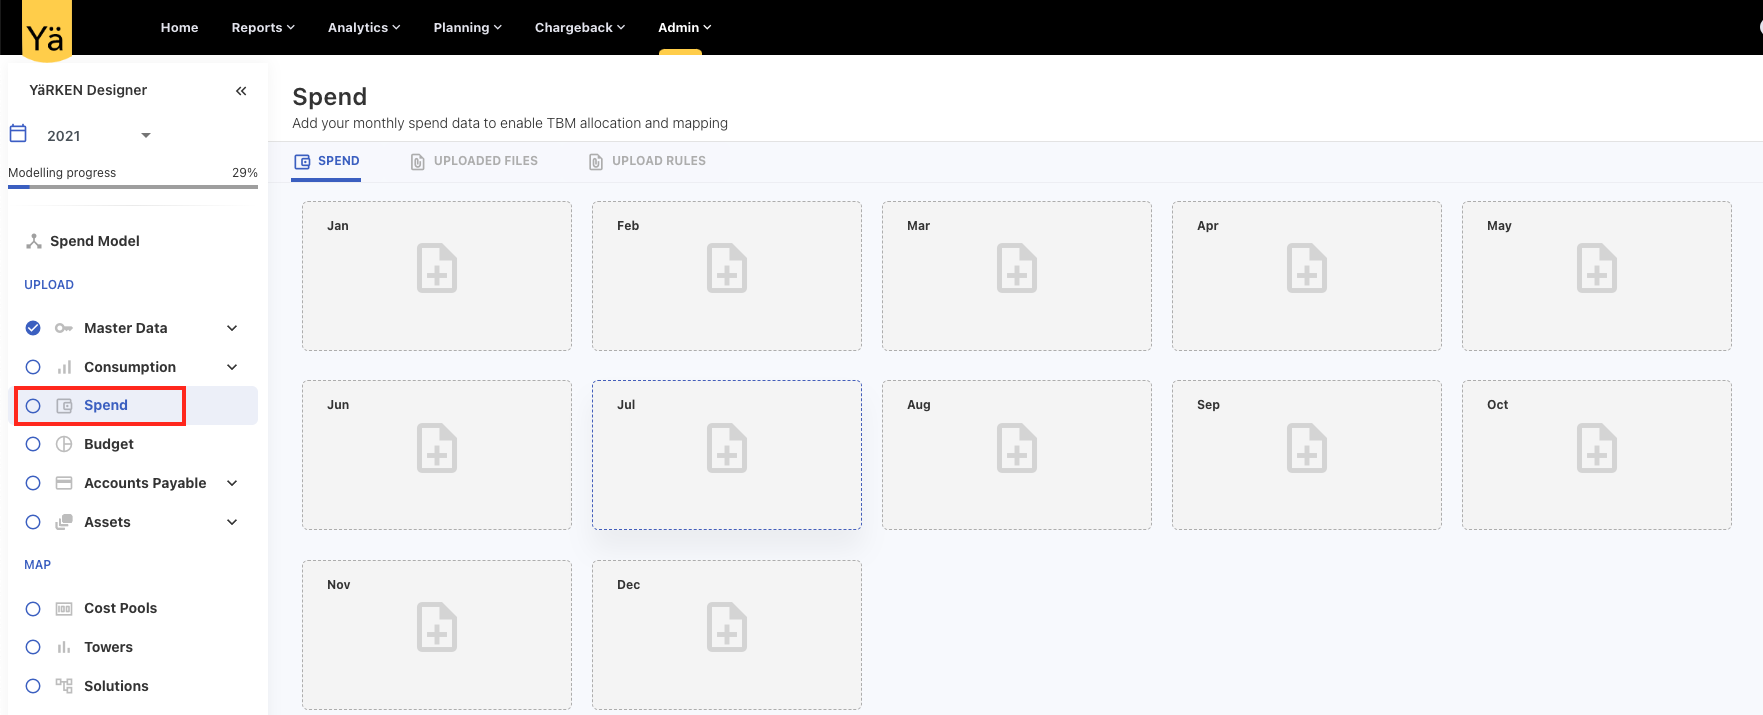
On the left pane, select the financial year for which you want to upload the spend and click Spend under the UPLOAD section.
-
On the SPEND tab, drag and drop your file or click + icon on month for which you want to load the spend.
-
Choose the file from your local storage and click Open.
A Data Preview screen appears..
Review your data on the Data Preview screen and select NEXT.
A mapping confirmation screen appears.
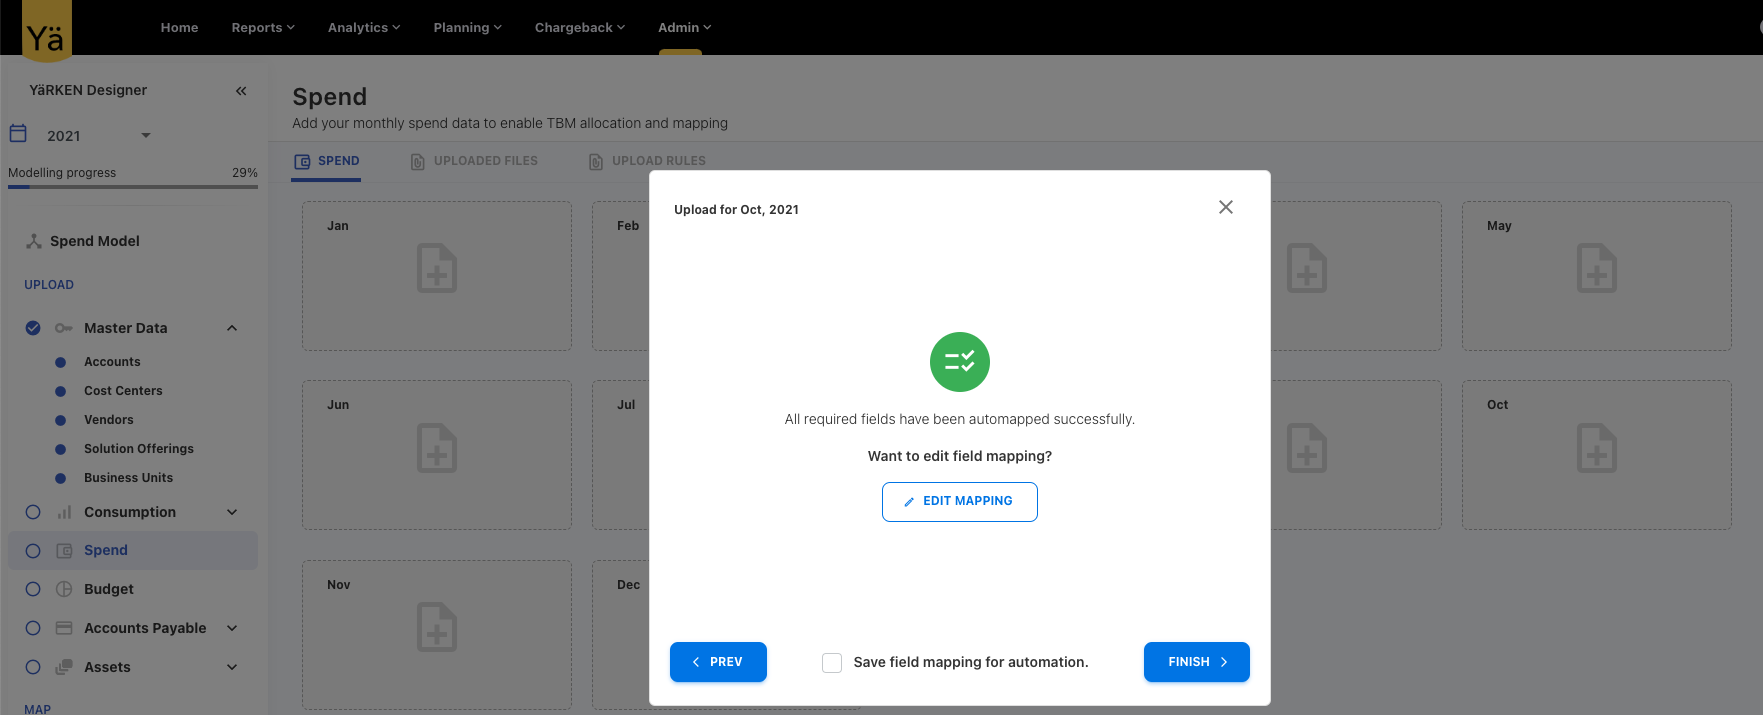
Note: If you have aligned to the template headers or loaded your data into the template, you should see “All required fields have been automapped successfully.”
Click FINISH or select EDIT MAPPING to edit the mapped fields.
The system processes the data and displays the upload status with the total loaded records count.
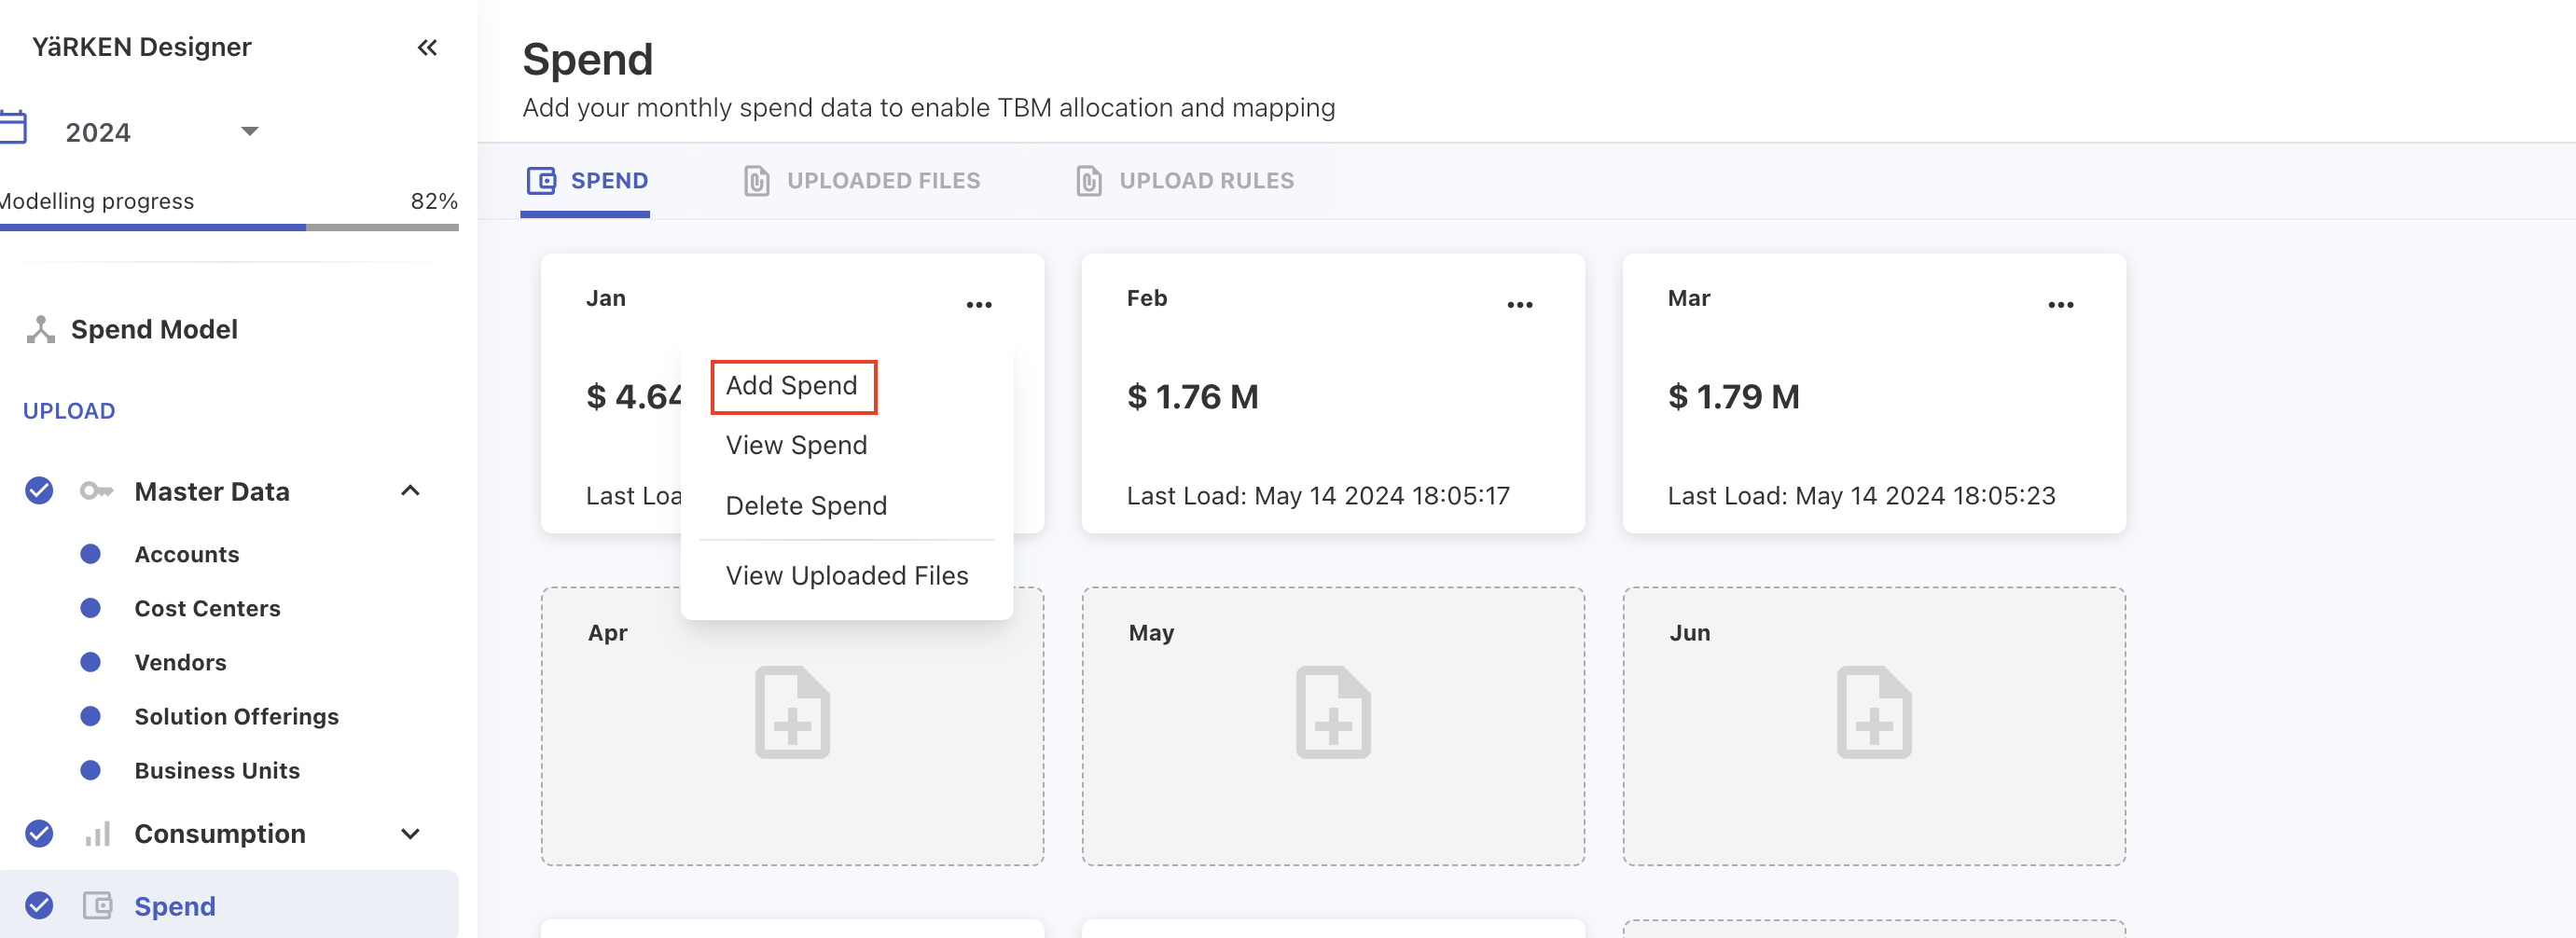
Adding Additional Spend
You cannot modify existing spend data. However, you can upload additional files for the already loaded month to add new spend entries as an add-on.
Note: Records with the same Journal ID will be rejected during the load. All other records will be loaded.
Prerequisites
To add additional spend, you should fill out the following mandatory fields in the template file:
-
Expense Type
-
Account Code
-
Cost Center Code
-
Transaction Date
-
Amount
-
Vendor Code
-
Journal ID (Not same as existing Journal ID uploaded in the application)
Procedure
-
From the menubar, select Admin > YäRKEN Designer.
-
On the left pane, select the financial year for which you want to add the spend and click Spend under the UPLOAD section.
-
On the SPEND tab, select the ellipsis (…) symbol on the month for which you want to add the spend.
-
On the upload dialog box, click OR BROWSE or drag and drop your file.
-
Review your data on the Data Preview screen and select NEXT.
A mapping confirmation screen appears.
Note: If you have aligned to the template headers or loaded your data into the template, you should see “All required fields have been automapped successfully.”
Click FINISH or select EDIT MAPPING to edit the mapped fields.
The additional spend is loaded in the month. You can view the uploaded spend entries from the View Spend option under ellipsis.
Viewing the Spend
Procedure
To view the spend details:
-
Navigate to the Spend under the YäRKEN Designer.
-
Select the ellipsis (…) symbol on the month for which you want to view the spend.
-
Select View Spend.
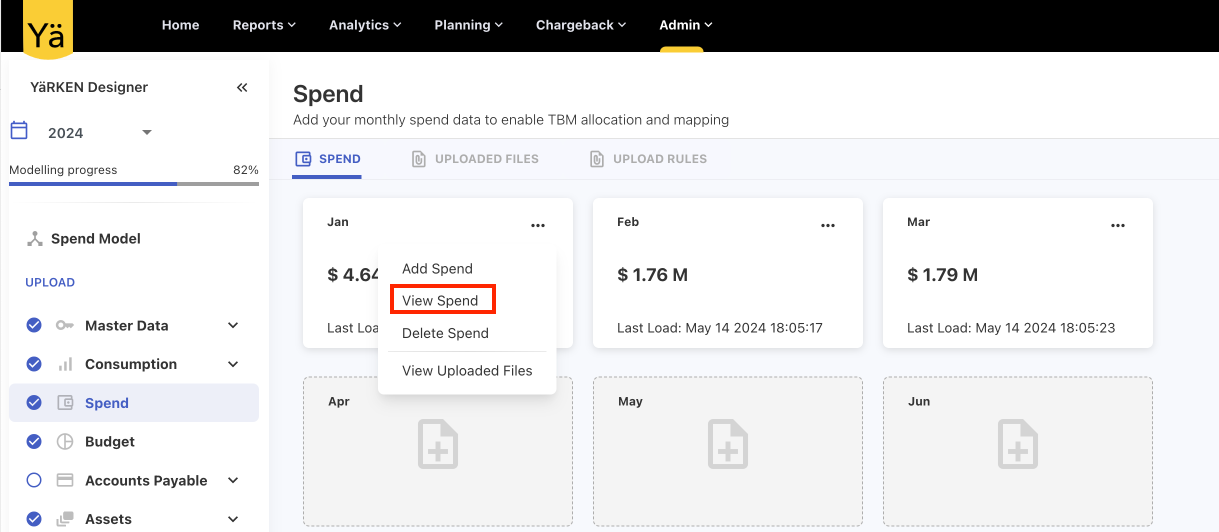
The view spend screen appears.
Deleting Spend
Deleting spend might affect TBM reports, dashboards or any other dependant data. You can delete the spend data even if its allocated to Cost Pools, Towers, Solutions, and Business Units. You can delete the spend directly from the month tile. When you delete the spend, the corresponding spend in the application will also be removed.
You may also opt to delete the spend by removing the spend source file for a given month from the UPLOADED FILES tab.
Note: You cannot delete the spend of the month for which the Chargeback is created. Chargebacked month can be easily identified by the lock icon.
Procedure
To delete a spend,
-
Navigate to the Spend under the YäRKEN Designer.
-
Select the ellipsis (…) symbol on the month for which you want to delete the spend.
-
Select Delete Spend.
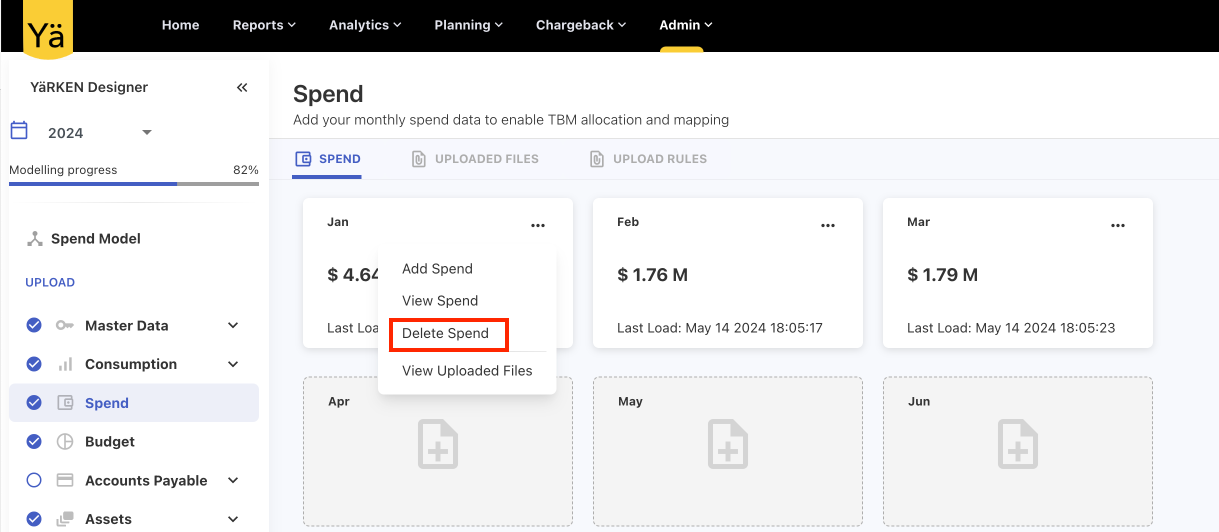
A message appears confirming whether you want to delete the spend.
Click OK.
The spend is deleted for the given month.
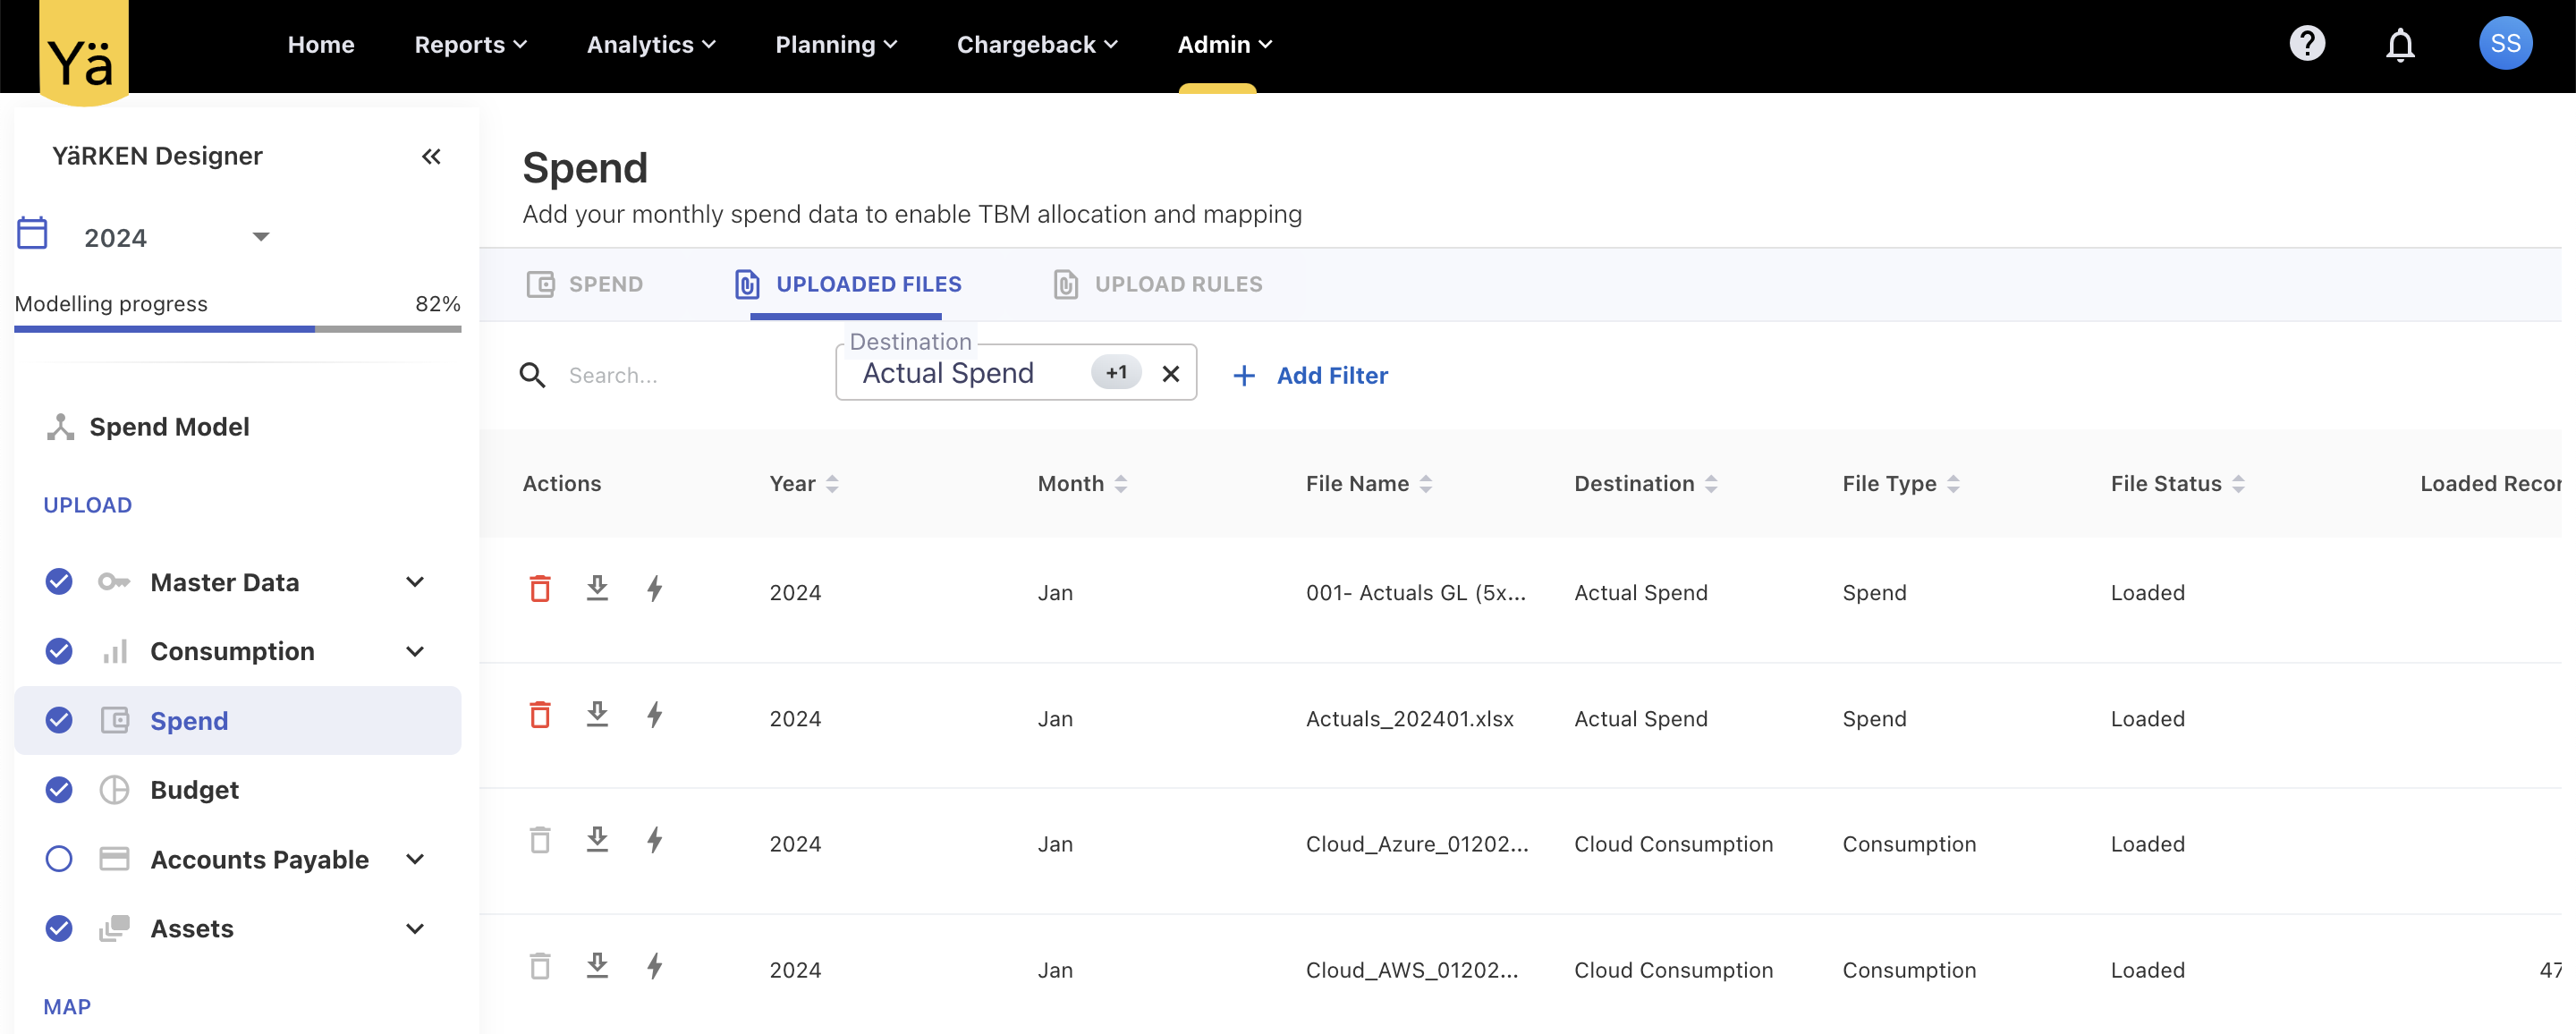
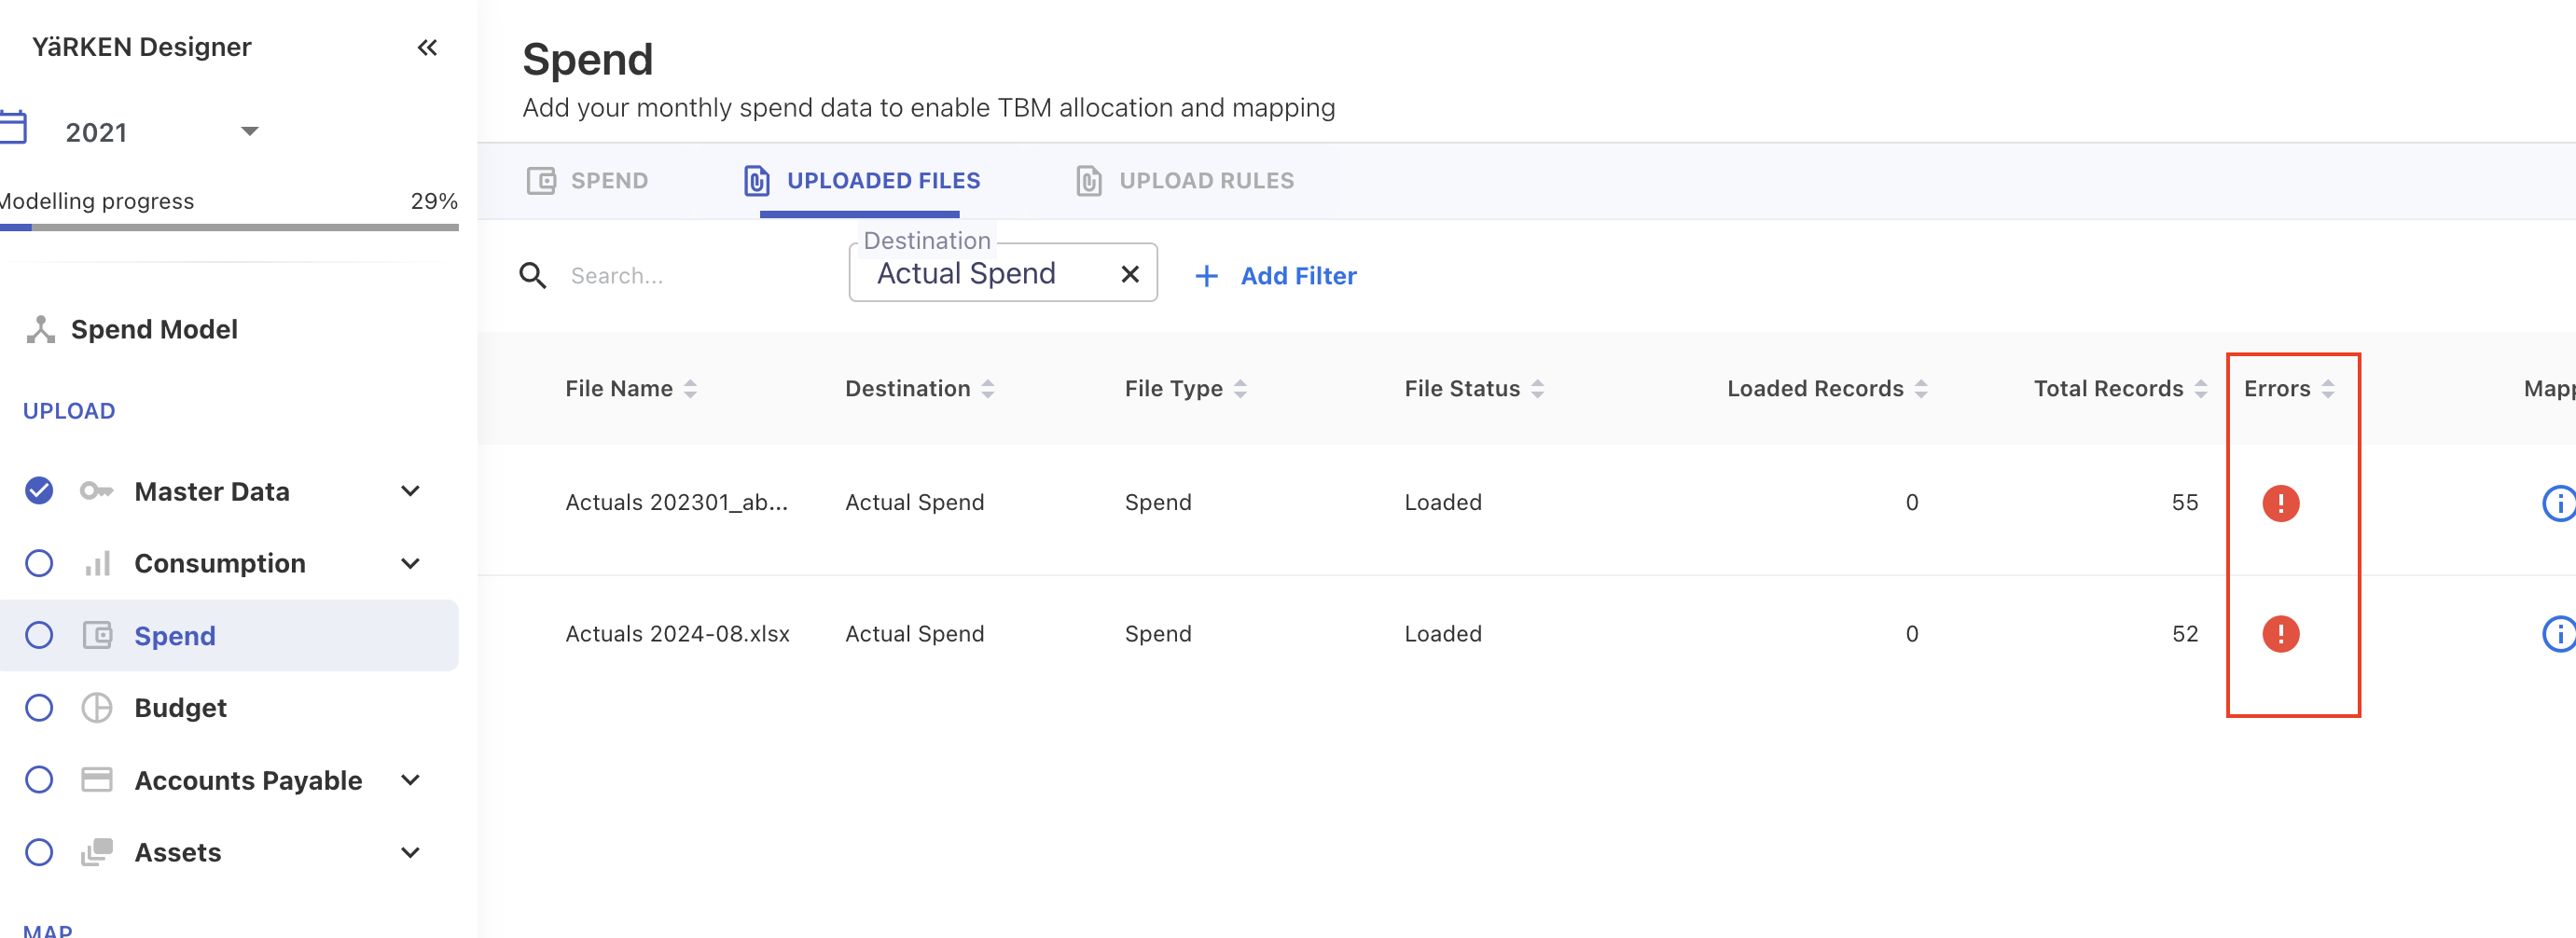
View Uploaded Files
The UPLOADED FILES tab provides a list of all the uploaded spend files across all months. You can use the search box or filter button to search for a specific file. You may use this tab to:
-
View the history and status of uploaded files.
-
Check the number of records in the uploaded file.
-
Find out the mapping errors encountered during uploads.
-
Dowload or delete the spend files.
Troubleshooting Upload Errors
If any error occurs during upload process:
Click on the error count displayed on the upload screen to view error messages.
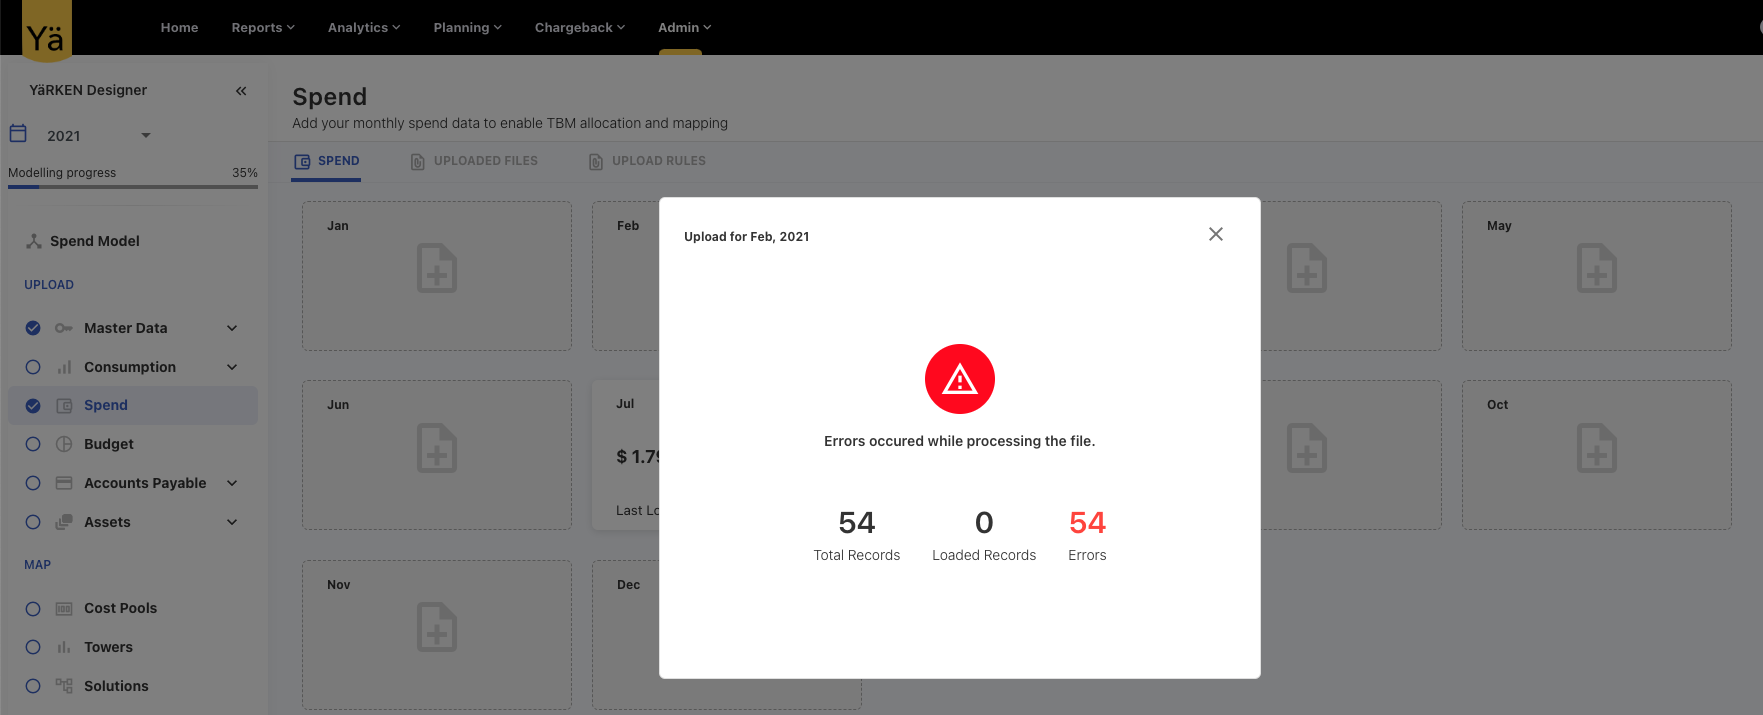
Alternatively, return to the main screen and navigate to the Errors column in the UPLOADED FILES tab. You can review errors associated with the loaded files.
You can also delete the error file form the UPLOADED FILES tab, fix the errors and then re-upload the file.
Upload Rules
The UPLOAD RULES tab in the Spend allows you to define the mapping rules for the spend files. You can use the upload rule to extract the specific field entries from the spend file and map it to the destination column in the application. These rules are executed only if the given criteria is met during the file uploading process.
The upload rule tab shows the list of rules that are created for the spend data. Once the rule is created, you can edit, delete, download or sort the rules.
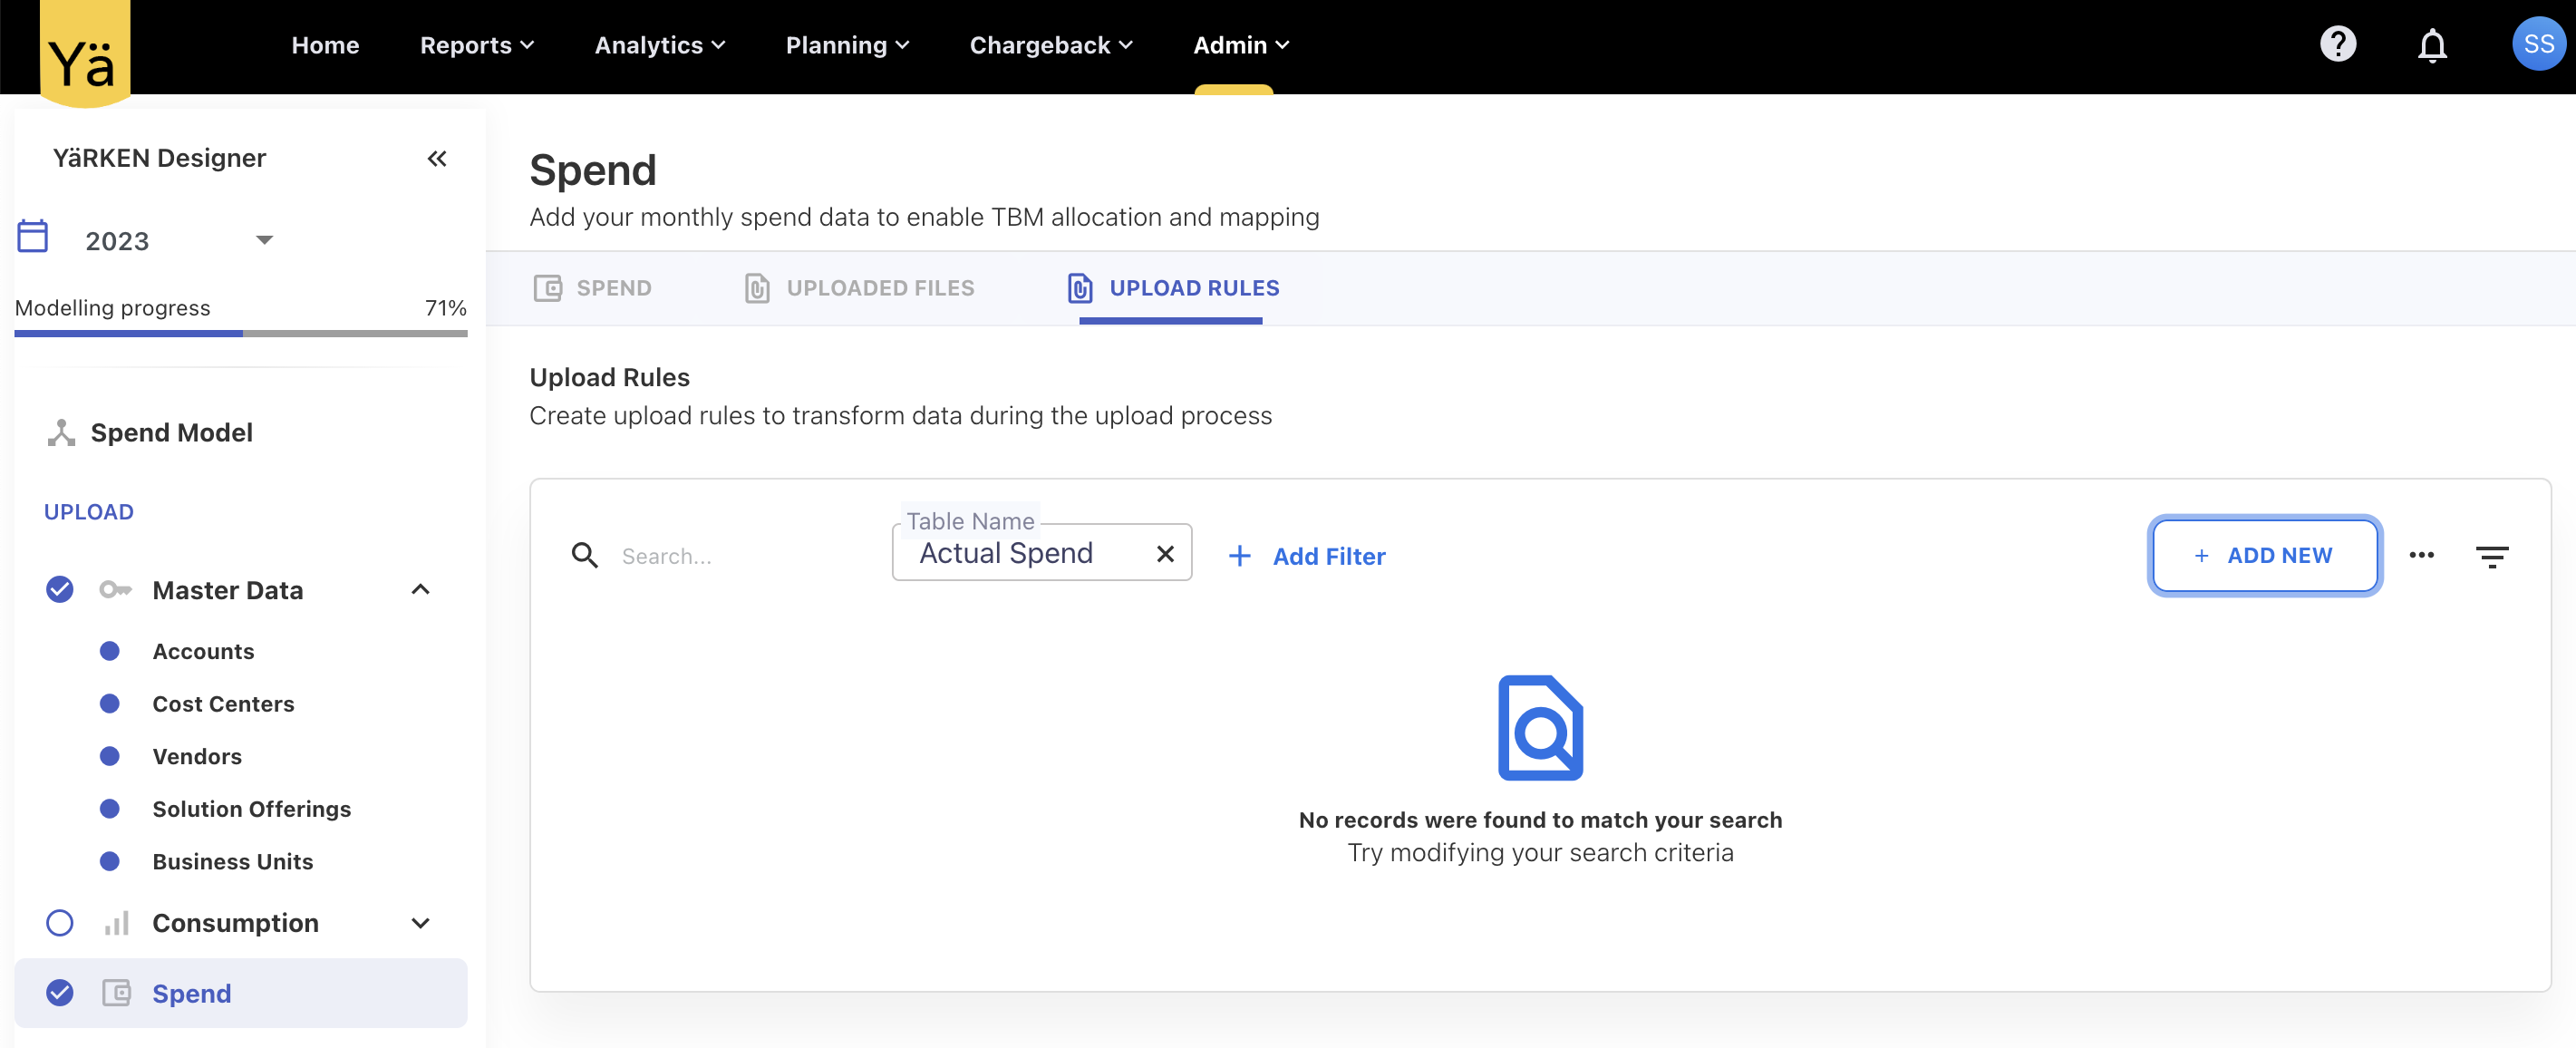
This section describe the steps on how to create the rules for the spend data. For more information on how this functionality works, refer the how to create upload rule guide.
Adding Upload Rule
You can create the upload rules based on different rule type. The rule type is used to specify the type of rule to be applied during the upload process.
To add the upload rule,
On the UPLOAD RULES tab, click + ADD NEW button.
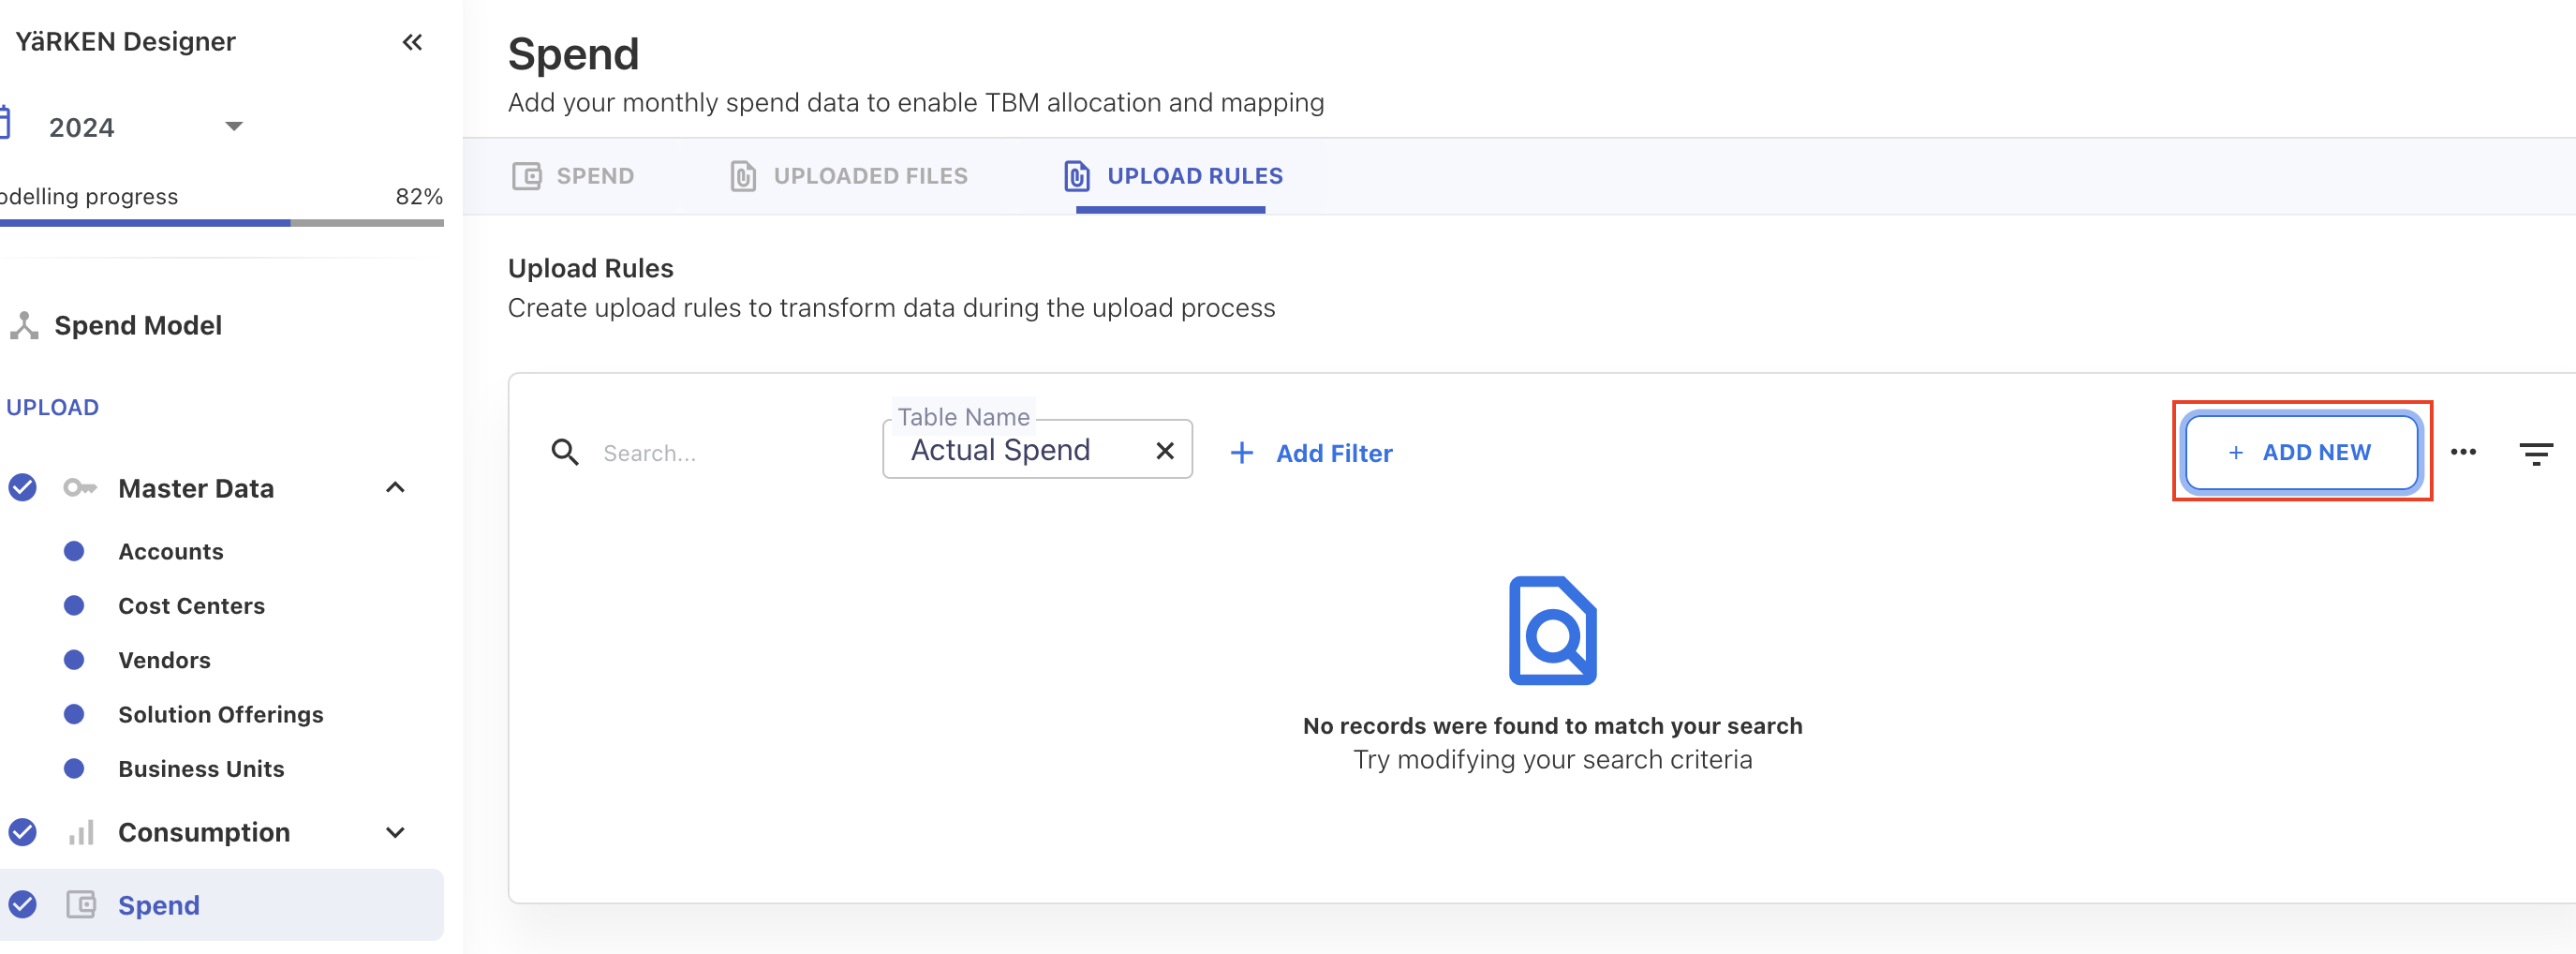
On the New Upload Rule dialog box, select the the below fields:
-
Destination Column: The name of the column within the specified table where the rule will be applied.
-
Rule Type: Specifies the type of rule to be applied during the upload process.
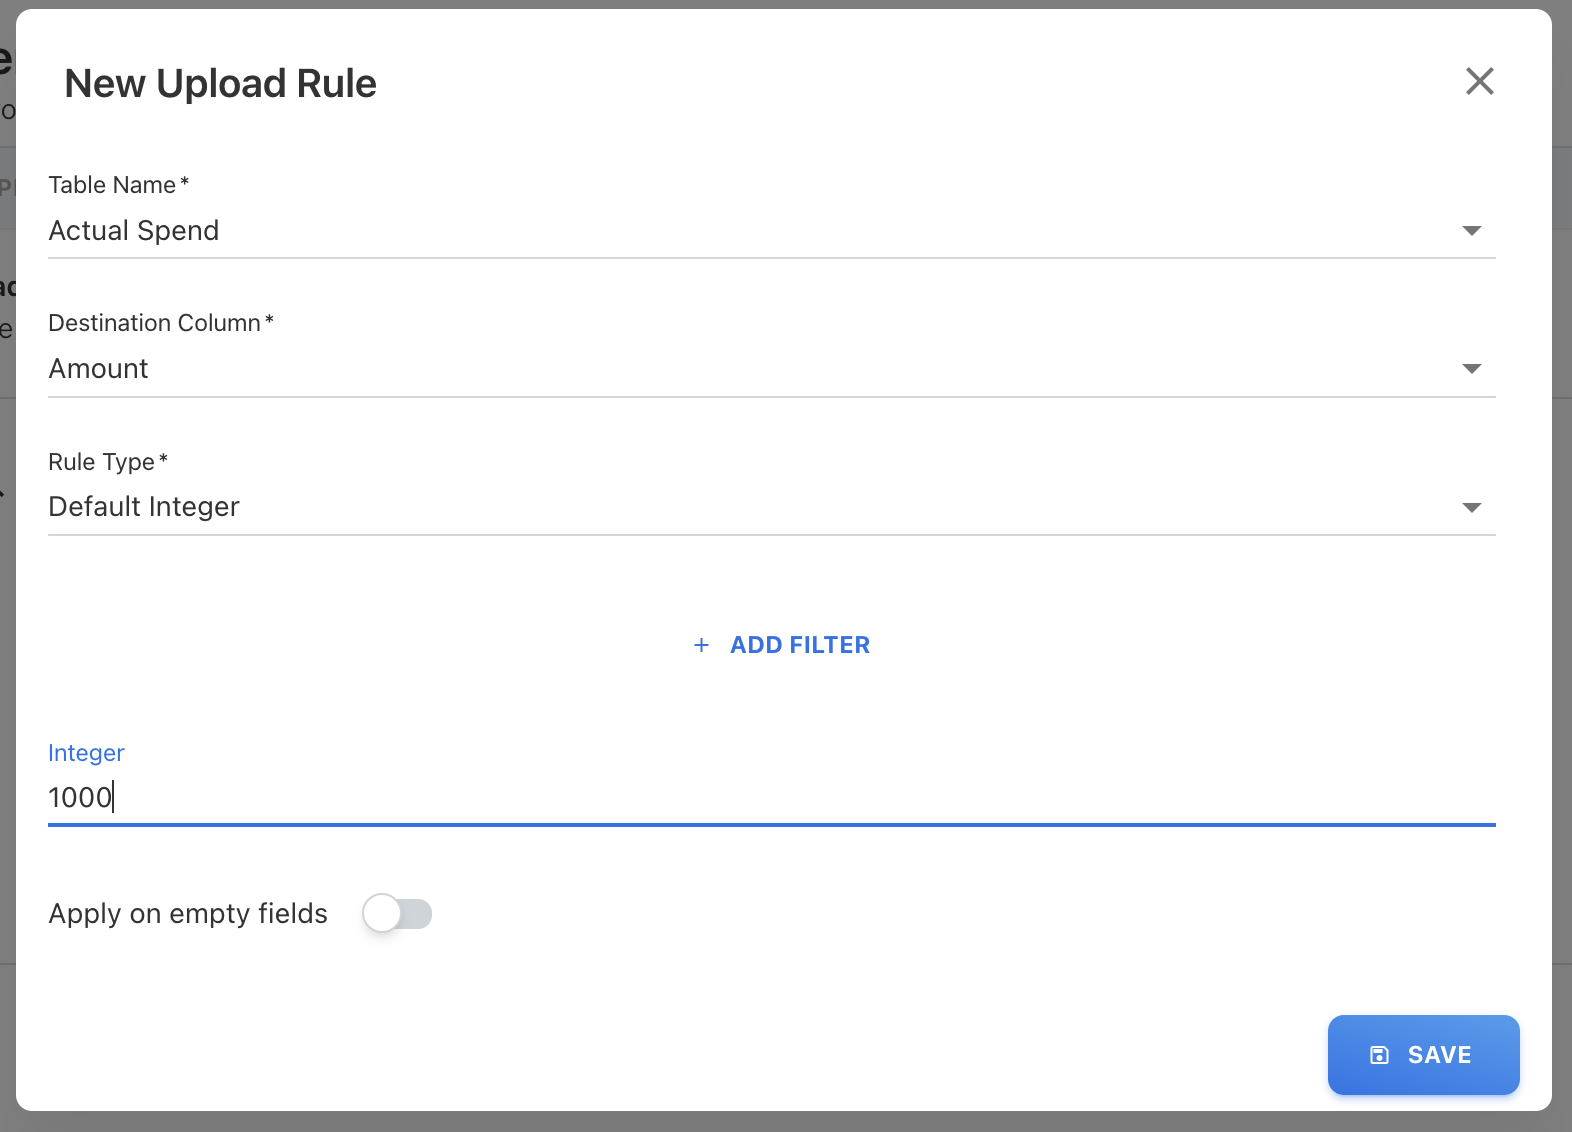
Note: By default, the Table Name is selected as Actual Spend.
Click SAVE.
Note: You can also apply the rule on empty fields by enabling the Apply on empty fields toggle button.
The rule is saved in the application.
Edit the Upload Rule
To edit the upload rule,
On the UPLOAD RULES tab, click edit ( ![]()
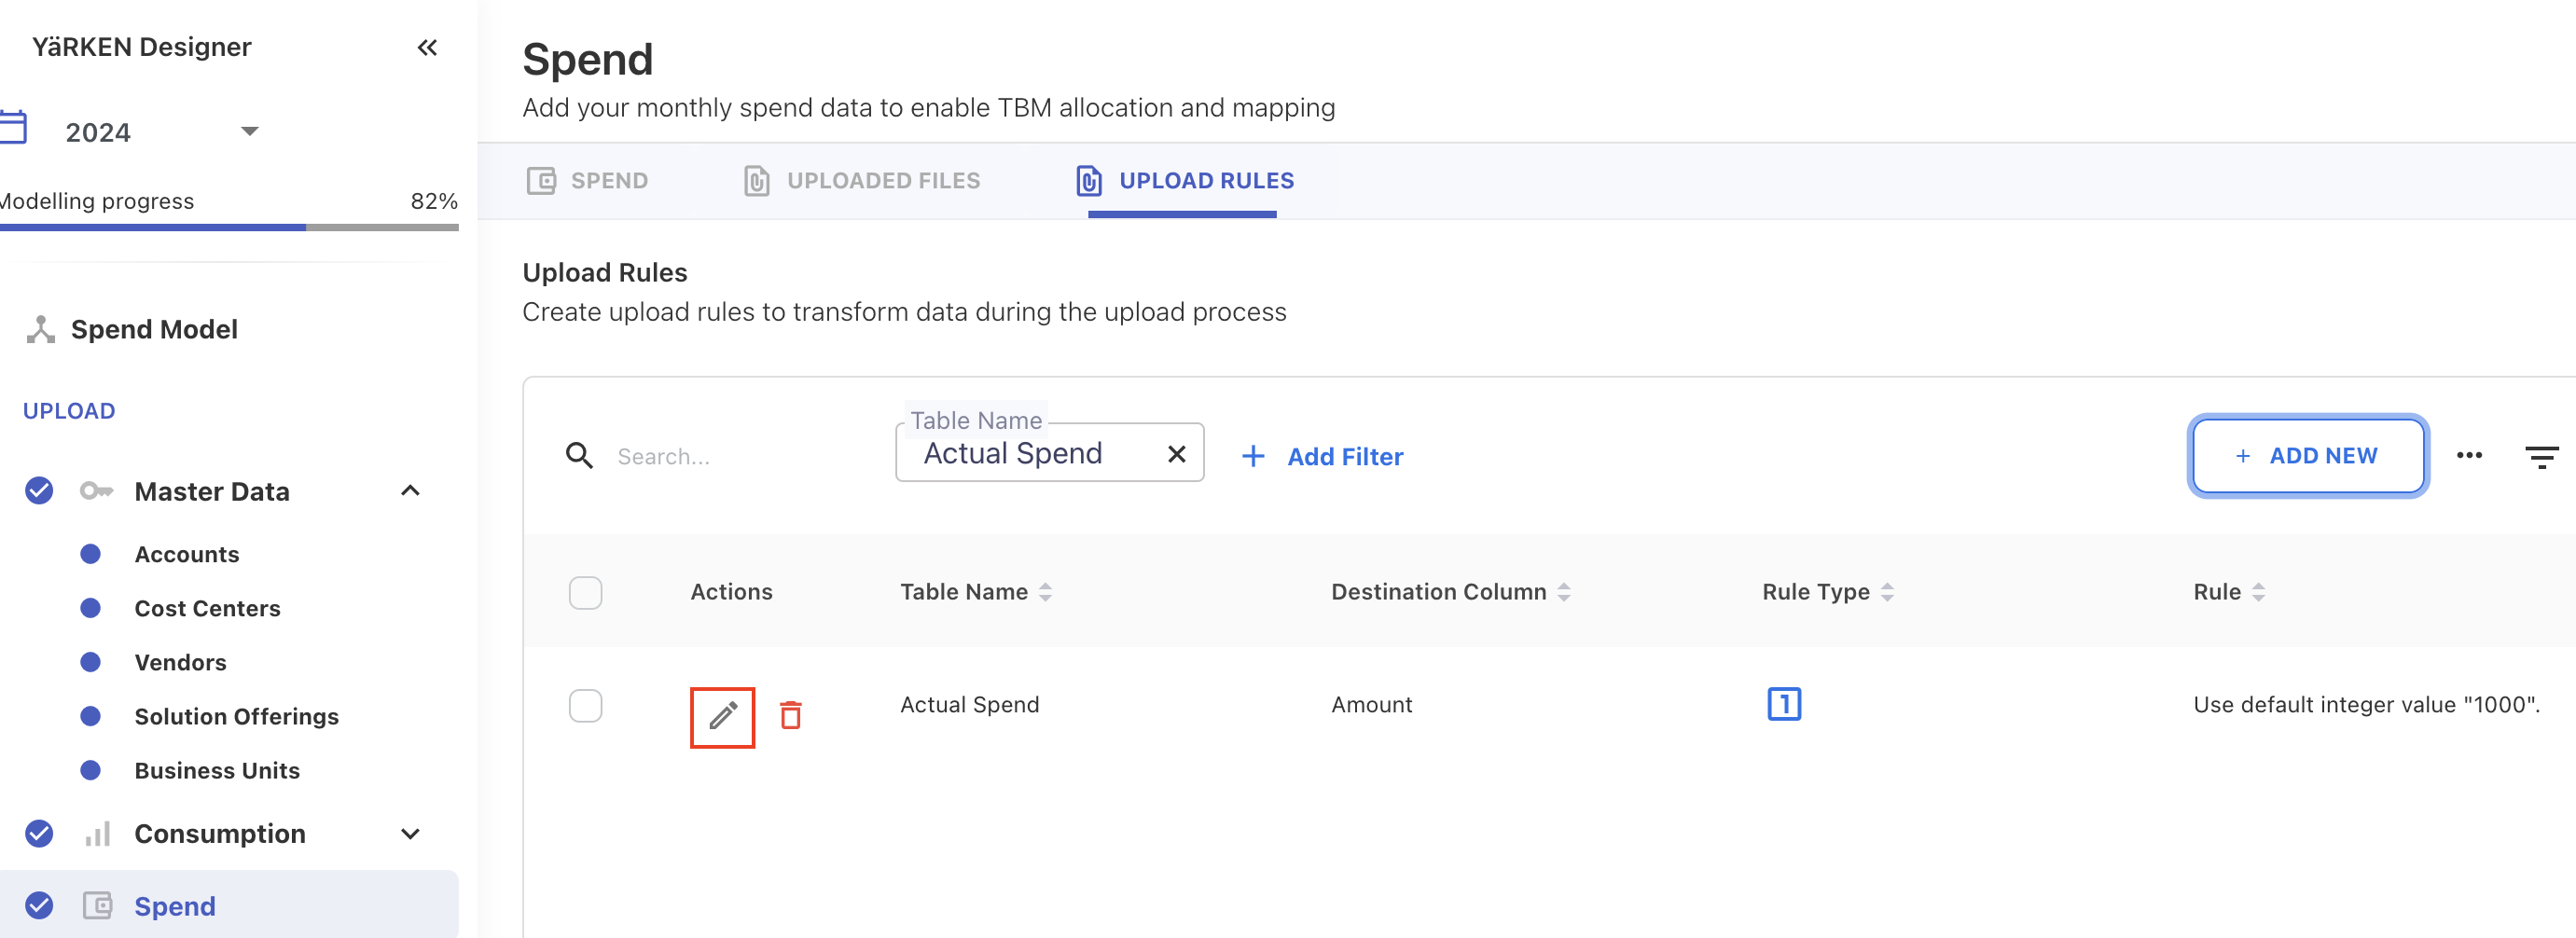
An Edit Upload Rule screen appears.
Edit the required fields and click SAVE.
The upload rule is edited in the application.
Delete the Upload Rule
To delete the upload rule,
On the UPLOAD RULES tab, click delete ( ![]()
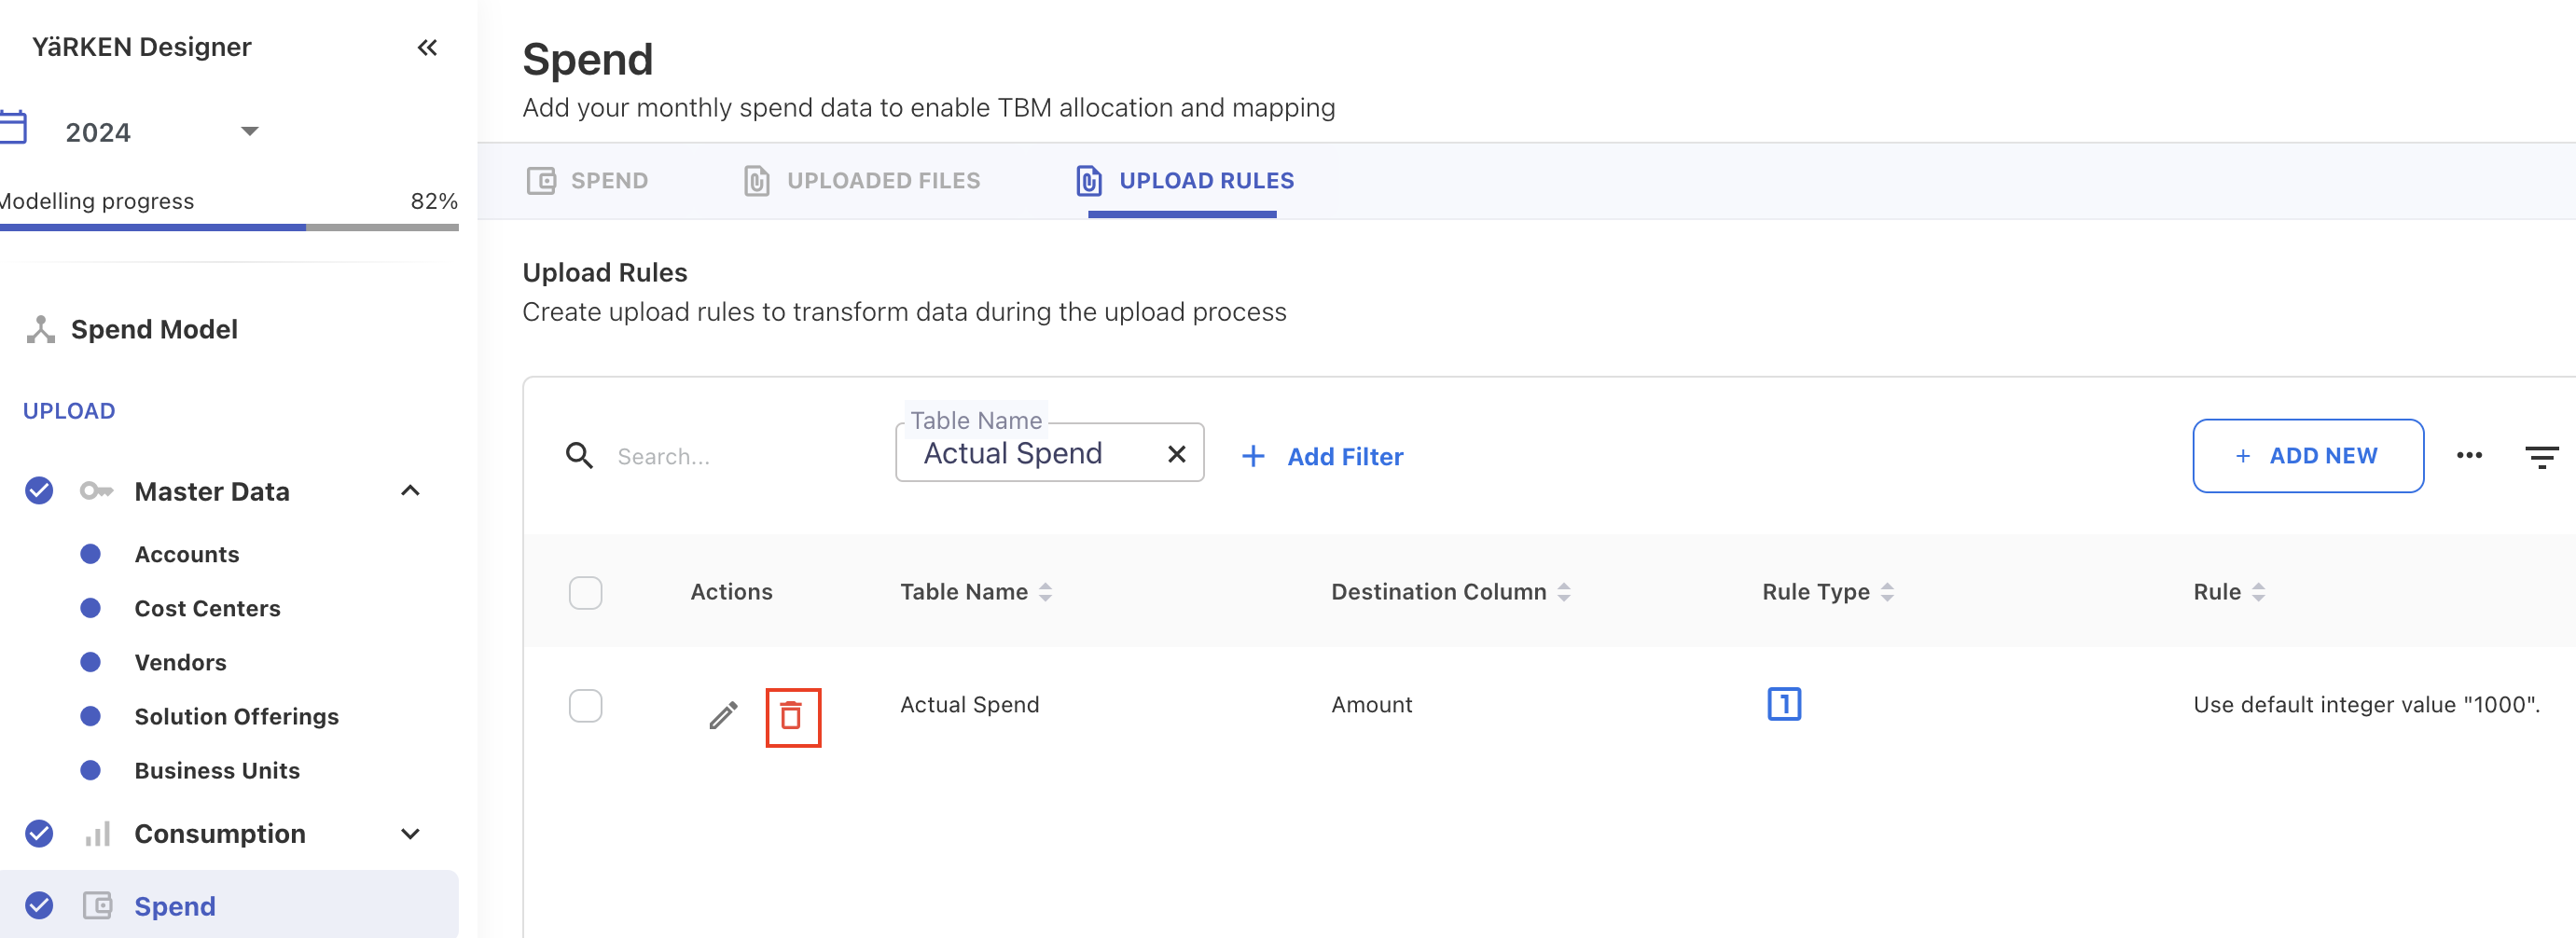
A delete promt appears.
Click OK.
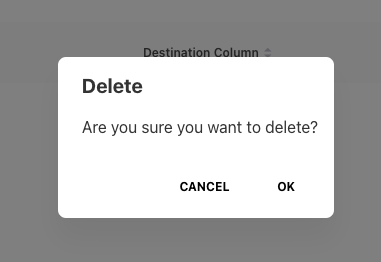
An upload rule is deleted from the application.
FAQs
-
Which are the mandatory fields you must fill before uploading the spend data?
-
Can we delete the spend?
-
What next after uploading the spend?
-
Can we edit the spend?
-
Can we re-upload the spend data?
-
What are the common errors encountered during the spend upload?
-
How to troubleshoot the uploading errors?
-
Where we can check the file uploading errors?
-
Can I copy the spend data into another month?