
Default String
Use this rule to assign a fixed text value to a destination field during upload. It applies the same value across all matching rows.
Example
You want to assign all cloud records to a default team.
Set Cloud Team Name = “Team Roster” during upload.
Procedure
-
Navigate to UPLOAD RULES in the relevant module (e.g., Cloud Consumption).
-
Click + ADD NEW.
-
Select Field to Update → Cloud Team Name.
-
Select Rule Type → Default String.
-
Enter value →
Team Roster.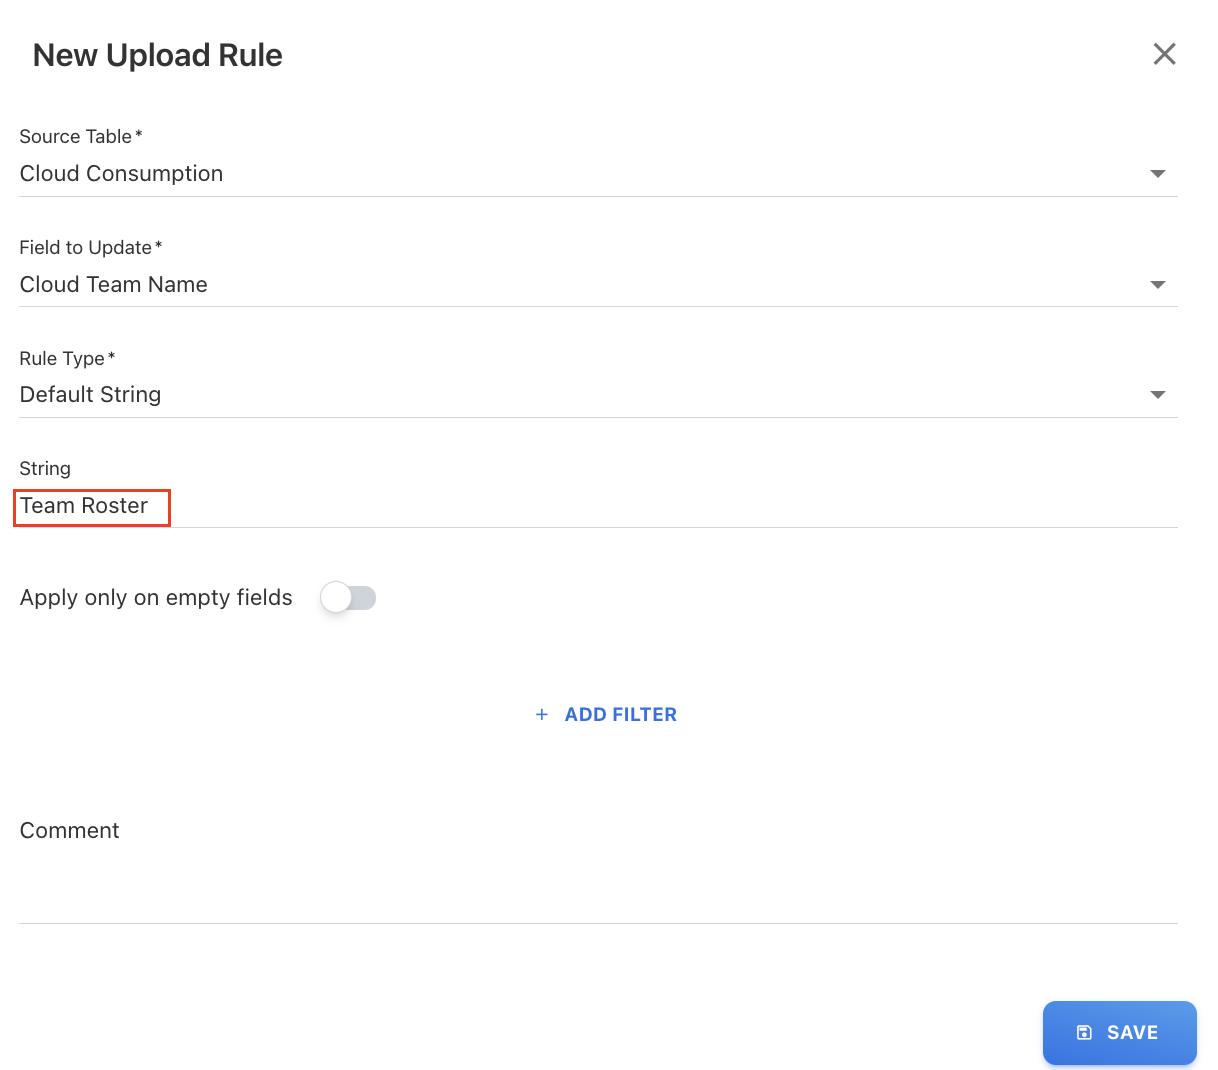
-
(Optional) Add filters if needed.
-
Click SAVE.
Default Integer
Use this rule to assign a fixed whole number to a field. It is typically used to populate default numeric values such as targets or counts.
Example
Set a default value for vendor planning.
Set Annual Target Spend = 1000 for all vendors.
Procedure
-
Navigate to UPLOAD RULES in the relevant module (e.g., Vendor).
-
Click + ADD NEW.
-
Select Field to Update → Annual Target Spend.
-
Select Rule Type → Default Integer.
-
Enter value →
1000.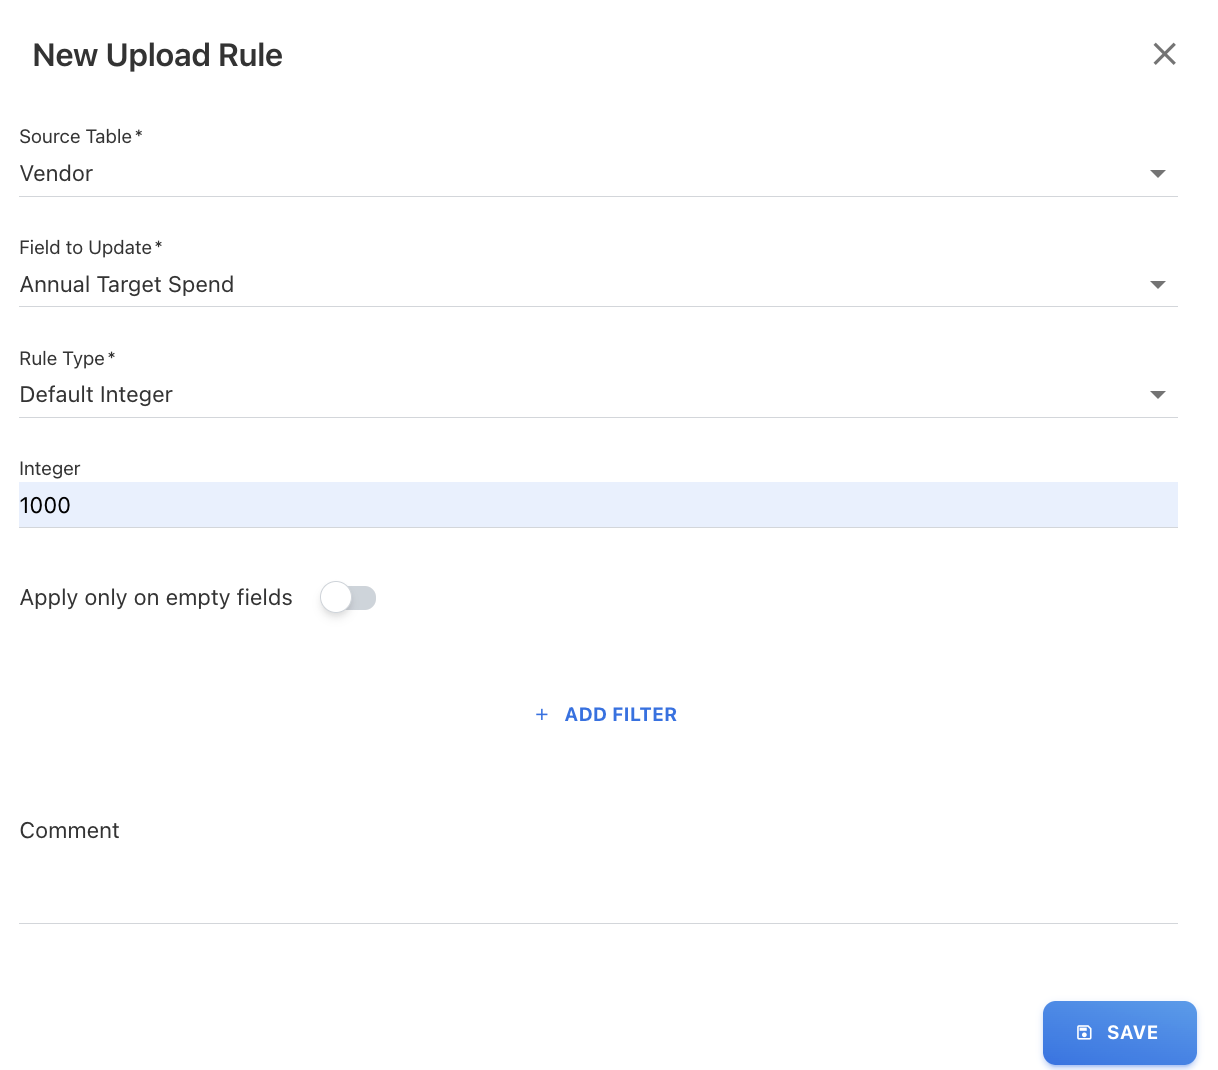
-
(Optional) Add filters.
-
Click SAVE.
Default Float
Use this rule to assign a decimal value, typically for financial data or amounts.
Example
Handle missing invoice values.
Set Invoice Amount = 0.0 where values are blank.
Procedure
-
Navigate to UPLOAD RULES in the relevant module (e.g., Invoices).
-
Click + ADD NEW.
-
Select Field to Update → Invoice Amount.
-
Select Rule Type → Default Float.
-
Enter value →
0.0. -
Enable Apply on empty fields.
-
Click SAVE.
Default Date
Use this rule to assign a fixed date in dd/mm/yyyy format, typically for missing or invalid date values.
Example
Set a default charge date in mobile consumption.
Set Charge Date = 24/09/2024 for all uploaded records.
Procedure
-
Navigate to UPLOAD RULES under Mobile Consumption.
-
Click + ADD NEW.
-
Select Field to Update → Charge Date.
-
Select Rule Type → Default Date.
-
Select the date →
24/09/2024.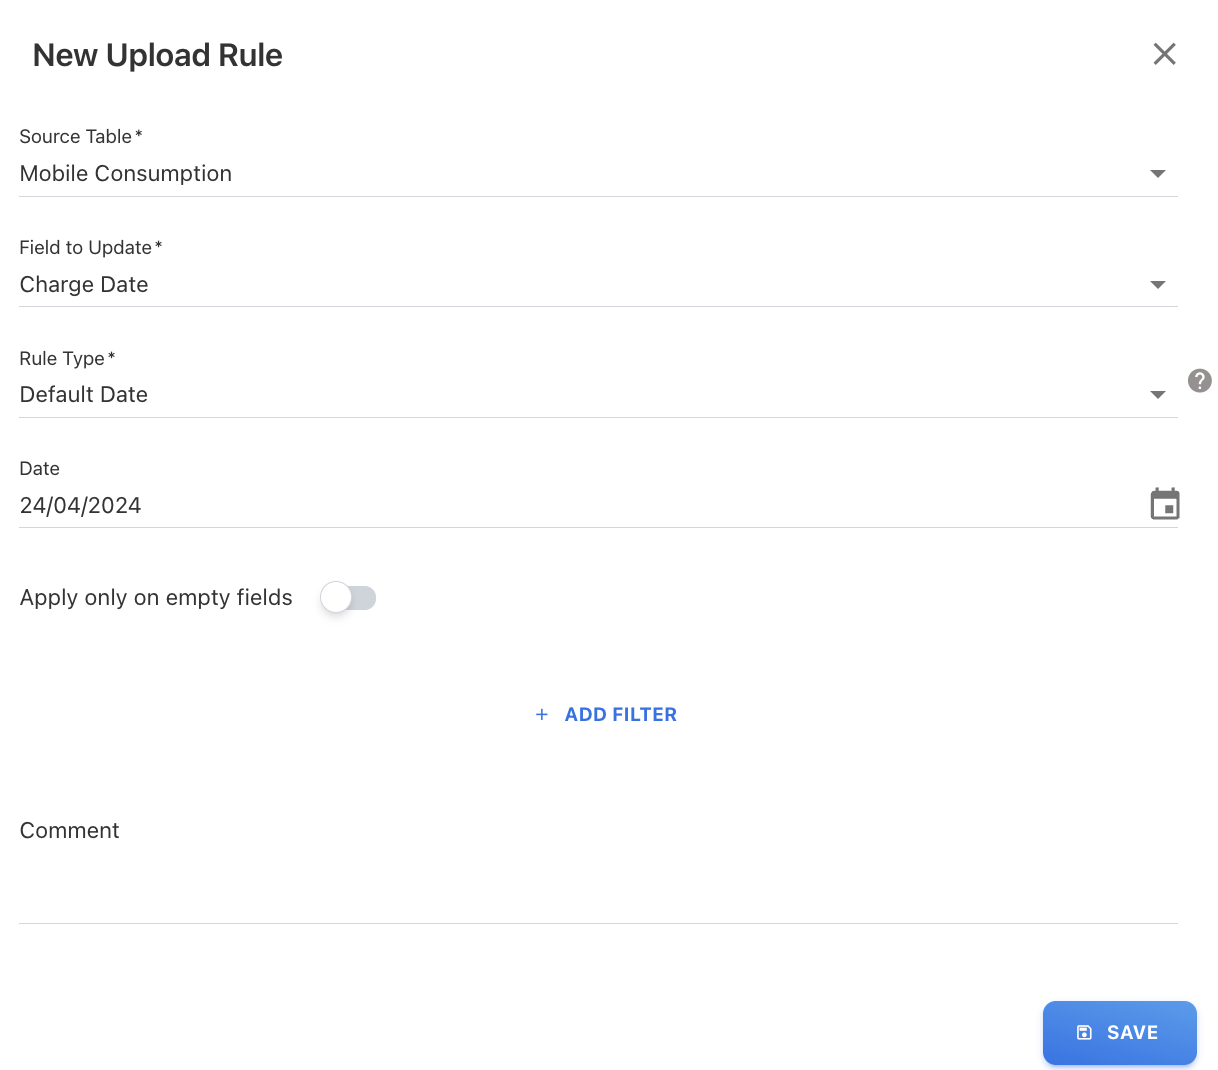
-
Click SAVE.
Copy Column
Use this rule to copy values from one column into another during upload. It is useful when one field should inherit values from another.
Example
Copy cost values for cloud spend reporting.
During cloud consumption file upload, duplicate the Billed Cost and Effective Cost.
Procedure
-
Open UPLOAD RULES in Cloud Consumption.
-
Click + ADD NEW.
-
Select Field to Update → Effective Cost.
-
Select Rule Type → Copy Column.
-
Select Source Column → Billed Cost.

-
Click SAVE.
Extract Column
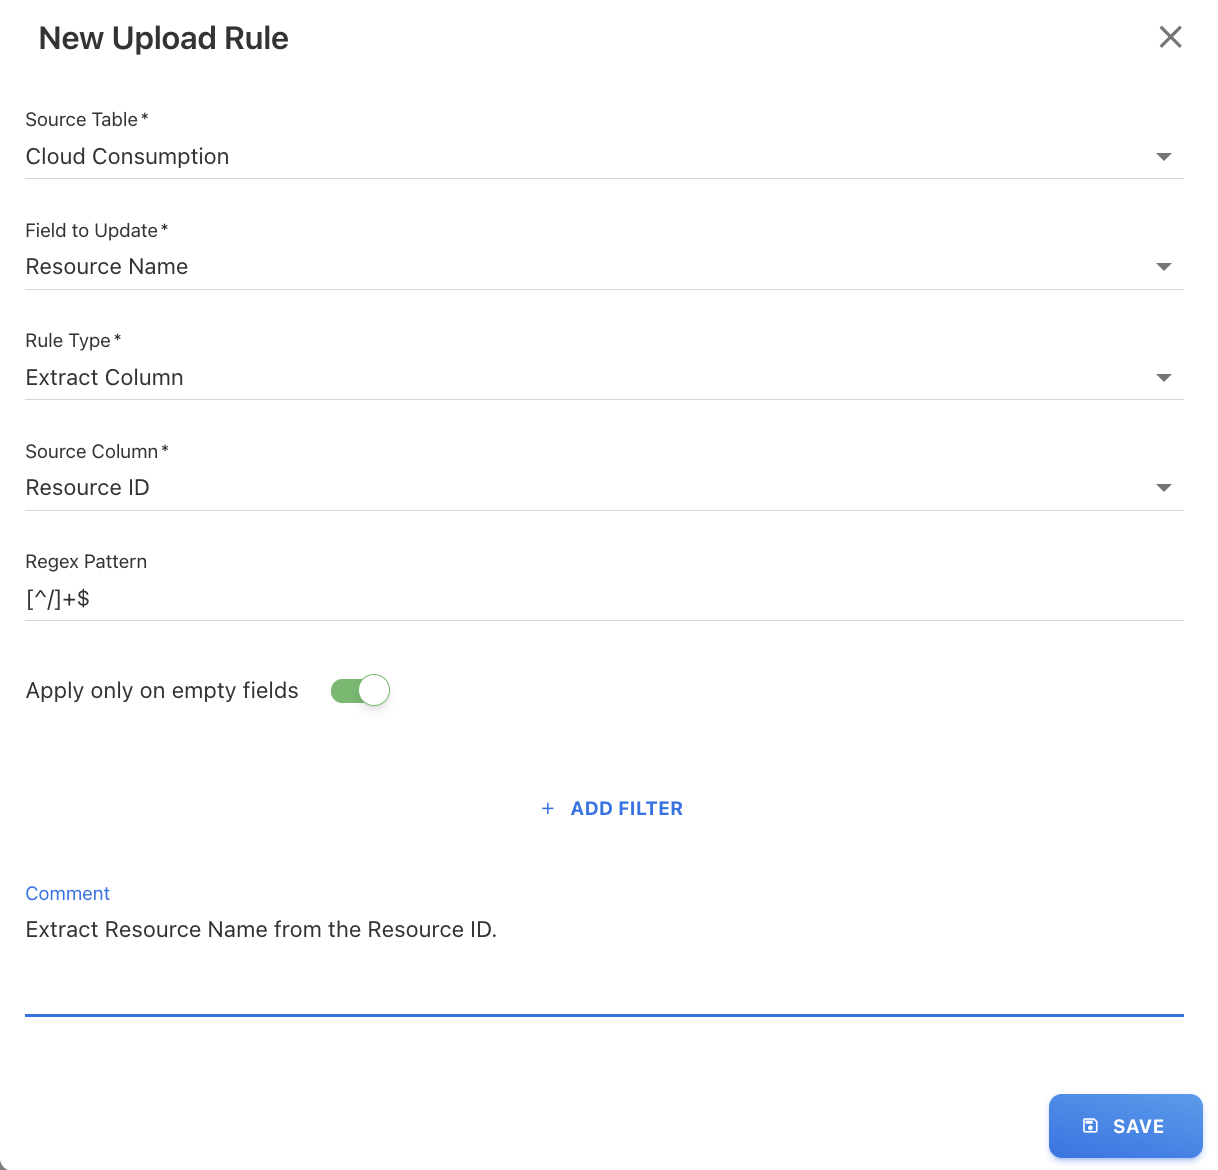
Use this rule to extract specific parts of a value from a column using regex. It is useful when a source field contains structured text and only a portion needs to be captured (for example, extracting an ID or environment name from a resource string).
Ensure the regex pattern is correct, as incorrect patterns may result in blank or inaccurate values.
Example
When loading the cloud consumption, extract the Resource Name from the Resource ID column using regex pattern.
Additional condition: Apply if Resource Name is empty
Procedure
-
Navigate to UPLOAD RULES in Cloud Consumption.
-
Click + ADD NEW.
-
Select Field to Update → Resource Name.
-
Select Rule Type → Extract Column.
-
Select Source Column → Resource ID.
-
Enter regex pattern.
-
Toggle Apply only on empty fields.
-
(Optional) Add comment.
-
Click SAVE.
Function
Use this rule to apply predefined system transformations to data. Functions help standardize or convert values during upload, such as converting text-based numbers into numeric format (ConvertStringToDouble), normalizing active status values (IsActiveFn), or processing cloud tag data (TagsFn). Select the appropriate function based on the data type and transformation required.
-
IsActiveFn: It is primarily used for masters data such as Accounts, Vendors, etc. The active column in masters indicates if a given account or vendor is active or inactive. It is advised to create a upload rule for masters and pass active column to this function. This will handle all acceptable values for active column such as 1, true, yes, active and shows Yes in masters view.

-
ConvertStringToDouble: This function is useful for converting string data types to double. Sometimes integer values such as Billed Cost, Spend, etc. can be in string data type in Excel file. In such cases, it is recommended to create an upload rule and pass that particular integer column to this function.

-
TagsFn: This function is specifically designed to extract tags from the cloud consumption file. Currently, a default rule passes the "tags" column to this function. If the column name in your file is different, for example, "tags1," then you should create an upload rule based on that.

Lookup
The Lookup rule type allows you to pull and add the data from another table to the destination column based on the lookup value. A lookup rule retrieves data from a lookup table by matching the lookup value. This rule is useful when you want to populate the destination column with existing data in the application.
Field used:
|
Rule Type |
Field Name |
Field Description |
|
Lookup |
|
Choose one or more fields from your source table to use for finding matches in the lookup table |
|
Select the reference table that contains the reference data that you want to pull from |
|
|
Select the fields in the lookup table that will be compared to your source table’s match fields. |
|
|
Select which fields from the lookup table should be returned when the match is found. |
|
|
|
|
Equals to, contains, contains whole word, starts with, ends with. |
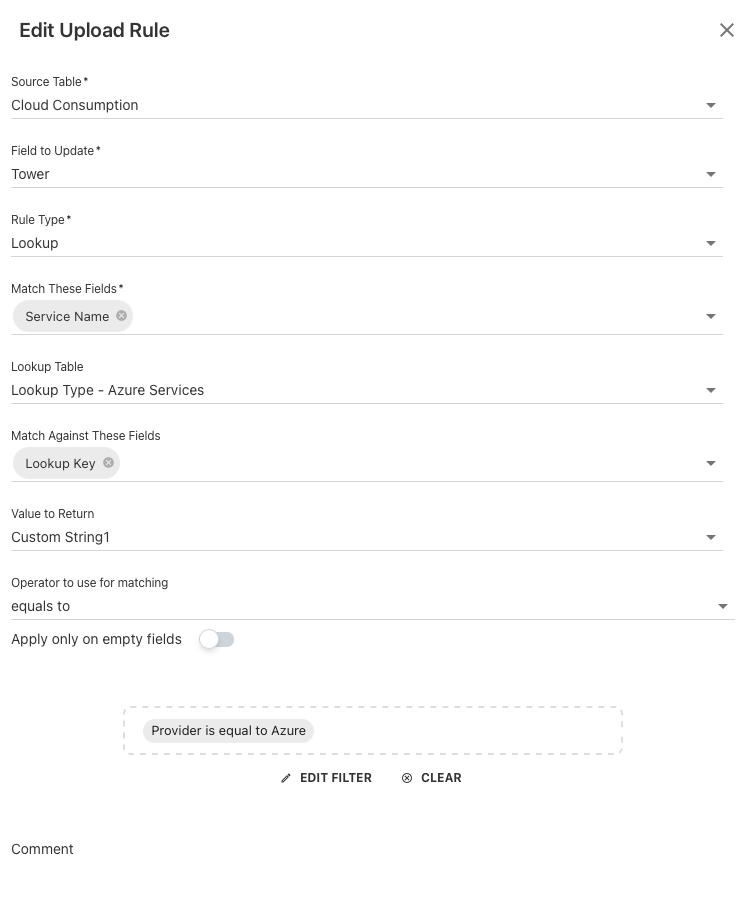
Example
You want to populate the “Tower” field in Cloud Consumption data based on the Service Name, but only for Azure records.
Instead of manually mapping each service, you can use an existing lookup configuration available in the application.
The following are already configured in the application:
-
Lookup Table: Lookup Type – Azure Services
-
Lookup Key: Contains the list of Azure service names
-
Custom String1: Contains the corresponding Tower values
Lookup table: Lookup Type – Azure Services (predefined in system)
|
Lookup Key |
Custom String1 |
|---|---|
|
VirtualMachine |
Compute |
|
BlobStorage |
Storage |
Procedure
-
Navigate to UPLOAD RULES in Cloud Consumption.
-
Click + ADD NEW.
-
Select Field to Update → Tower
-
Select Rule Type → Lookup.
-
Configure:
-
Match These Fields: Service Name
-
Lookup Table: Lookup Type – Azure Services
-
Match Against Fields: Lookup Key
-
Value to Return: Lookup Key
-
-
Select matching operator (e.g., equals).
-
Click + ADD FILTER button to add below additional filter criteria in the rule type and click SAVE:
-
Field: Select the field from the table, for example, Provider.
-
Operator: Choose the filter condition, for example, is equal to.
-
Value: Select the field value, for example, Azure.
-
-
Click SAVE.
Uploaded file:
|
Provider |
Service Name |
Tower |
|---|---|---|
|
Azure |
VirtualMachine |
(blank) |
|
Azure |
BlobStorage |
Existing Value |
|
AWS |
EC2 |
(blank) |
Result after upload:
|
Provider |
Service Name |
Tower |
|---|---|---|
|
Azure |
VirtualMachine |
Compute |
|
Azure |
BlobStorage |
Storage (updated) |
|
AWS |
EC2 |
(no change) |
Concat
Use this rule to combine values from multiple columns into a single field. It is useful for creating composite fields or identifiers (for example, combining Resource Name, Resource ID, and Resource Type into a single value).
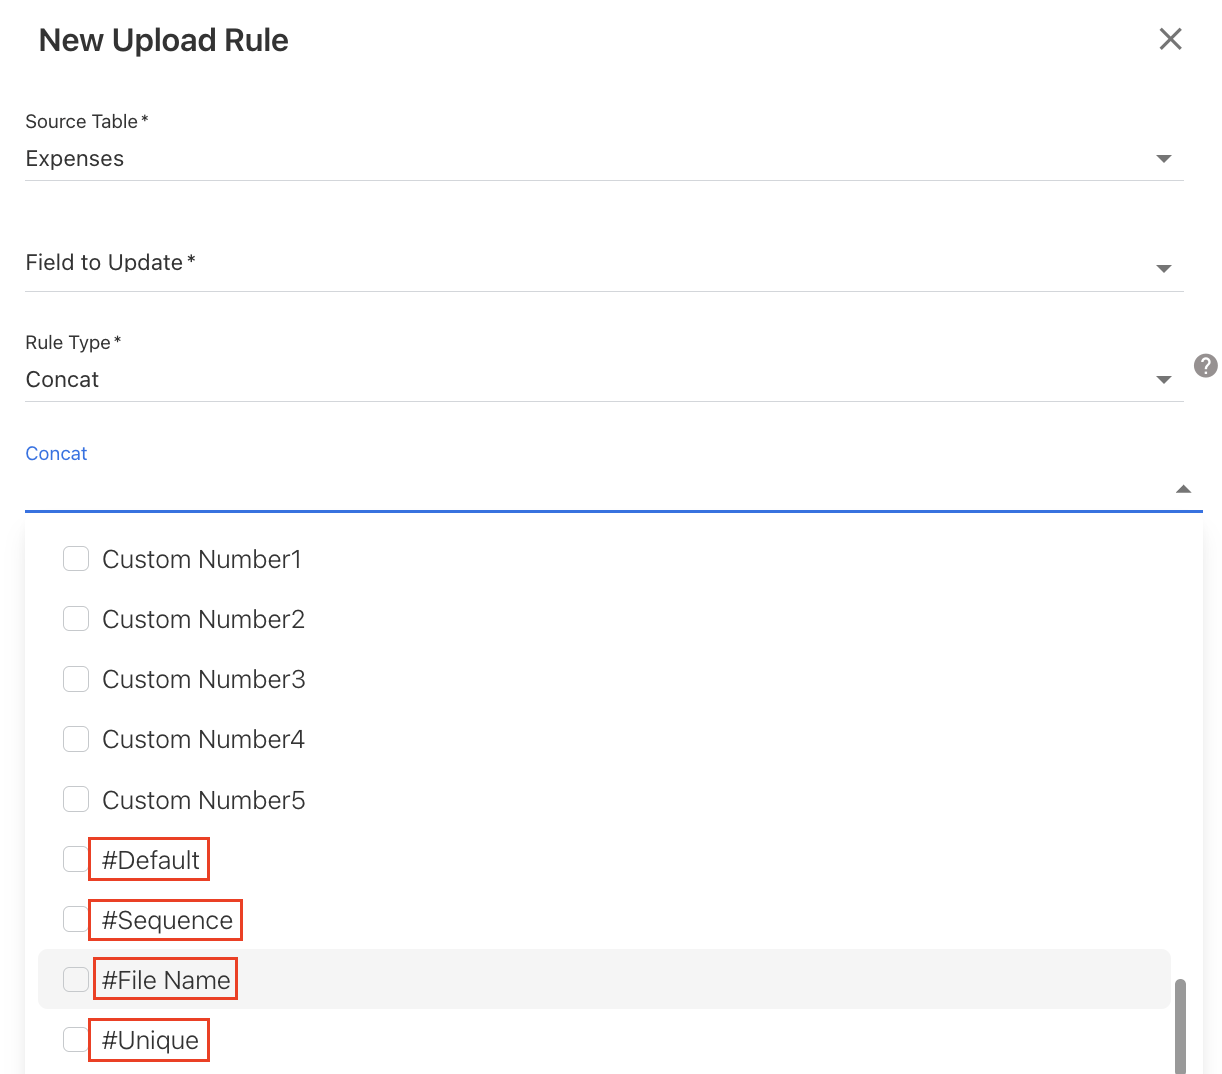
You can define separators, include default values (#Default), sequences (#Sequence), or file names (#File Name), and enable the Unique (#Unique) option to generate distinct values for duplicates.
The additional fields available under concat rule are:
-
#Default – allows you to add any default value (click on pencil icon).
-
#Sequence – generates a sequential number automatically. It includes a year Id – month Id of the uploaded month & year.
-
#File Name – uses the file name in the concatenation.
-
#Unique - creates an unique IDs by incrementing the duplicates.
Example:
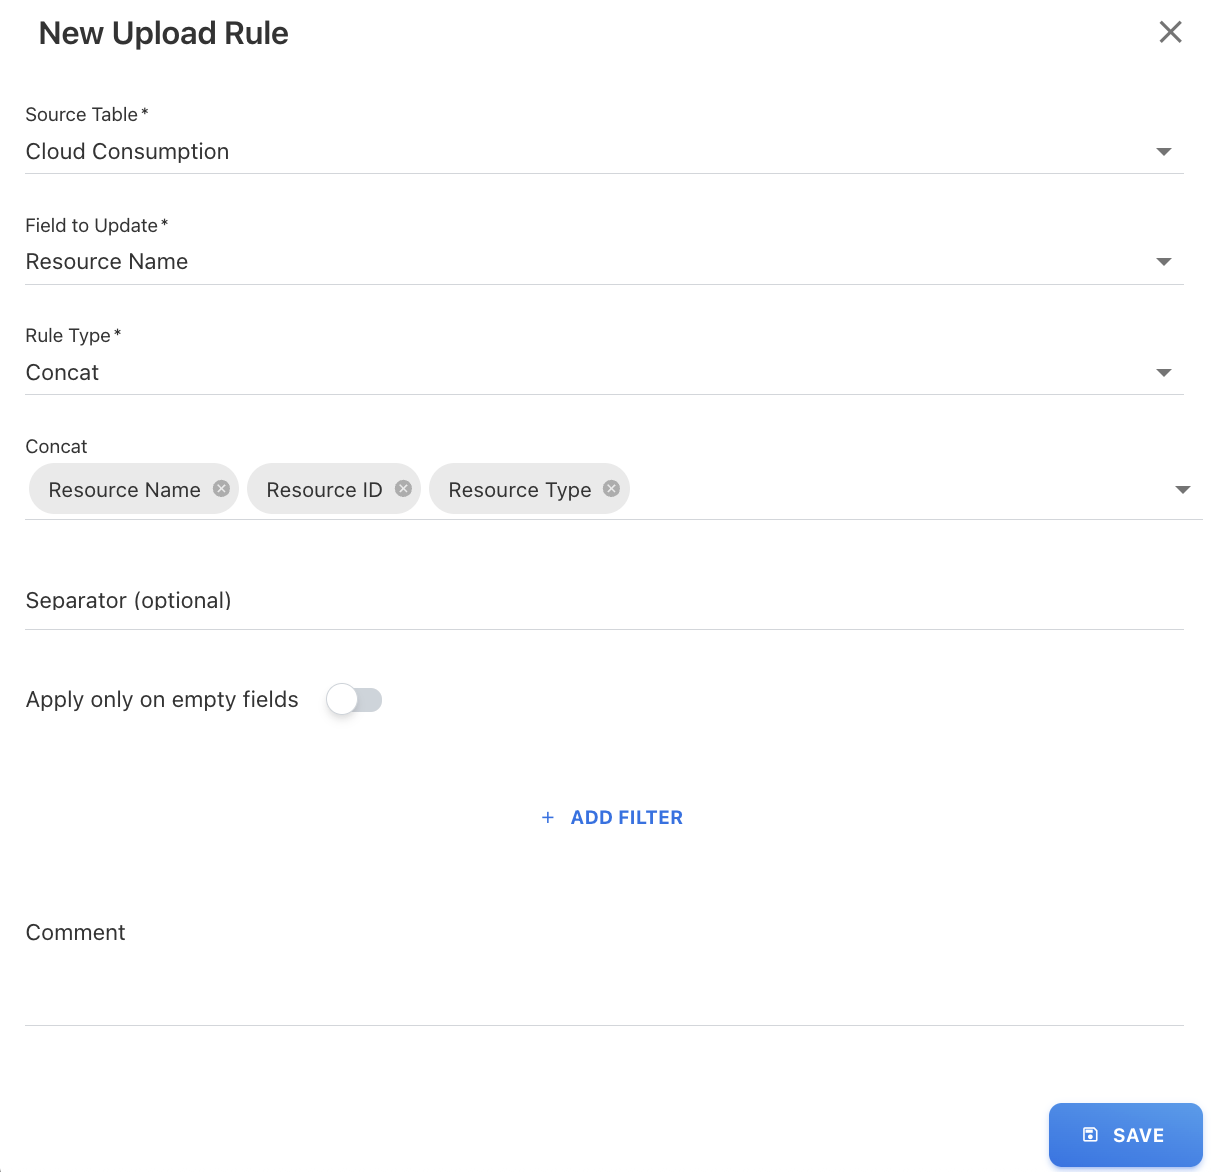
When uploading the cloud usage file, you want to combine the field entries from the Resource Name, Resource ID, and Resource Type into a Resource Name destination column.
To create the concat rule,
-
Navigate to the UPLOAD RULES tab under the Cloud Consumption and click + ADD NEW.
-
On the New Upload Rule dialog box, select the Field to Update, for example, Resource Name.
-
Select the rule type as Concat. A Concat field appears.
-
On the Concat field, select the multiple columns from the dropdown list that you want to concatenate, for example, Resource Name, Resource ID, and Resource Type.
-
(Optional) Add separator.
-
Click SAVE.
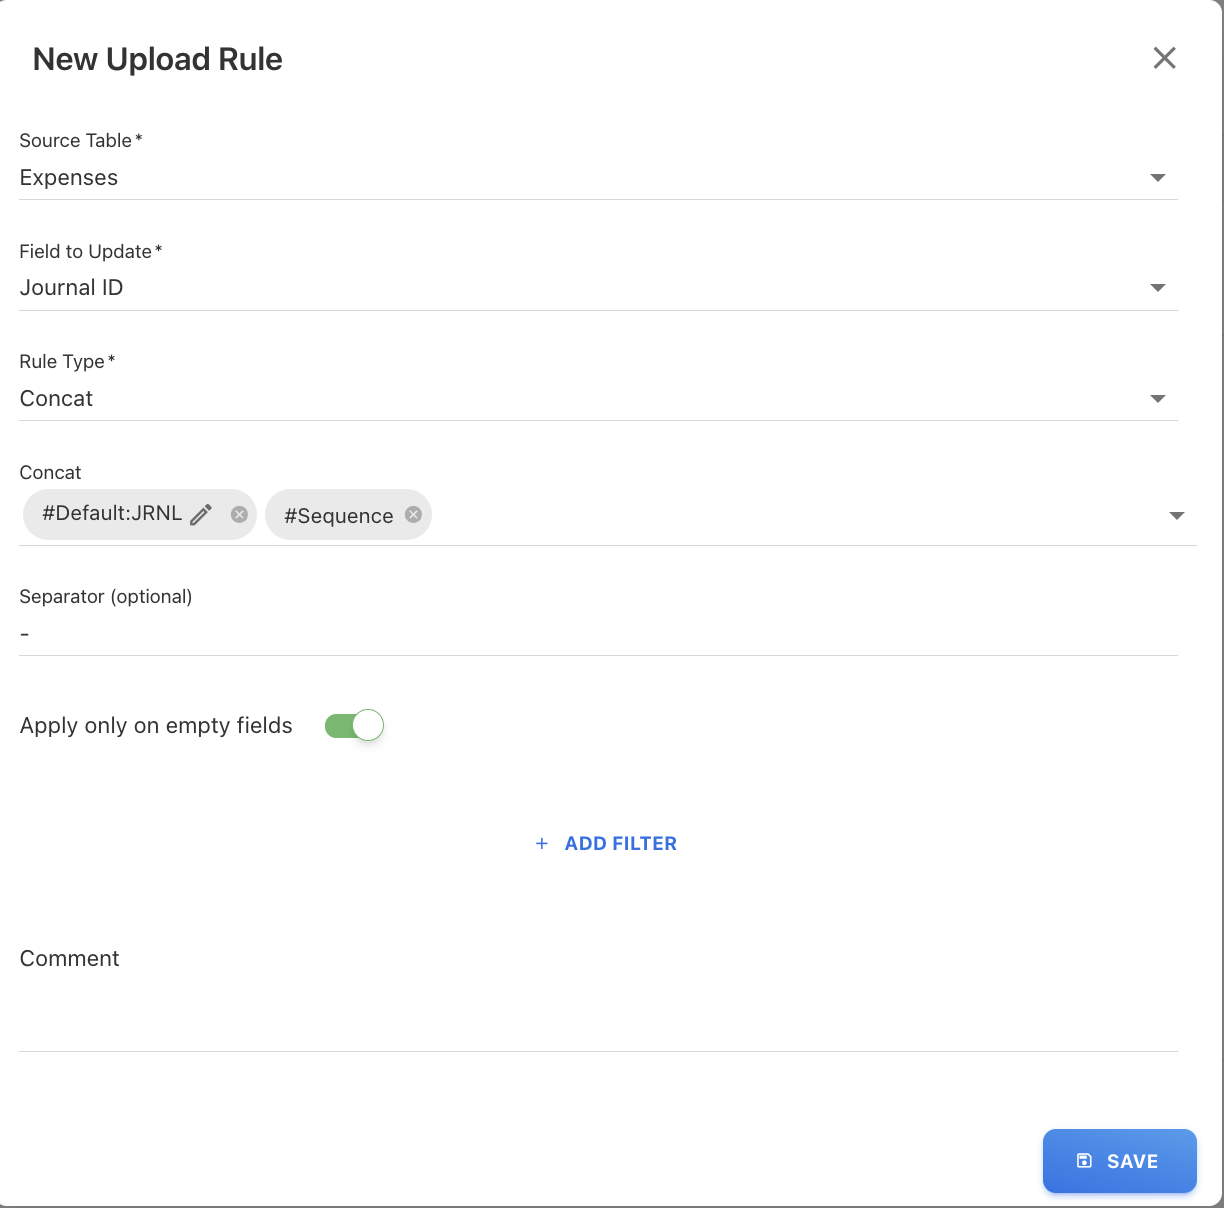
Use case for #Default and #Sequence: Journal Id seeding
Example:
You want to generate Journal IDs only for records where the Journal ID is missing, without affecting existing values.
Instead of manually entering IDs, the system can automatically generate them using a combination of:
-
#Default - add a fixed prefix = JRNL
-
#Sequence - generate an automatic running number for each row
Rule configuration
Source file

Result after upload:
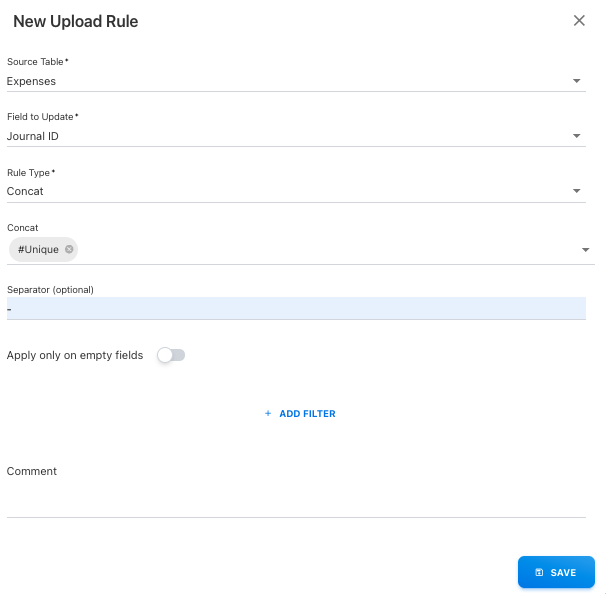
Use case for #Unique
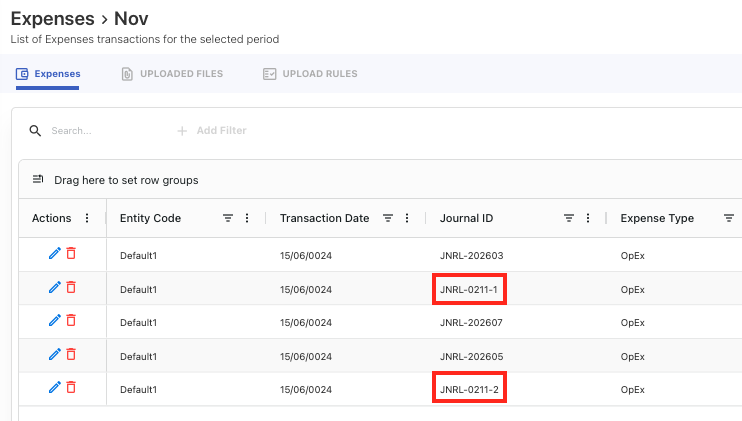
The #Unique field in Concat rule type is used to convert the duplicate IDs into unique IDs by incrementing the duplicates. After executing the upload rule using a unique field, the destination column is concatenated with a unique sequence, for example, JRNL001-1, JRNL001-2, JRNL001-3, and so on, followed by a user-defined separator value.
Example:
In your Spend upload file, some records contain duplicate Journal IDs, for example JNRL-202603.
To avoid duplication and ensure each record has a unique identifier, you can use the #Unique option in the Concat rule.
Rule configuration
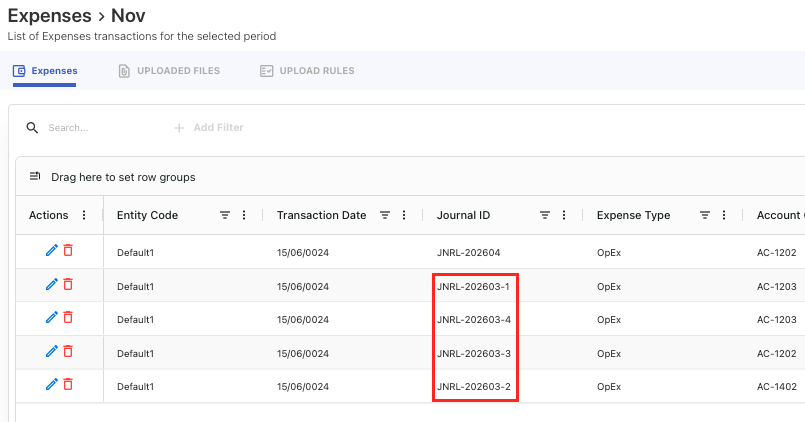
Result after upload:
Extract Tag
The Extract Tag rule type is used to extract specific tag values from a cloud consumption file and populate them into a selected destination column.
This rule is especially useful when your uploaded file contains multiple tags in a single column, and you want to capture only specific tags for reporting or categorization.
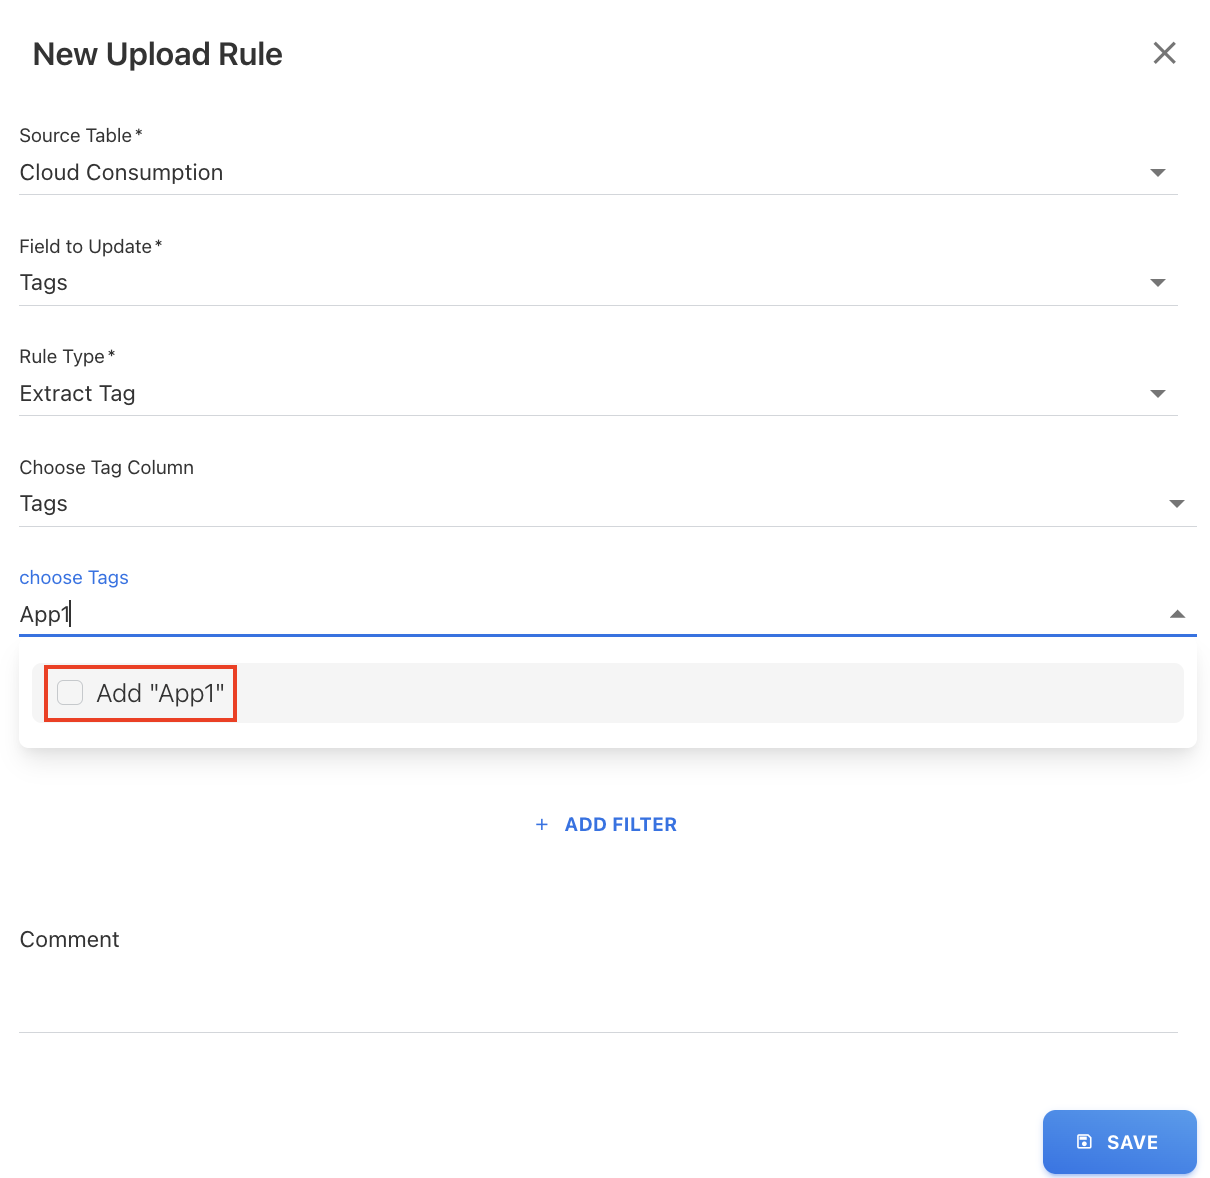
Custom tag support
If the required tag is not available in the dropdown list, you can:
-
Type the tag manually in the Choose Tags field
-
Select Add “<tag name>” option, for example, if “App1” is not available, you can add it manually and use it in the rule.
Example:
You have a cloud spend file where:
-
Tags are stored in a column called “Tags”
-
Each row contains multiple tag values such as:
-
app=CRM -
application=ERP
-
You want to extract the application-related tag values and populate them into the “Application Tag” column in the application.
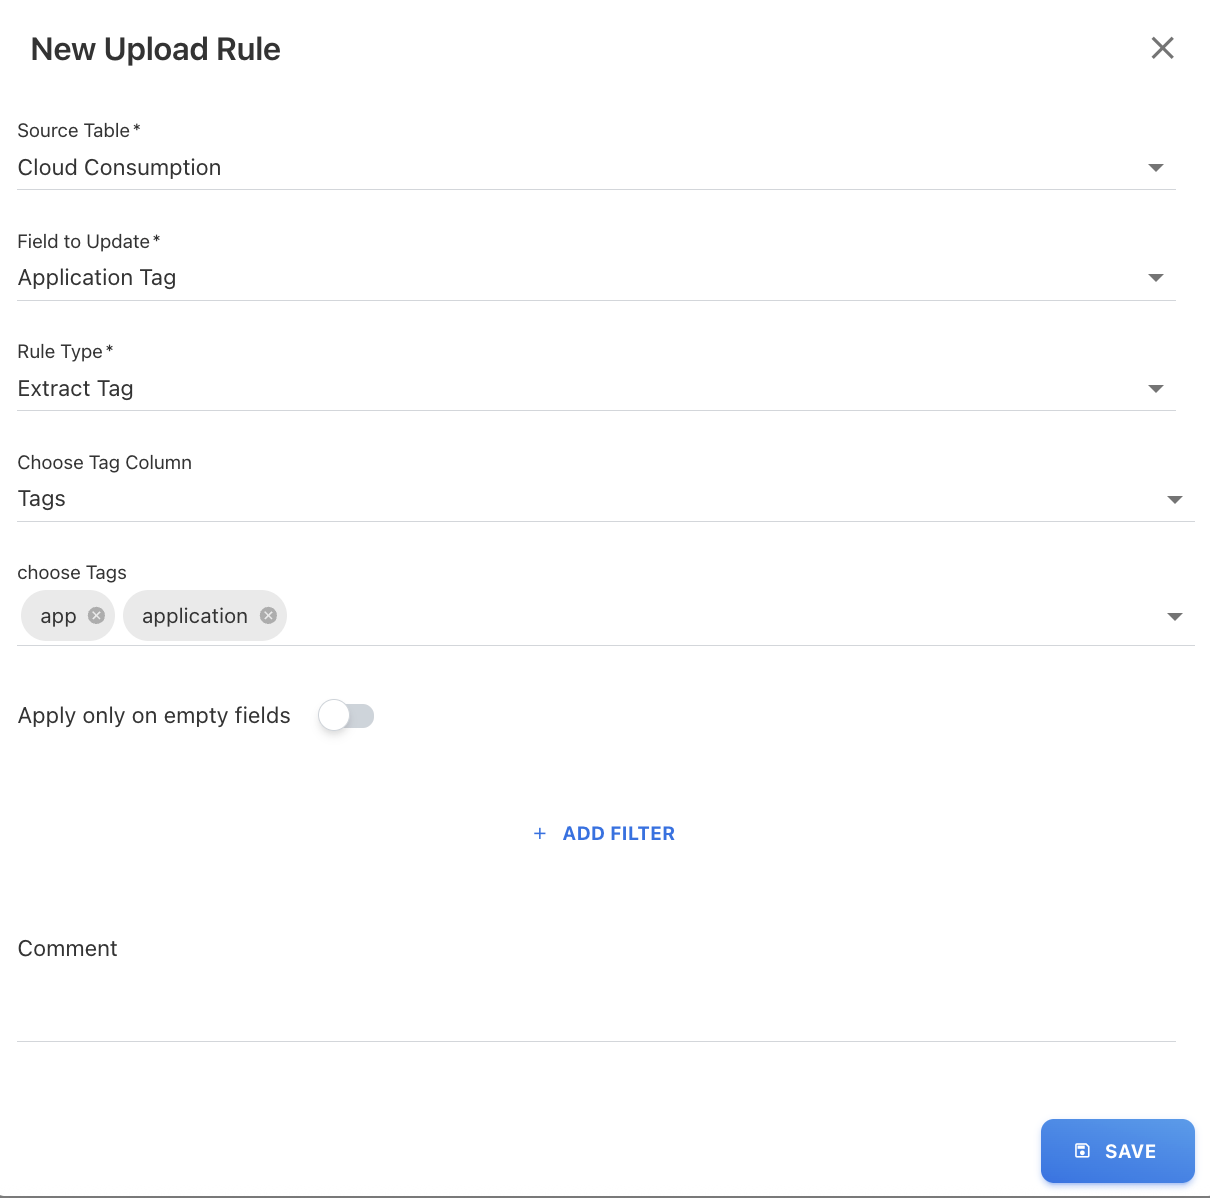
To create the extract tag rule,
-
Navigate to the UPLOAD RULES tab for the Cloud under Consumption and click + ADD NEW.
-
On the New Upload Rule dialog box, select the Field to Update, for example, Application Tag.
-
Select the rule type as Extract Tag. The Choose Tag Column and choose Tags fields appear.
-
(Optional) Select + ADD FILTER button to add additional filter criteria in the rule type.
-
Select the tag column and tags in the below fields:
-
Choose Tag Column: Select the tag column from the file where the tags are available, for example, Tags.
-
Choose Tags: Select the tag value that you want to extract from a file, for example, app and application.
-
(Optional) Type the tag value if the tag is not listed in the dropdown list.
-
-
Click SAVE.
All entries in the "Application Tag" column are set to fill with the corresponding tag values from the cloud file (e.g., "CRM," "ERP").
Example input file:
|
Tags |
|---|
|
app=CRM;env=prod |
|
application=ERP;region=US |
|
app=Billing;team=Finance |
Result after upload:
|
Application Tag |
|---|
|
CRM |
|
ERP |
|
Billing |
Spend Reversal
Use this rule to exclude specific spend entries and create corresponding reversal records. It is typically used for financial adjustments, such as excluding accrual or invoice-based entries. This rule updates the exclusion type and generates reversal entries for matching records.
Supported exclusion types:
-
Cloud Accrual
-
Cloud Invoice
-
Cloud Accrual Reversal
Important behavior
-
The rule applies only to records that match the defined filter condition
-
Automatically creates reversal (offset) entries for matched records
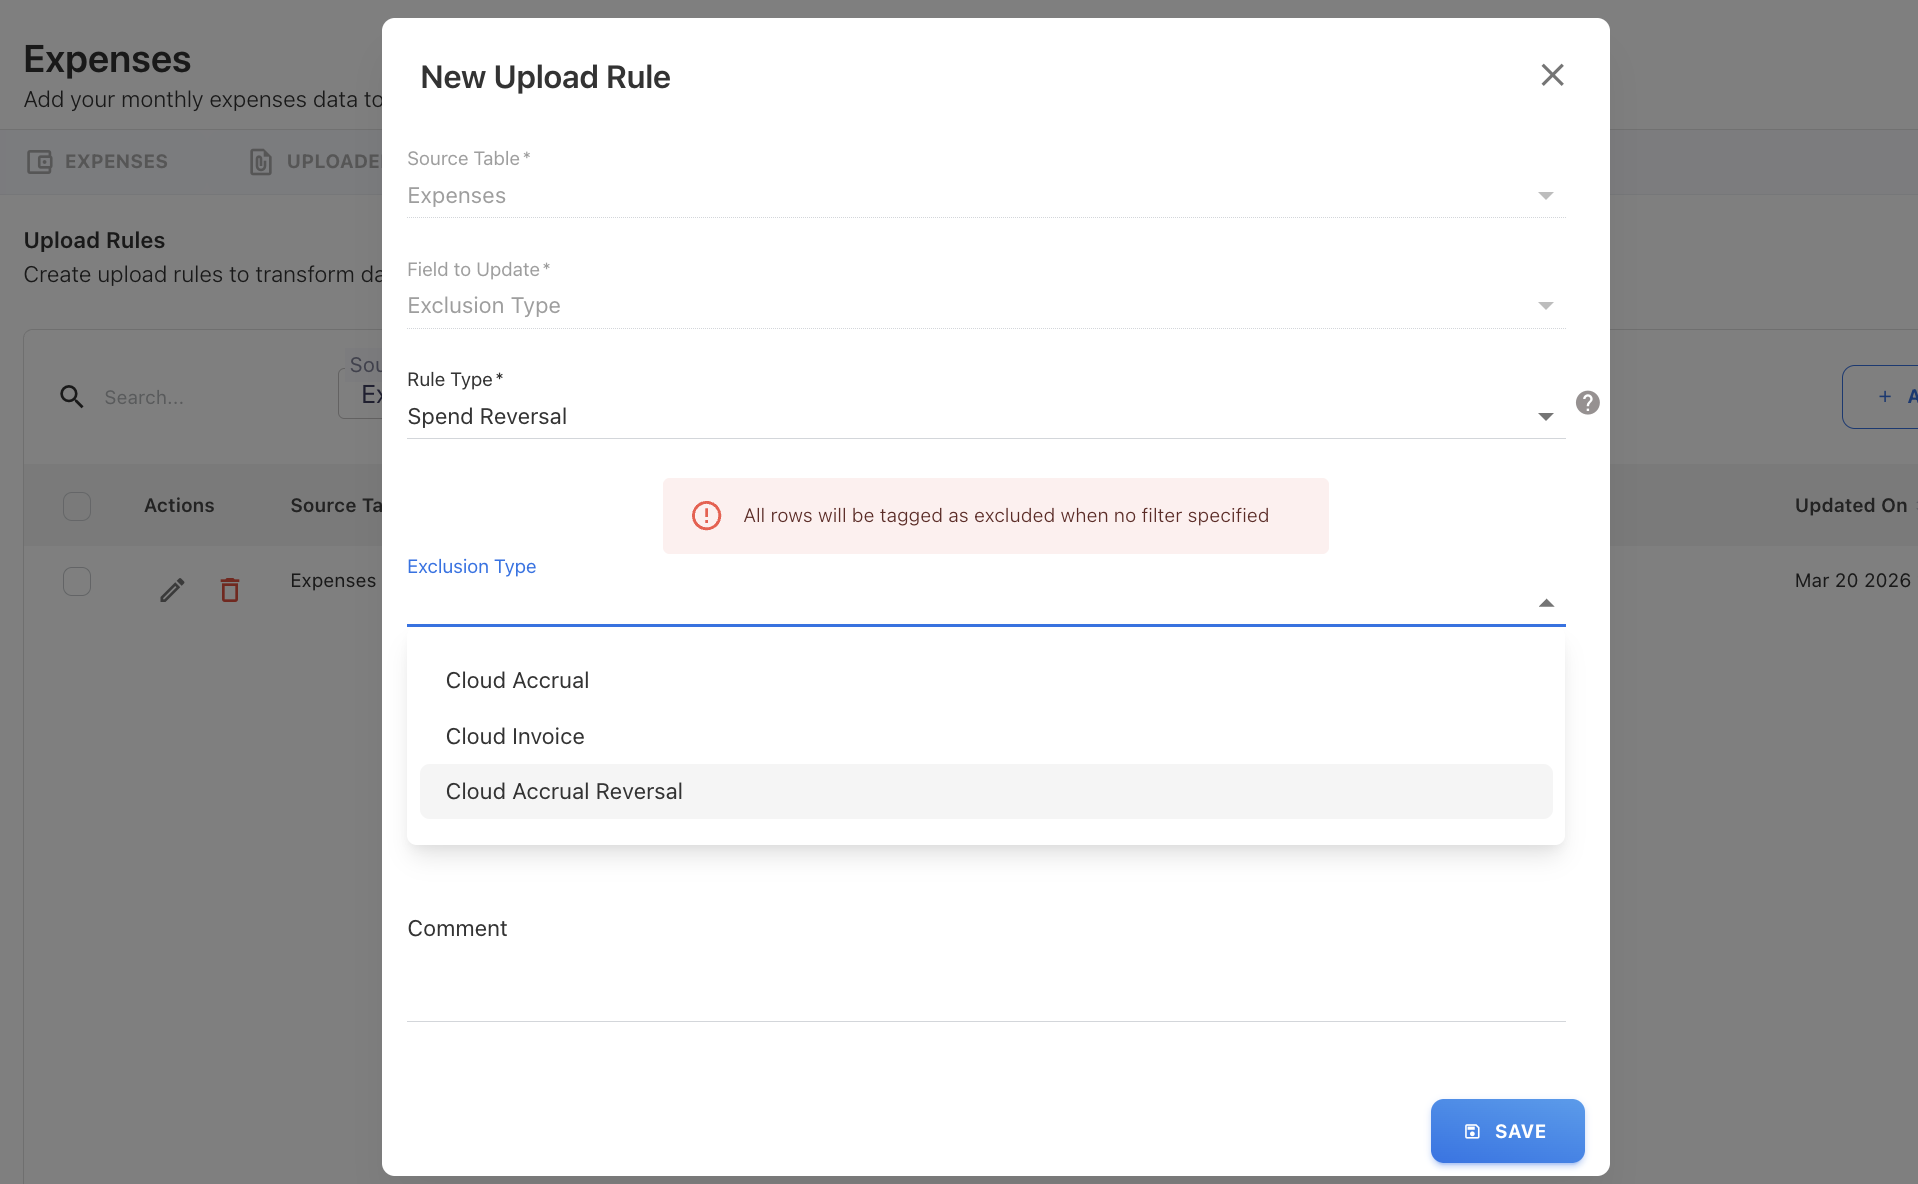
Filter is mandatory
-
If no filter is specified, the rule will:
-
Apply to all rows in the uploaded file
-
Mark all records as excluded
-
Create reversal entries for every record
-
Example:
You want to:
-
Exclude spend entries where:
-
Exclusion Type = Cloud Accrual
-
Account Code = AC-1203
-
Procedure
-
Open UPLOAD RULES in Expenses module.
-
Click + ADD NEW.
-
Select Rule Type → Spend Reversal.
-
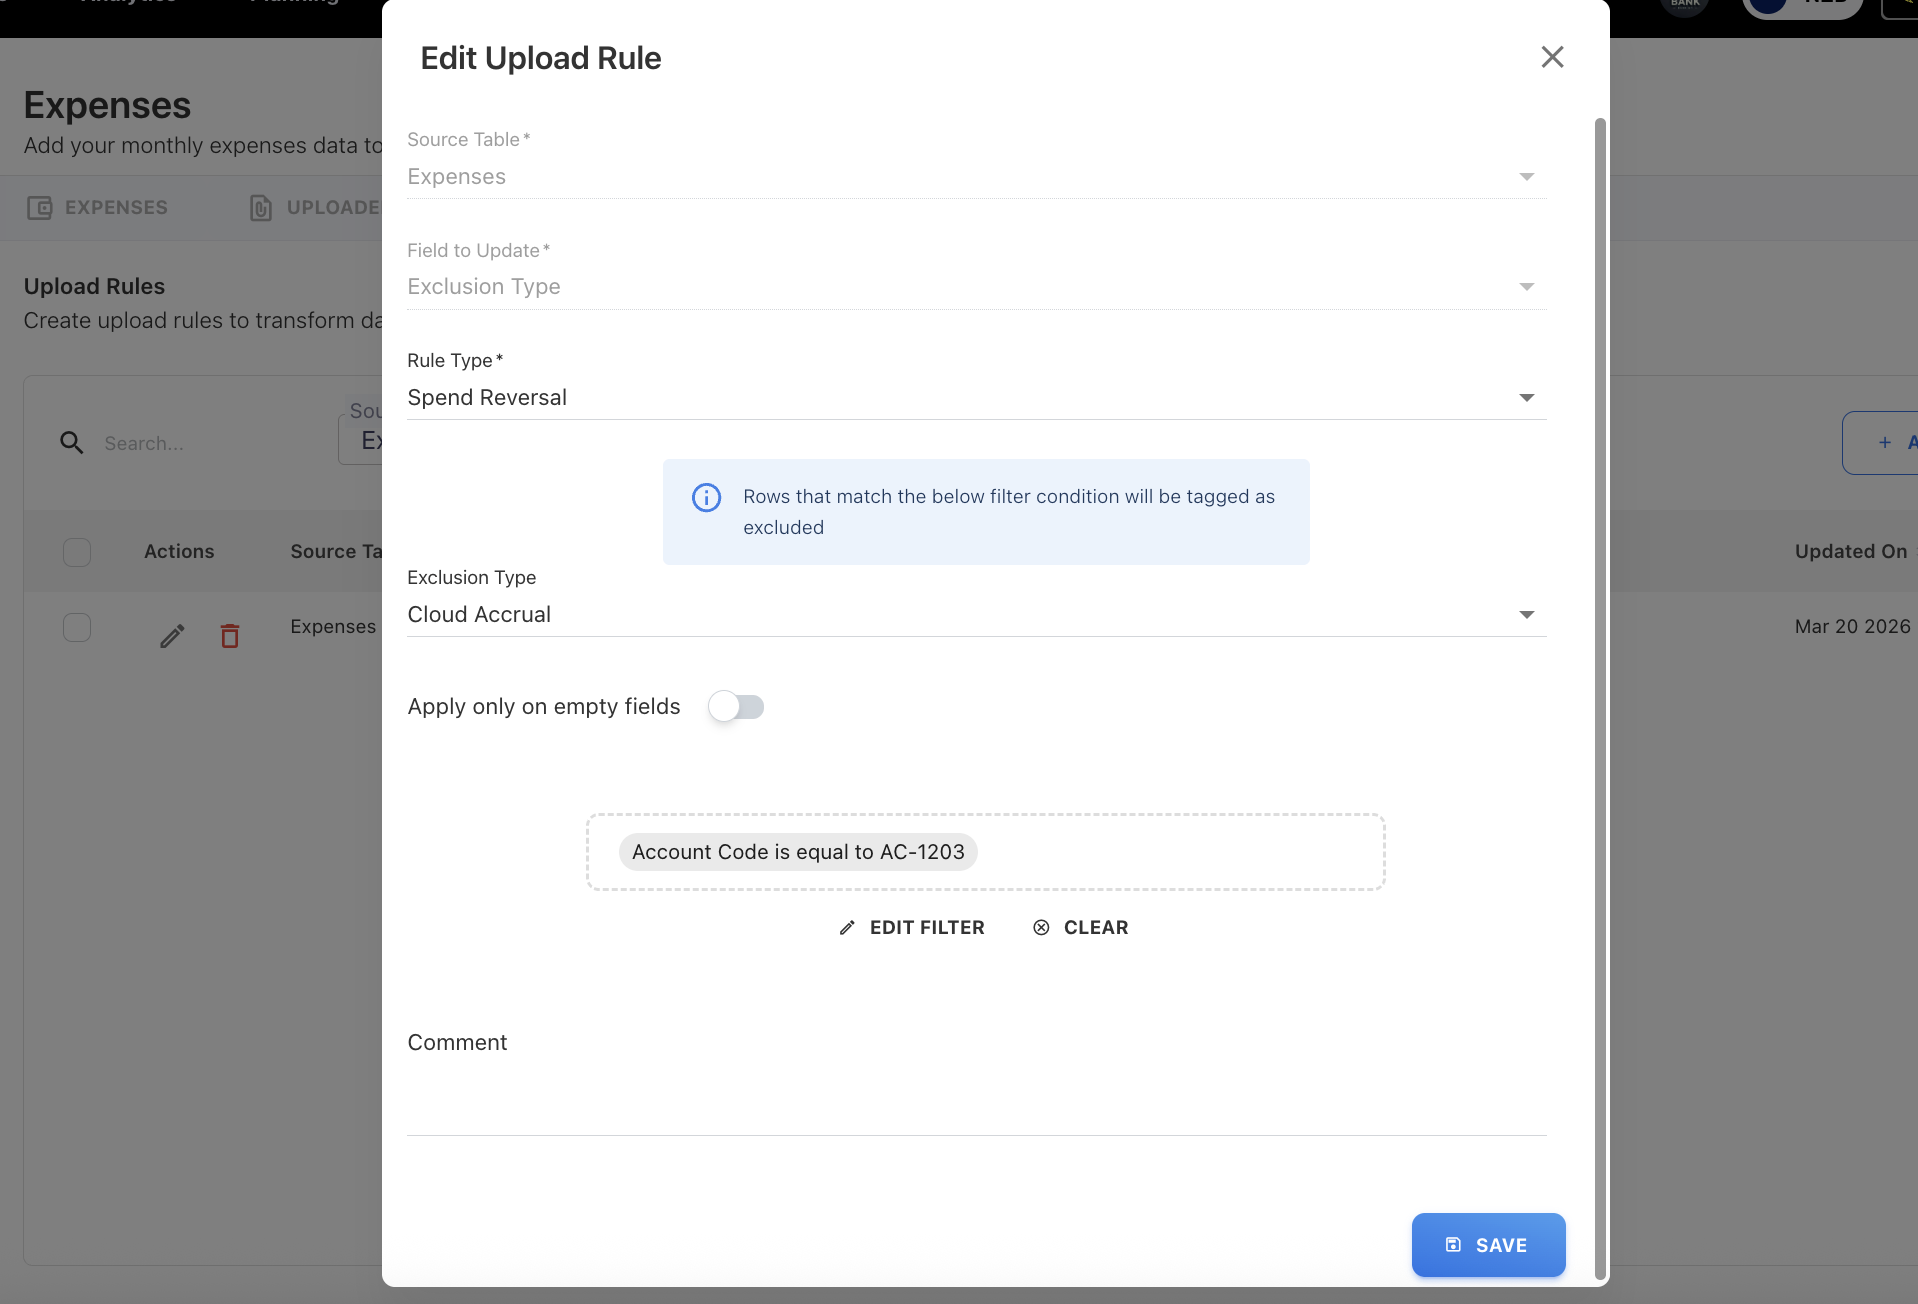
Define Exclusion Type, for example, Cloud Accrual.
-
Click + ADD FILTER button to add below additional filter criteria in the rule type and click SAVE:
-
Field: Select the field from the table, for example, Account Code.
-
Operator: Choose the filter condition, for example, is equal to.
-
Value: Select the field value, for example, AC-1203.
-
-
Click SAVE.
Result after upload:
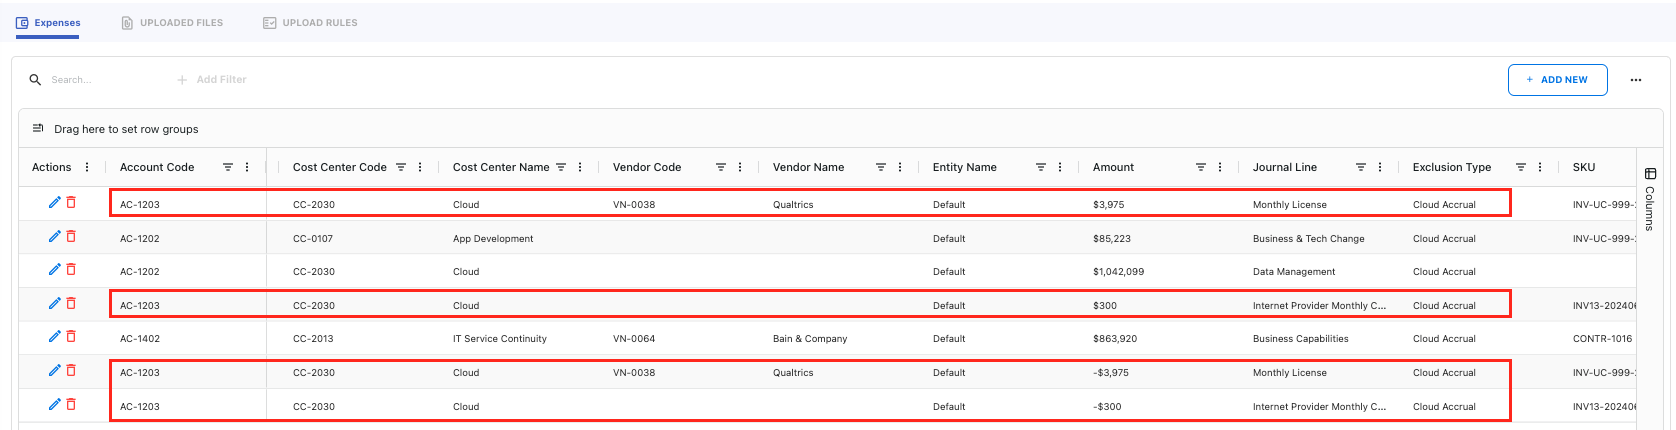
After execution, the reversal entries for AC-1203 are created with the Cloud Accrual exclusion type.
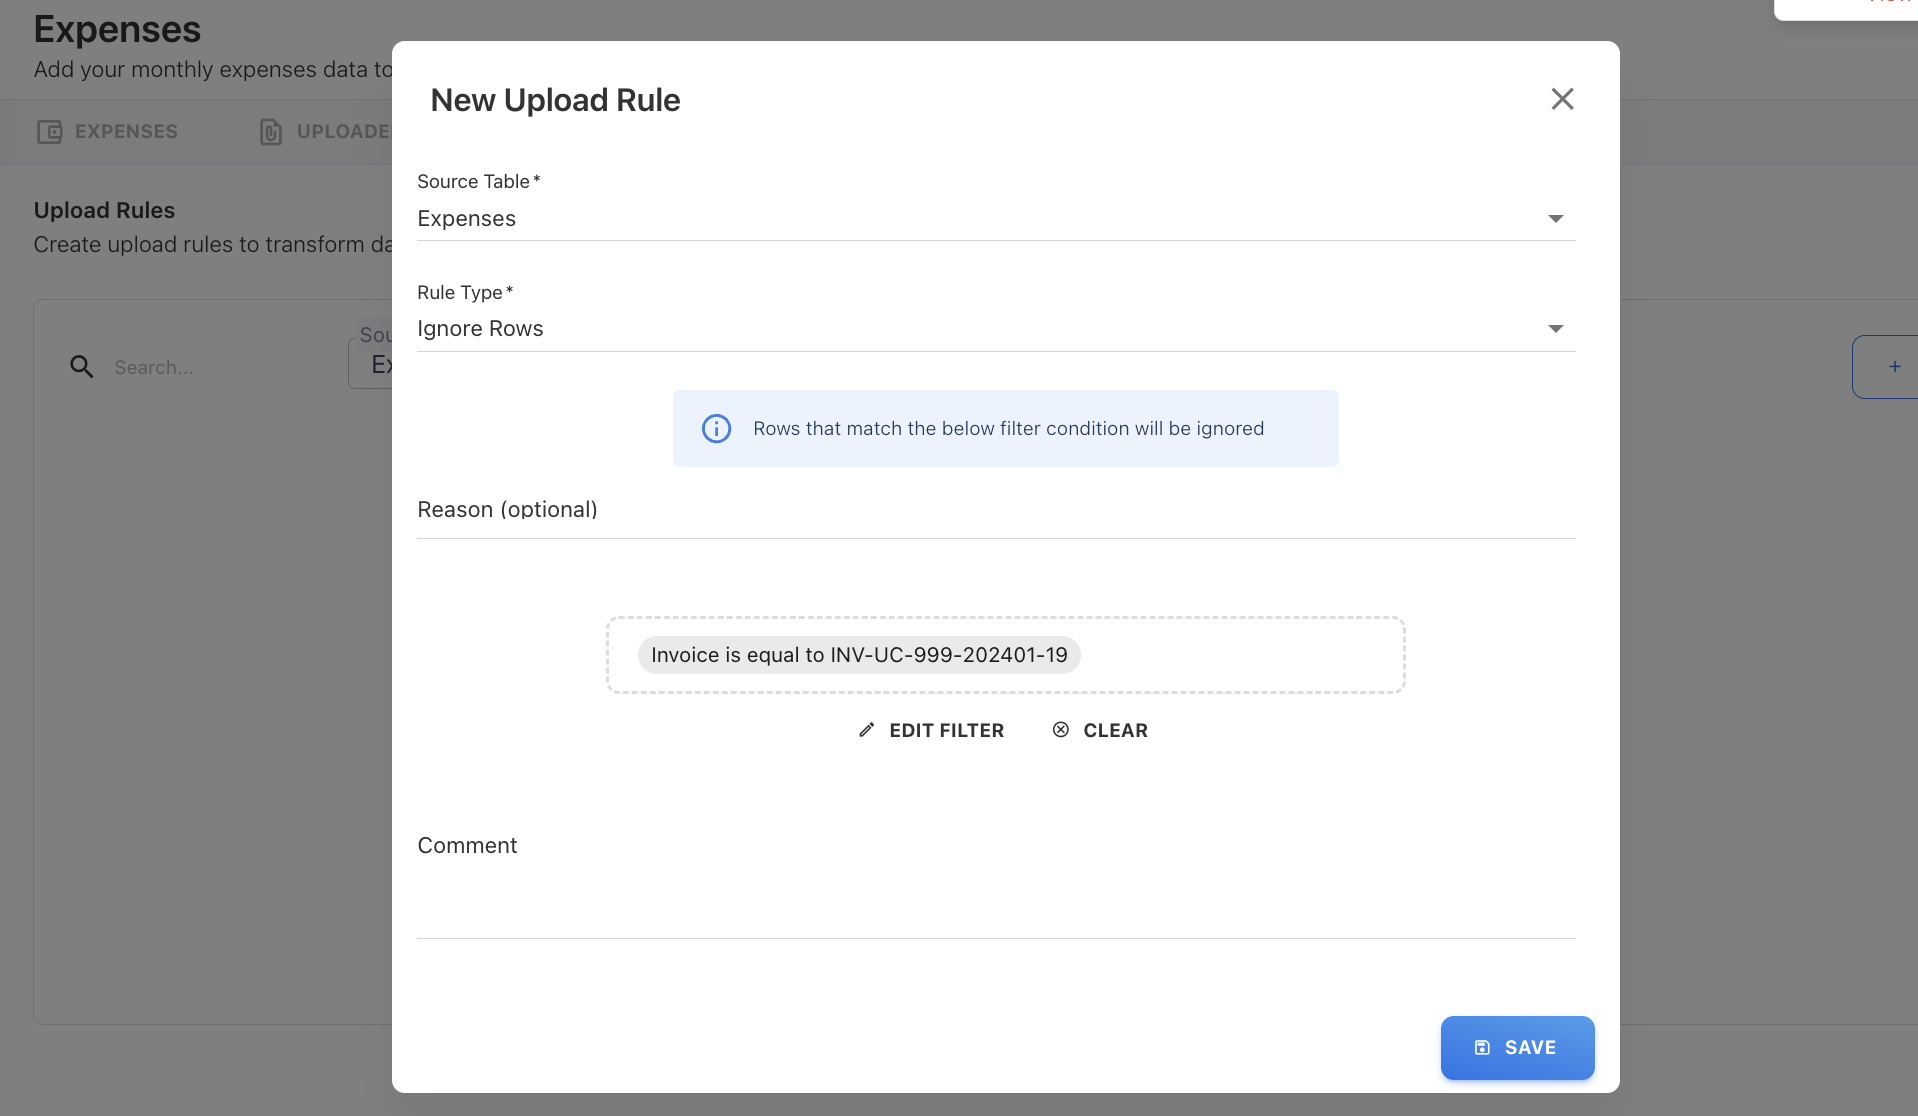
Ignore Rows
This rule type allows you to exclude specific rows from being uploaded. It is useful for removing test data, invalid entries, or records that should not be processed.
If no filter is defined, all rows will be ignored.
Example:
From your upload file, you want to ignore rows where:
-
Invoice = INV-UC-999-202401-19
-
Navigate to UPLOAD RULES in Expenses.
-
Click + ADD NEW.
-
Select Rule Type → Ignore Rows.
-
(Optional) Add reason to exclude the rows.
-
Click + ADD FILTER button to add below additional filter criteria in the rule type and click SAVE:
-
Field: Select the field from the table, for example, Invoice.
-
Operator: Choose the filter condition, for example, is equal to.
-
Value: Select the field value, for example, INV-UC-999-202401-19.
-
-
Click SAVE.
The row with INV-UC-999-202401-19 will be completely excluded.
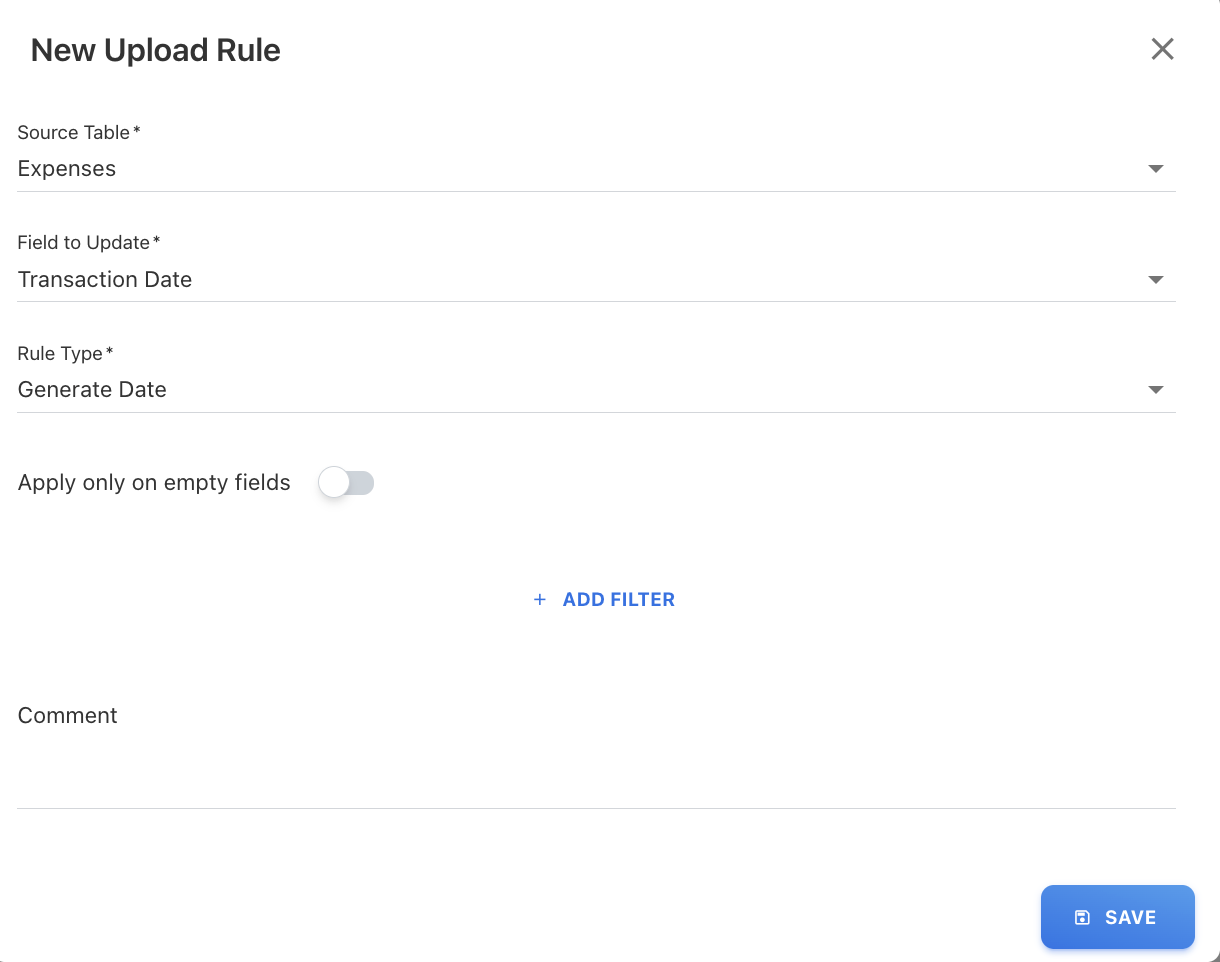
Generate Date
The Generate Date rule type is used to automatically populate date fields during file uploads based on the upload period.
The system sets the day to 01, while the month and year are derived from the file’s upload period (for example, Oct 2025 → 01/10/2025).
The rule generates a date in the format: DD/MM/YYYY
Example:
You want to populate the Transaction Date for all records based on the upload month (Oct 2025), instead of relying on the file data.
Procedure
-
Open UPLOAD RULES in Expenses.
-
Click + ADD NEW.
-
Select Field to Update → Transaction Date.
-
Select Rule Type → Generate Date.
-
(Optional) Add filters.
-
Click SAVE.
The application populates the Transaction Date field with 01/10/2025 for all records.
Related content